Auto-mount encrypted partitions at boot
Mounting encrypted partitions manually can be annoying. This post will show you how to mount encrypted partitions at boot automatically.
This post is connected to the previous post, where you learned how to encrypt your hard drive in Linux with LUKS. In this post, you will learn how to mount encrypted partitions at boot automatically.
You can watch the video tutorial or continue reading below.
Set up auto-mount at boot
First, check the name of your encrypted partition.
lsblk

In this example, my encrypted partition is sdb1, depending on the configuration of your system, this name may be different
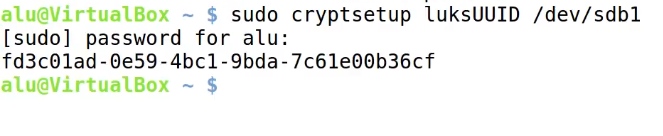
Next, obtain the UUID of the encrypted device.
sudo cryptsetup luksUUID /dev/sdb1
Now, edit /etc/crypttab:
sudo nano /etc/crypttab
By adding this line:
sdb1 /dev/disk/by-uuid/<UUID of block device> none luks
The format of the entry in /etc/crypttab is as follows.
sdb1is the name of the encrypted device.fd3c01ad-0e59-4bc1-9bda-7c61e00b36cfis the UUID we have just got.nonemeans we do not use any key file and the system will ask your encryption password to decrypt the partition. So, you can also use a key file here, if your system partition is encrypted already. I personally do not encrypt my system partition and I assume most users also do not encrypt it. So, just use none here.luksis the disk encryption specification.
Ctrl+O to save the changes. And Ctrl+X to exit from nano editor.
Finally, create a folder where you want to mount your encrypted partition.
sudo mkdir /mnt/encrypted_sdb1
Then, edit /etc/fstab file.
sudo nano /etc/fstab
Next, add the following to add this mount point:
/dev/mapper/sdb1 /mnt/encrypted_sdb1 ext4
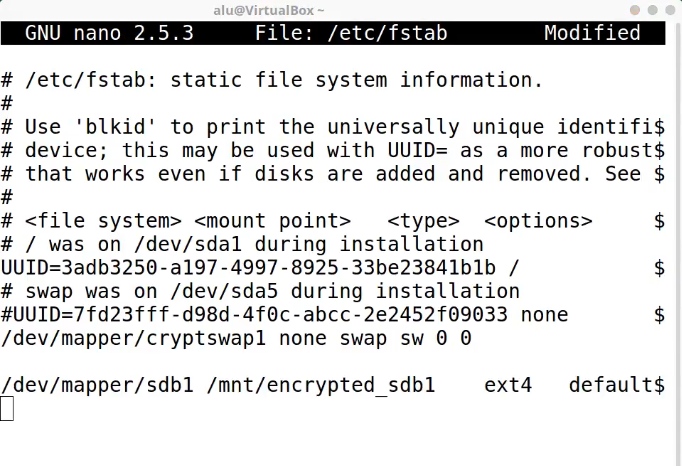
Let’s explain the entry:
sdb1is the encrypted device. If your device name different, replace sdb1.encrypted_sdb1is the mounting point we have just created.
Ctrl+O to save the changes. And Ctrl+X to exit from nano editor.
Then, reboot your system.
Test the mounting during boot
Next, you will have to type a decryption password during the system boot.

After you enter it, the encrypted partition should be auto-mounted.
If I open the file manager and navigate to the place where I specified the mounting point, you will see the encrypted partition has been mounted automatically.
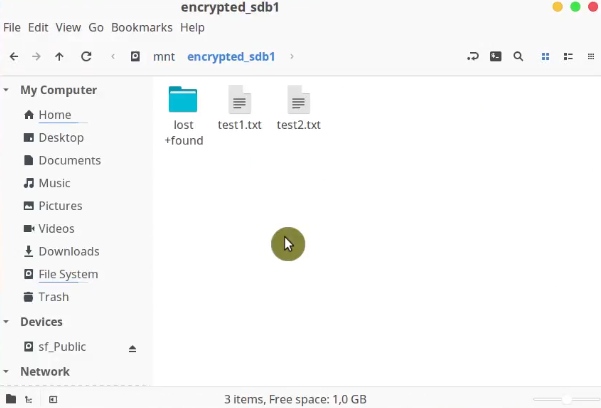
There are the two files we created during the encryption described in the previous post.
Now, you know how to mount encrypted partitions at boot.
Conclusion
This way to mount encrypted partitions at boot works only for LUKS encryption. If you use any other encryption method, auto-mounting settings may differ. So, I recommend using LUKS encryption that I showed in this previous post. Read it if you missed it.
You can also read 10 things to do after installing KDE Neon.
Comments
George
Works great on Manjaro (Kernel 5.10, all updates as of 06/03/2021). Thank you so so much for taking the time to write this tutorial, and for its clarity. Worked like a charm and to be honest I prefer not having a key and instead having to enter the pswd myself; that’s kind of the point of encryption! Thanks again :-)
Average Linux User
Happy to hear that, George!
Phil
Beautiful and much easier than the other methods with key files.
I can confirm this works on Ubuntu Desktop 20.04.1 LTS. My setup is a fully encrypted system disk (encrypted at Ubuntu install) + another data disk with the same encryption password. I wanted both the disk to be mounted at boot. Because the password is the same for the 2 disks, I enter the password once at boot and it makes everything available as intended. Thanks!
Average Linux User
I am glad it worked!
Blaise
Curious how/whether this can work on a headless server instance without I/O during boot. Is this not recommended for that use-case?
I'm using this for a backup drive attached to my home server.
Average Linux User
I assume it won’t work.
Mike F.
This appears to only work on Linux Mint. How can I do this on Armbian Buster with a headless server?!
Average Linux User
I have not tried it with Armbian. Try Armbian forum for help.
Jonathan
This is an absolutely superb tutorial, along with the previous one. Clear, correct, worked to a T on Arch.
Average Linux User
Thank you, Jonathan! Subscribe to Blog Updates