Convert video to images with VLC Media Player
This instruction will help you to convert video to images with VLC.
You might want to make screenshots when you watch a video. It can be useful for making GIF animation or for any other purposes. Most users will do it manually. But it is very easy to automate the process using the VLC Media Player.
VLC is probably the best media player out there. Besides playing videos and audios, it even can extract video frames and save them as images in any required format. In this guide, I will show you how to convert video to images with VLC.
There are many reasons to convert video to images using the VLC Media Player. For example, one can use these images to make a GIF animation form a video.
Convert video to images with VLC
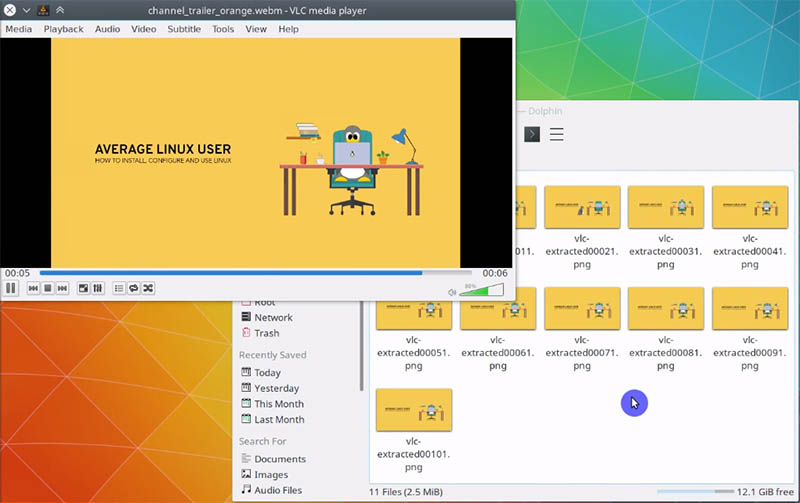
As an example video, I will use the 6 seconds long intro video of my YouTube channel.
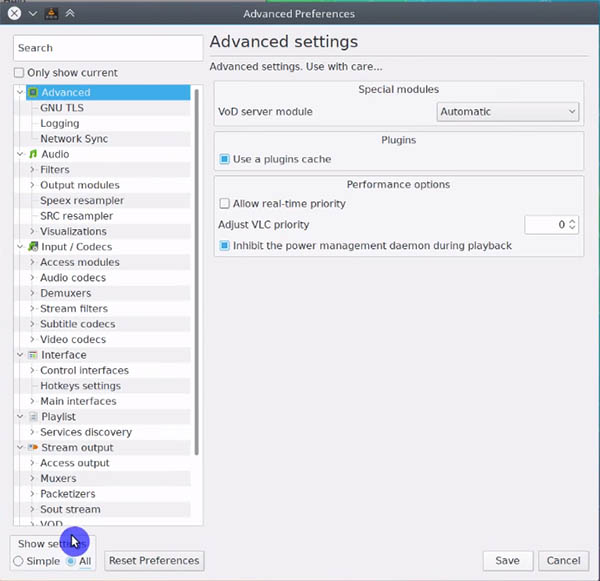
- Open VLC Media Player and go to Tools -> Preferences.
- In the left bottom corner, check All in the Show settings box.
- Scroll down to the Video section -> click on Filters -> Scene Filter. Here, you will be able to change the image format, width and height, filename prefix, directory path, and recording ratio.
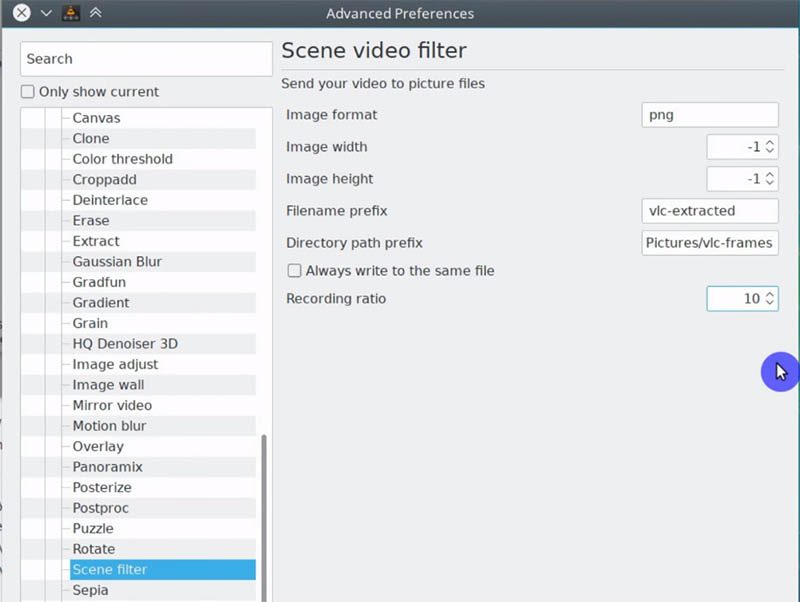
- Select the file format you prefer. I think PNG is the best one in most of the cases.
- Leave the default image height and width values: -1. With this value, VLC will create the images of the same size and resolution as the video file.
- Change the image name prefix. For example, vlc_extracted.
- Specify the folder where you are going to save the created images. For example, it can be
/home/yourUserName/Pictures/VLC_frames. - Leave unchecked the Always write to the same file box. Otherwise, the VLC will just rewrite the same file.
- The Recording ratio option defines the frames rate extraction. I usually use 10.
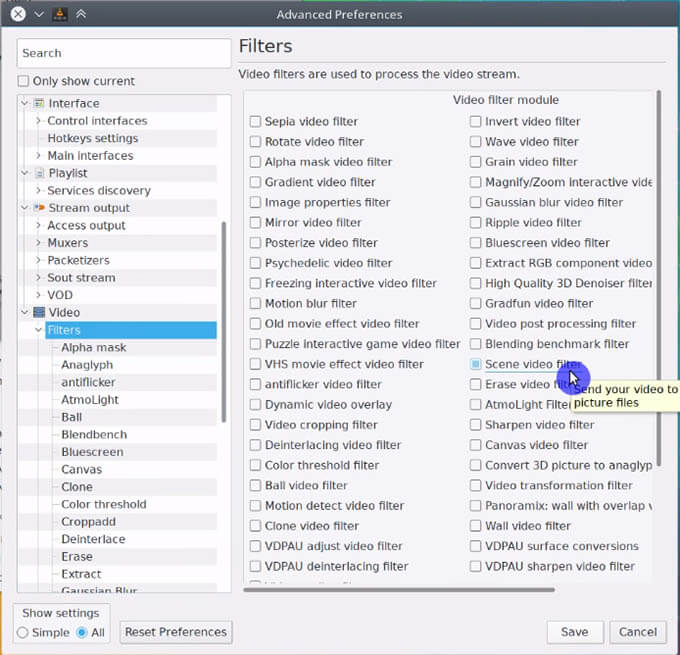
- Next, in the side menu, scroll up to Filters and enable Scene video filter.
Now, you can play any video you want to convert to images. The VLC Media Player will extract the frames and save them as images to the folder you specified. If you stop the video, frame extraction will also stop. When you continue playing the video, frame extraction will also resume.
Having extracted all the frames you were interested in, go back to the Preferences -> All -> Video -> Filters, and disable Scene video filter. Because if you forget to do this, VLC will keep extracting frames from every single video you play.
How to choose the right recording ratio value?
The specified Recording ratio number will define which frame in succession will be saved as images. For example, if you select 1, it will extract every frame. If you select 10, it will extract every 10th frame. The number of saved images will depend on the video frame rate. For example, my intro video is 25 frames per second and 6 seconds long. Totally, it is 150 frames.when I used Recording ratio 10, I got 15 images. The math: (150 frames)/(recording ratio 10) = 15 images.
Final thoughts
Obviously, the VLC media player is a very powerful tool to play media files. But it also provides a great feature of extracting the images from videos. You do not have to perform any special actions. This option is available in the player by default. You just have to activate it.
If you are a command line user, you can extract images from a video more effectively with FFmpeg. and then make a GIF without leaving the terminal.
I hope you liked this VLC image extraction feature. Do not forget to share the article with your friends and feel free to ask any questions.
Comments
Arnold
I’m using VLC Player (Streambox VCR Suite) on a Win10 64bit computer. At Preferences -> All -> Video -> Filters I can’t find the “recording ratio”. I did a trial frame extraction and found in the output folder that every 50th frame was extracted. Can you specify where can I find the RECORDING RATIO? I would like to set that at 10 or 20. thanks in advance, Arnold
Kumar
when new photos are extracted and saved in folder as per file path, the old saved files are over written. I have kept unchecked ALWAYS WRITE TO SAME FILE.
i restarted the vlc after saving the settings as u advised. the problem remains same….. over writing over the previous saved snaps.
Iam using windows 64bit.
kindly advise. Kumar
Kumar
when new photos are extracted and saved in folder as per file path, the old saved files are over written. I have kept unchecked ALWAYS WRITE TO SAME FILE.
i restarted the vlc after saving the settings as u advised. the problem remains same….. over writing over the previous saved snaps.
kindly advise. Kumar
Jackou_marvelou
Not creating the folder beforehand was the issue for me.
Gennady
You made my day!
Cy6erNauti1us
I am a convert to the Linux desktop who tries to avoid the command line as far as is possible.
I reached this page while searching for a way to extract frames only whenever a scene change is detected. This is different from extraction at a fixed number of frames. I saw many search results discussing how to detect a scene change. And many other results discussing how to extract image frames from videos. But none discussing how to do those two together!?
I am dropping this comment here hoping that you, or some reader of this post, in future, offers a solution in a reply to my comment.
Rich
The instructions worked perfectly on my MacBook Pro. The only thing is that I had to restart VLC to apply and/or change the filter settings. Thanks!!
asdf
thanks, it took me 30 minutes of trying. but your comment helped in the end :)
Matz
I’m using Windows, I followed all the steps, changed to the right ratio. I don’t see it on the folder where I supposedly put the file path.
tes
its not working, using a Mac book pro. followed all the steps but it wont save the images?
Nick
This has been a big help, thank you. However, I am having a slight issue. It might be somewhat similar to Lucy’s. The video I’m using the filter on has 1920x1080p dimensions, but for some reason when the images are created the images are 1920x1088p. I’ve kept image width and height at -1 like you say above, but it still happens. I double checked the video file itself and it is also 1920x1080p so I don’t understand what is happening. If you could help, I would really appreciate it.
Average Linux User
Have you tried to set the image width and height to 1920 and 1088 instead of -1?
Nick
Oh, I thought they had to remain at -1 each, but I tried again after manually putting in the aspect ratio I wanted and it seems that it fixed the problem. Thank you so much!
Average Linux User
Happy to hear that. Thanks for letting me know you fixed it.
Lucy
Hi! this was super helpful, but can I just ask, whenever I try to convert to frames, the images come out squashed and are saved to a completely different ratio to the video? Is there a way I can fix that so it saves the images to look the same as the video?
Average Linux User
Try to change width and height in:
Tools -> Preferences -> Video section -> click on Filters -> Scene Filter.
Also, see the screenshot with my settings above in the article.
If you are on Linux, you can also try ffmpeg converter.
Billy Bob
I am doing a video with 30 fps, and its 10 seconds long, and I have 1 for my recording ratio, but I keep getting only 112 frames. :(
Average Linux User
Sorry, I don’t know what the problem can be. I usually use ffmpeg on Linux to extract frames. It is more precise.
Erza
Very helpful , I reopened VLC post setting the filter and this helped save the images.
Ben
That helped, after restarting VLC mine saves images too :-)
Ben
Running VLC on Windows 10 to make the reply more usefull
Tim
Very useful tip. Thanks. VLC is awesome!
Average Linux User
Thank you, Tim!