Backup and Restore Your Linux System with rsync

If you need to backup your system, there is no better way than making a backup with rsync.
Rsync (Remote Sync) is a popular and powerful tool used to copy and synchronize files and directories between remote or local Linux/Unix systems. With the help of rsync, we can easily copy/synchronize data between local and remote directories, across different drives and networks.
In this tutorial, I will show you how to make a backup with rsync using the Linux terminal. If you prefer graphical programs, you can use rsync with graphical interface too.
Video Tutorial
Making the backup with rsync
To make this tutorial, I will use Arch Linux in a virtual machine built with VirtualBox. To simulate an external hard drive, I will connect a USB flash drive where the backup will be stored and then restored. I recommend you do the same to test your backup. This will give you the confidence to know that your backup works because an untested backup is not a backup.
For this case we will use this entire command:
sudo rsync -aAXv --delete --dry-run --exclude=/dev/* --exclude=/proc/* --exclude=/sys/* --exclude=/tmp/* --exclude=/run/* --exclude=/mnt/* --exclude=/media/* --exclude="swapfile" --exclude="lost+found" --exclude=".cache" --exclude="Downloads" --exclude=".VirtualBoxVMs"--exclude=".ecryptfs" / /run/media/alu/ALU/
To make a backup with rsync, we usually use the command line. I know that not everyone is confident with the command line tools, but you will realize that the process is not that complicated and you can also back up your system using the command line.
We now proceed to explain what this command means:
sudo - to execute the command as a superuser. Mandatory use.
rsync - is the program itself to use.
-a - archive mode.
-A - preserve Access Control List.
-X - preserve extended attributes.
Basically, these three options mean to preserve all the attributes of your files. Owner attributes or permissions will not be modified during the backup process.
-v - It will show the progress of the backup.
--delete - this option allows you to make an incremental backup. That means, if it is not your first backup, it will backup only the difference between your source and the destination. So, it will backup only new files and modified files and it will also delete all the files in the backup which were deleted on your system. Be careful with this option.
--dry-run - This option simulates the backup. Useful to test its execution.
--exclude - Excludes folders and files from backup. I typed exclude as a separate option for every directory. You can also use it this way --exclude={/dev/*,/proc/*,/sys/*,/tmp/*,/run/*,/mnt/*,/media/*,/home/*,/lost+found}. But make sure you change your working directory to root (cd /) before you run rsync, otherwise the joint exclude option may not work.
The excluded folders depend directly on each of us, however, the /dev/, /proc/, /proc/ /sys/ /tmp/ /run/ /mnt/ and /media folders are not important to backup because rsyn will not copy their content. /mnt/ it is vital to exclude them if we connect a USB memory.
/ - What we want to back up.
/run/media/alu/ALU - This is where you what to backup. I recommend to enrypt the destination, to make your data safe.
We press enter, the command will execute in a simulation mode (because of the --dry-run option) This way we test it to make sure everything is okay. When you’re sure that everything is performed as you want, you remove --dry-run from the command and run it again.
Note: It is recommended that the backup drive has a Linux compatible file system as ext4.
Restore the backup with rsync
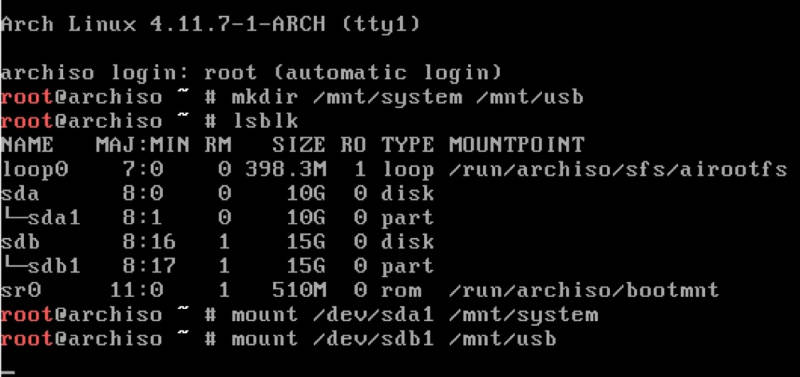
To restore the backup we have made, we are going to boot from a live ISO. Since we are working with Arch Linux, then the iso image must be from Arch Linux. Next, we must mount our USB flash drive.
Once logged in from the live image, we must create two folders, one for the system on the hard disk and the other where the backup created will be mounted:
mkdir /mnt/system /mnt/usb
Next, we need to check the names of our devices:
lsblk
Then, we must mount the file system and the backup on the USB flash device:
mount /dev/sda1 /mnt/system
mount /dev/sdb1 /mnt/usb
Finally, we proceed to perform the restoration of our backup. For this we run:
rsync -aAXv --delete --exclude="lost+found" /mnt/usb/ /mnt/system/
By running this command, we restore the backup of our system.
Conclusion
Rsync is a powerful tool that can be used from the command line, with multiple options that adapt to any need. You can of course use backup programs with graphical interface. There are also some really good non-open sources graphical backup programs.
To make your backup safe, I also recommend encrypting your backup drive.
Have you already done your backup? Let me know about your experience with rsync.
Please share this article through your social networks.
Comments
theconstant82
Hey, ALU, very good guide. I followed it being a noob, and was able to make my first full system backup. I wonder if is possible to restore the backup without using the live CD. My system works fine… well, kinda. I’m having issues after installing PHP and María DB, and find difficult to get rid off them. So I wanted to restore the backup I made the day before installing PHP, MariaDB and all their files, using the actual boot. I hope I explained myself properly.
Thanks.
Josh
Hi, I was wondering what the process would be if your restoring from a newly installed live system?
Ced
Great rsync tutorial. It helped me restore my Ubuntu 20.04.02 home directory from a backup. Everything came over with no problem!
Average Linux User
Fantastic!
Randy
Regarding the rsync errors and specifically “sync error: some files/attrs were not transferred (see previous errors) (code 23)”, I reformatted my USB flashdrive as EXT4 and everything worked perfectly.
Average Linux User
Right! FAT doesn’t support some Linux attributes. Sorry, I didn’t guess it before. Thanks for sharing your experience.
Randy
Well, I spoke too soon. While I don't have sudo installed on my Debian 10 server, I do (and did) use su - prior to running the rsync job. On each line of “failed: Operation not permitted (1)” messages, the file name is preceded with a “.” and appended with a . and 6 random characters. On inspecting the source directory, the file name being backed up is not preceded with a “.” (I ran ls -a) nor is it appended with a . and 6 characters.
Here's an example: rsync: chown “/mnt/backup/var/www/html/wordpress/wp-includes/theme-compat/.comments.php.oCnE2a” failed: Operation not permitted (1)
Here's the command I ran per your instruction above (logged in as root): rsync -aAXv –delete –exclude=/dev/* –exclude=/proc/* –exclude=/sys/* –exclude=/tmp/* –exclude=/run/* –exclude=/mnt/* –exclude=/media/* –exclude=”swapfile” –exclude=”lost+found” –exclude=”.cache” –exclude=”Downloads” –exclude=”.VirtualBoxVMs”–exclude=”.ecryptfs” / /mnt/backup
I appologize in advance as I'm a linux novice. I appreciate your help in advance.
Average Linux User
Hi Randy, Try to back up with
-avzand only the wordpress folder :Randy
Same outcome
Average Linux User
Maybe you have a wrong permission in your
/mnt/backup.Try to change the ownership to the current user:
And re-run rsync.
Randy
Nope, that didn’t do it either. The summary says: rsync error: some files/attrs were not transferred (see previous errors) (code 23) at main.c(1207) [sender=3.1.3]
I did a little searching for code 23. A lot of info, but not conclusive.
Average Linux User
It seems your destination file system doesn’t support some Linux attributes. Probably, it is FAT or NTFS file system. You need to format your destination driver to ext4 file system.
Randy
Hi and thanks for this excellent RSYNC tutorial. After I run the RSYNC backup command, I receive many “chown” errors associated to the /mnt directory structure with “failed: Operation not permitted (1)” at the end. For example:
rsync: chown “/mnt/backup/var/www/html/wordpress/wp-includes/theme-compat/.embed.php.iB1xYJ” failed: Operation not permitted (1)
Is this something I need to be concerned about? Thanks in advance.
Average Linux User
It seems you back up files as a regular user. To change file ownership, you need to run
rsyncwithsudoin front.Randy
Silly me. Thanks for the prompt reply.
Joleen Shook
I am attempting to clone a machine (different hardware) to a new machine. I have excluded all of the directories mentioned above, plus the /boot directory. Machine is stuck on the loading screen. Original machine is 18.04.5, new machine has fresh install of 18.04.5. Both were last patched immediately before transfer. What am i missing/doing wrong?
jerome
Hey, first of all thank you for this post. Can you take a look at this scenario
Backup The daily backup is already up and running in a cronjob
sudo rsync -aAXv -e “ssh -i /root/.ssh/id_rsa” –delete –exclude={“/dev/”,”/proc/”,”/sys/”,”/tmp/”,”/run/”,”/mnt/”,”/media/*”,”/lost+found”} / root@ip:/backups/
date +%w-%ARestore To restore we create a new instance with a fresh minimal centos 7 installation. After that we run the following command to restore the data:
sudo rsync -aAXv -e “ssh -i /root/.ssh/id_rsa” –delete / root@ip:/backups/0-Sunday /
Question. Do we still need to mount /mnt/system on a fresh minimal centos 7 installation.
George Voina
rsync is not recommended for OS backup, it is intended just for simple directory copy or back-up. Is not handling well symbolic links and sparse files. Back-up of 800GB was producing more than 2TB on the destination with lots of corrupted sparse files and duplicates. There are better tools for full back-up.
Steve
What program would you use for an OS backup, if not rsync? dd? clonezilla? something else?
Orrin Ahola
I prefer to tuck my excluded folders in a text file which keeps the rsync command a little less cumbersome….
–exclude-from '/home/orrin/.rsync_exclude.txt'
mweiss
Thanks a lot for your great job and that amazing video! You have a talent to explain complicated things with simple words, it's cool 👍
Average Linux User
Thanks for your kind comment 🙂
Ric
Very helpful. Id like to know whether using an iscsi target storage as destination backup would work or not?
antonio1
nice and useful, one question. How you perform backup/restore if you have 4 sda with about 3 logical volumes each one? At restore moment can you mount the entire sda as system?
Tanveer Salim
Hello Average Linux User,
I found that when the following flag was used without double quotes encasing the directories:
–exclude={/dev/,/proc/,/sys/,/tmp/,/run/,/mnt/,/media/,/home/,/lost+found}
The rysnc program wento into an infinite loop in the /mnt/ directory until the backup disk ran out of memory.
A simple fix is this:
–exclude={“/dev/”,”/proc/”,”/sys/”,”/tmp/”,”/run/”,”/mnt/”,”/media/”,”/home/”,”/lost+found”}
This was taken directly from the ArchWiki.
Best,
Tanveer Salim
Imran Ullah
Hi Alu,
Is mounting system a must while restoring backup? What happens if i copy all the files to / ?
I look forward to hearing from you.
Imran Ullah
Just to add, my backup functions with your method. Thanks a lot for the video, and explaining an easy approach method :) I faced some problems when I copied the /boot/ directory to the new machine. I had to exclude it while restoring, and also excluded /etc/fstab file.
Average Linux User
You are right. If you move your system to another hardware, you need to exclude or update
/bootand/etc/fstab. This is because your participations will have different IDsAverage Linux User
Yes, you need to mount the system. When you are in Live mode,
/is your Live system.davidA
Thanks for the explanation. I'm wondering why do you restore to “/mnt/system/”? I guess, in this context, it's important to understand the difference between hard link and soft link, right? In your example, the backup will affect sda1 (which is mounted to /mnt/system/ in the USB-Live version but to root (“/”) on my installed system (which is about to be restored). So you just mount to “/mnt/system/” in order to address sda1, but it will still sit on (“/”) in my system, right? The whole mounting stuff is a bit confusing for beginners, especially when you come from windows. Love your videos, thank you.
Average Linux User
Right
binbashexe
hello, thnk you for great tut i want to ask you something ; i need to back up just system mean like fresh install without other config thing do i need to remove /mnt/ folder because i have prtition on it with big files i do not to be back up fdisk -l /dev/sda1 2048 7999487 7997440 3.8G 82 Linux swap / Solaris /dev/sda2 * 7999488 105656319 97656832 46.6G 83 Linux » root /dev/sda3 105656320 300967935 195311616 93.1G 83 Linux » home /dev/sda4 300967936 625141759 324173824 154.6G 83 Linux » /mnt/
Average Linux User
You need to exclude /mnt only if the drive where your backup is mounted to /mnt.
Manu
How does this work with a full system backup? Let's say I want to replace the whole data on one disk with a full system backup and launch from it. Are there any more steps needed? Thanks in advance
Average Linux User
It should work as described. You only need to install GRUB on that new disk from a Live USB.
d0mi0
You would also need to adjust fstab if you are moving to a new drive.
Benjie
Good day, May I ask 2 question, please. * I have a SERVER1 with 300gb used and 200gb free space total of 500gb of HDD, I want to back it up to SERVER2. Does SERVER2 needs to have more than 300gb? * If I run rsync in SERVER1 it will create a 300gb backup to the remaining 200gb free space, is that posible? Sorry for my bad english but I hope you can help me. Thank you.
Average Linux User
Benjie
Thank you very much sir..
Average Linux User
Thank you for reading!
Chris Spatgen
Thank you for the great article. I had to use the Restore the backup with rsync procedure today and it saved a lot of time. Thank you again!!
Average Linux User
Hi Chris, Thanks for the feedback and I am happy to hear the restore procedure worked!