10 Things to do first after installing Arch Linux
You have just installed Arch Linux and wonder what to do next. I am going to share with you my 10 things to do first after installing Arch Linux.
Arch Linux is very configurable and you can tweak it endlessly. But I believe these 10 things to do first after installing Arch Linux are the most essential for great user experience and security.
You can watch the video tutorial or continue reading below.
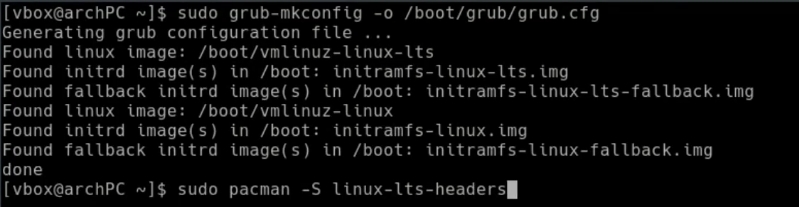
1. Install the LTS kernel
The first thing to do after installing Arch Linux is to install the LTS (long-term support) kernel, which is recommended installing if you want to make your Arch system more stable. The LTS kernel gets less frequent updates but it is patched with all the security fixes. First, check if you do not have the LTS kernel already:
uname -r

If there is not lts in the kernel name, you have a standard Arch Linux kernel. So, you can install the LTS kernel and you also need to reconfigure the GRUB bootloader:
sudo pacman -S linux-lts linux-lts-headers
sudo grub-mkconfig -o /boot/grub/grub.cfg
Reboot, and select the LTS kernel in Advanced options of the GRUB menu. After the boot, check if you indeed use the LTS kernel with uname -r.
If everything is fine and your active kernel is the LTS kernel. Feel free to remove the non-lts kernel
sudo pacman -Rs linux
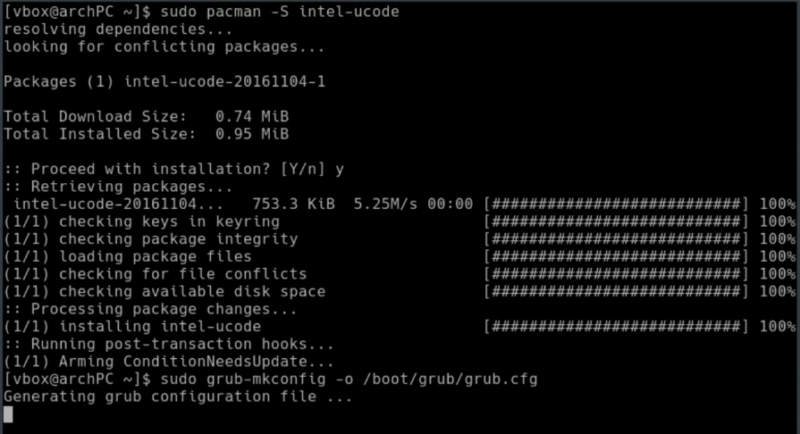
2. Install Microcode
Microcode is some kind of software installed on your processor. While microcode can be updated through the BIOS, the Linux kernel is also able to apply these updates during boot. These updates provide bug fixes that can be critical to the stability of your system. For Intel processors install intel-ucode, for AMD processors install linux-firmware. After the installation also update the GRUB:
sudo pacman -S intel-ucode
sudo grub-mkconfig -o /boot/grub/grub.cfg
3. Disable GRUB delay
GRUB is a multiboot loader, developed by the GNU project that allows us to choose which Operating System to boot from the installed ones. It is mainly used in GNU/Linux operating systems. You see this GRUB menu every-time you start the system.
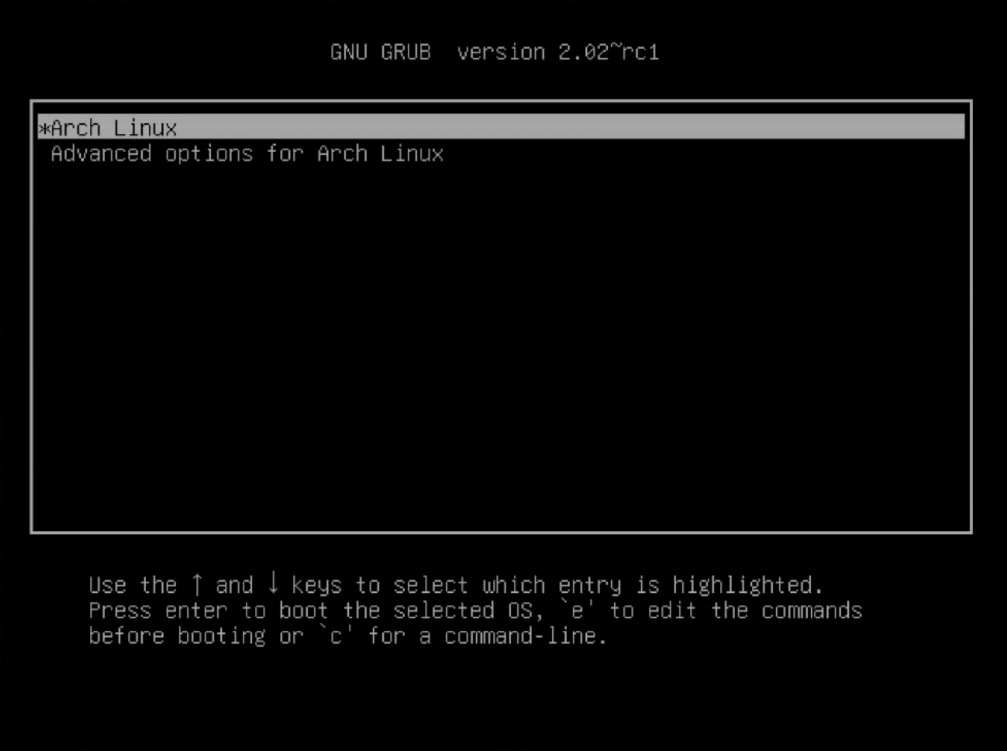
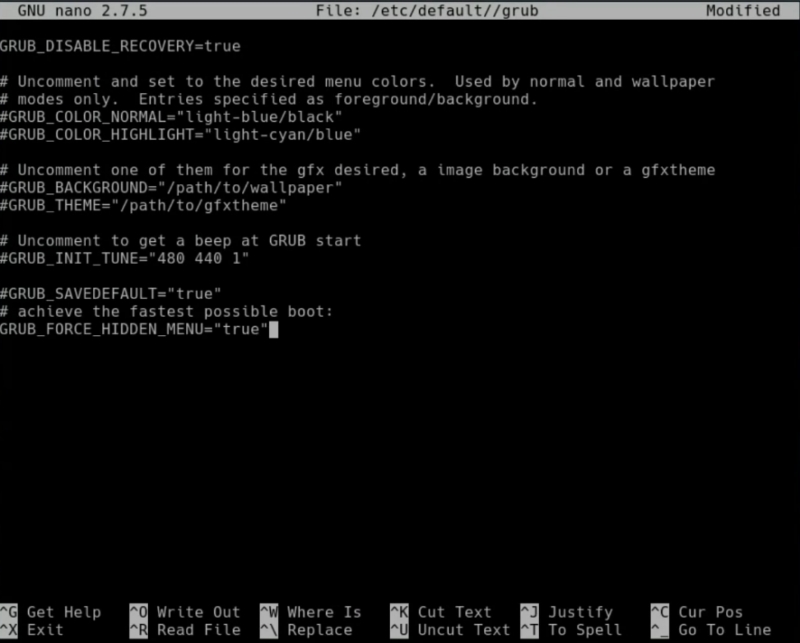
Sometimes this is annoying because it wastes our time. Let’s make the system skip it and load as fast as possible. Open the GRUB configuration file:
sudo nano /etc/default/grub
Add the following lines to at the end of the file:
# to achieve faster boot:
GRUB_FORCE_HIDDEN_MENU="true"
Then download this file 31_hold_shift.gz, uncompress it and place it to /etc/grub.d/.
gunzip 31_hold_shift.gz
sudo mv 31_hold_shift /etc/grub.d/
Make this file executable, and update the GRUB config:
sudo chmod a+x /etc/grub.d/31_hold_shift
sudo grub-mkconfig -o /boot/grub/grub.cfg
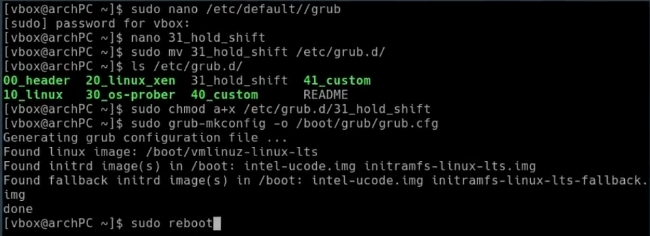
This won’t show GRUB menu during the system load. To show GRUB menu, you need to hold the Shift key during the start-up.
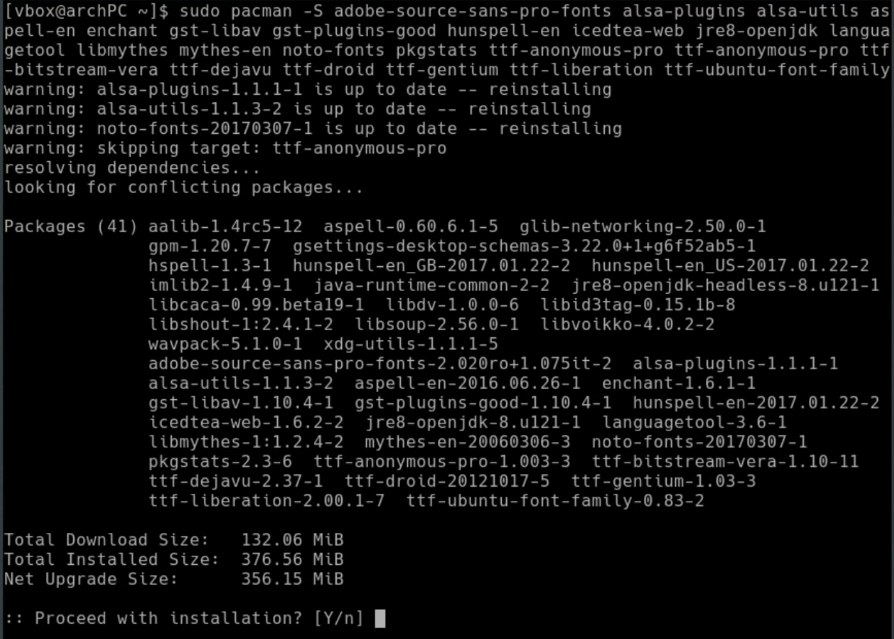
4. Install some key packages
Here, I recommend only cross-desktop packages such as fonts, spell checking dictionaries, Gstreamer plugins, java etc. These are the packages I recommend, check their names in the command below:
pacman -S enchant mythes-en ttf-liberation hunspell-en_US ttf-bitstream-vera pkgstats adobe-source-sans-pro-fonts gst-plugins-good ttf-droid ttf-dejavu aspell-en icedtea-web gst-libav ttf-ubuntu-font-family ttf-anonymous-pro jre8-openjdk ttf-gentium languagetool libmythes
I will do a separate video about the applications I install in KDE Plasma 5 desktop.
5. Enable the firewall
A firewall is a computer program that controls the access of a computer to the network and of network elements to the computer, for security reasons. The best way to set up a firewall on Linux is to use iptables, which is a built-in Linux firewall. But it is quite complicated and deserves a separate tutorial. Here, I will show you how to set up an uncomplicated firewall which is fine for a regular user.
First, we must install it:
sudo pacman -S ufw
Next, we must enable the service:
sudo ufw enable
Check the status of the service, to make sure it works:
sudo ufw status verbose
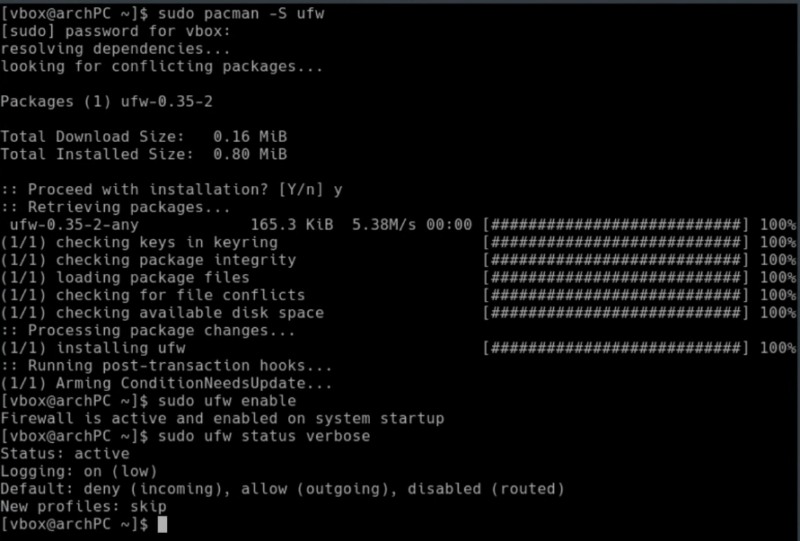
The default rules to deny incoming and allow outgoing are good for most of the users.
Finally, enable its autostart with the system.
sudo systemctl enable ufw.service
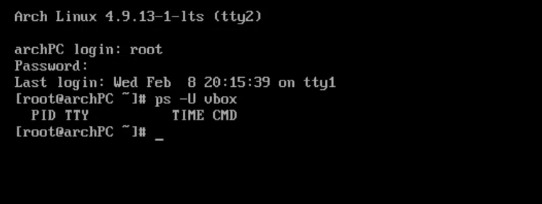
6. Encrypt your home directory
It is wise to make a back up of all your data before this step. Encrypting your home folder is a very good idea if you want to have even more protection for your files. The simplest way to encrypt your home is to use ecryptfs-migrate-home script.
To run it, you need to log out. Switch to a virtual console by simultaneously pressing Ctrl+Alt+F2. In this console, login with the root user name and administrative password and check what processes are owned by your user:
ps -U username
There should be no output. If some processes are active you can kill them or reboot and login as a root again.
Next, install these programs:
sudo pacman -S rsync lsof ecryptfs-utils

Now, you can start encrypting your home folder:
modprobe ecryptfs
ecryptfs-migrate-home -u username

Use the same passphrase as your login password. It is required for auto-mounting during the login.
Log out and log in as a regular user and mount your encrypted home folder:
ecryptfs-mount-private
Unwrap the decryption passphrase and write it down or save outside of your computer.
ecryptfs-unwrap-passphrase
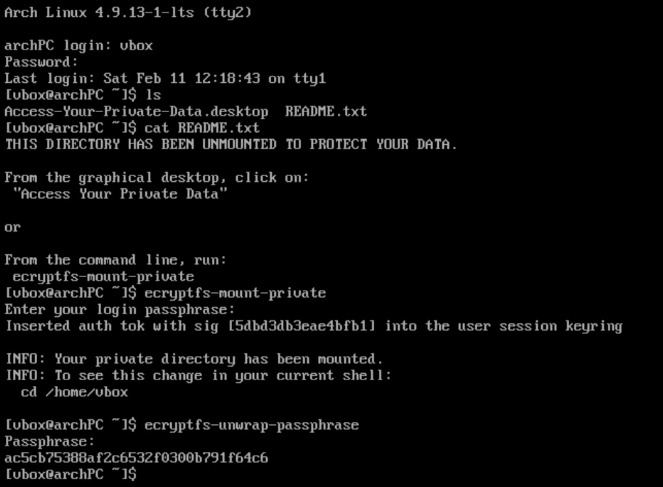
Now, make sure the files auto-umount and wrapped-passphrase exist:
ls .ecryptfs

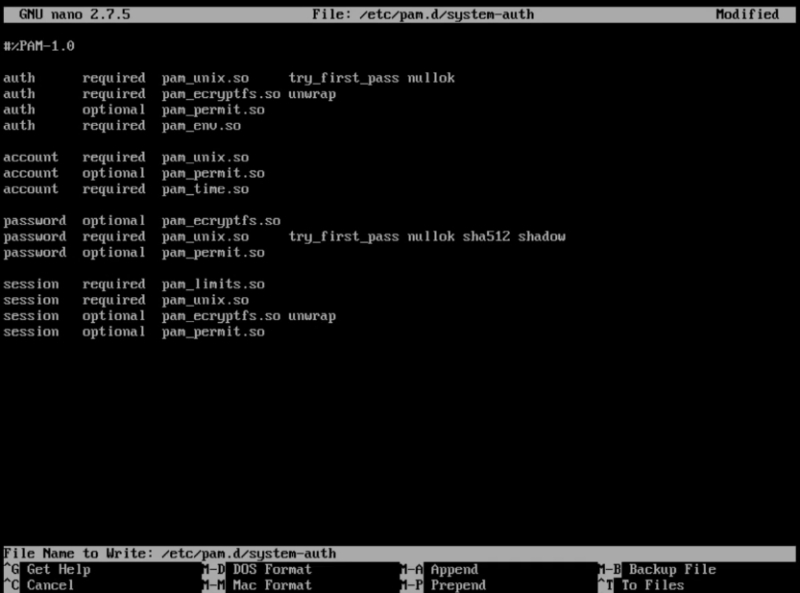
Then open system-auth file:
sudo nano /etc/pam.d/system-auth
And after the line auth required pam_unix.so insert the following content:
auth required pam_ecryptfs.so unwrap
Next, above the line containing password required pam_unix.so paste this line:
password optional pam_ecryptfs.so
And finally, after the line session required pam_unix.so write:
session optional pam_ecryptfs.so unwrap
See the final result in the image below.
Reboot and check if you can log in to your user account. If everything is fine, it is safe to remove the backup of your home which was created during the migration. It is named with your username and some random characters.
sudo rm /home/username.randomCharacters
7. Remove orphans
After installing Arch Linux and configuring it, you can little clean your system. This is important if you want to save disk space and improve disk performance. You can remove unused packages (orphans) and their configuration files.
sudo pacman -Rns $(pacman -Qtdq)
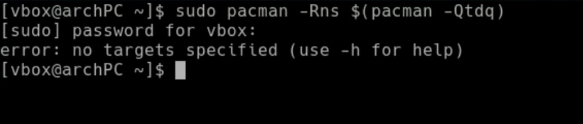
I have no unused packages on my system (image above), but you may have some listed after that command.
8. Optimize pacman's database
Arch Linux performance can be further enhanced by optimizing the pacman package manager with the following command:
sudo pacman-optimize
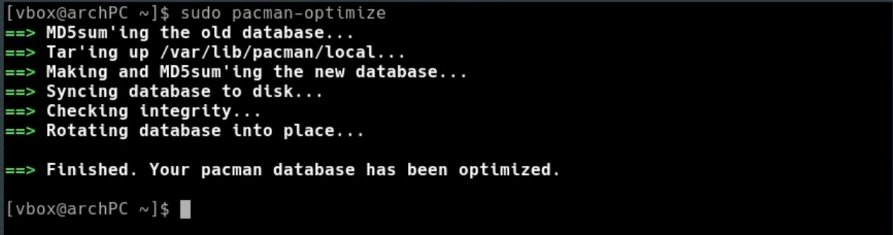
This improves the speed at which pacman accesses the system’s databases.
9. Check for errors
First, check for failed systemd services:
sudo systemctl --failed
Second, check for errors in logfiles:
sudo journalctl -p 3 -xb
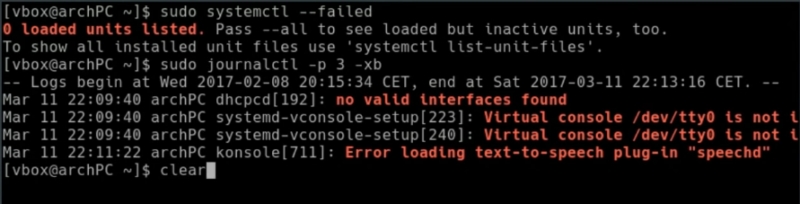
If you find some errors, google them. If they are serious, try to fix. The errors you see on my system (image above) are not very dangerous as far as I know.
10. Backup the system
It is always good to have a backup of the system, so you can recover it in case there is a problem with it. And it is the last thing to do after installing Arch Linux.
I have already described how to back up your system in this post. Please, read it. Here, I only provide the commned to back up everything except some unnecessary directories:
sudo rsync -aAXvP --delete --exclude=/dev/* --exclude=/proc/* --exclude=/sys/* --exclude=/tmp/* --exclude=/run/* --exclude=/mnt/* --exclude=/media/* --exclude=/lost+found / /mnt/backupDestination/

As a conclusion, I would like to say that Arch Linux is very configurable and adaptable to many situations. So, there are many other things do after installing Arch Linux, but these 10 are the most essential in my view.
I hope this tutorial was useful for you. Let me know what you would add to this list by commenting below. And please share it.
Thank you for reading.
Comments
koms
excellent thank you
anonyme
merci pour c’est précieuse information essentiel pour un débutant comme moi
Brendan
Thanks for this guide, but when I try to download 31_hold_shift.gz it gives a 404 error
NewArchuser
Just search it up on github
Oliver
ttf-gentium package has changed name to gentium-plus-font
Stan
ttf-gentium doesn't work anymore, it's been replaced with gentium-plus-font https://www.archlinux.org/packages/community/any/gentium-plus-font/
Can
Thanks. It's simply useful tutorial. But I didn't understand a point in this article. Why should I install pkgstats package as you specified in step 4? As it seems it only sends my installed package list to Arch Linux servers. Here's the description of the package:
extra/pkgstats 2.4.1-1 Submit a list of installed packages to the Arch Linux project
Are you sure it's useful to install for users?
Average Linux User
I think this anonymous stats will help the Arch Linux team to prioritize the development. But you do not have to install it, of course.
Rosyid Tn
The tutorial was extremely helpful, thanks and hope for more.
Average Linux User
Thank you, Rosyid! You can SUBSCRIBE to receive updates.
Myarch
The tutorial was extremely helpful, thanks and hope for more
Average Linux User
Thanks, Myarch! SUBSCRIBE and you won't miss new posts.
Pouk Phaw Gyi
1st command line umane is actually uname,no offened bro Ps not a native eng speaker.
Average Linux User
Typo :) Thanks for telling me. I corrected it.
Ullas
ALU, Hunspell-en is not the package name it is in: https://www.archlinux.org/packages/extra/any/hunspell-en/
chris
I had this issue too, but the solution is to add the region for your country… in my case I edited this command with hunspell-en_US
Average Linux User
Hi Ullas, Thanks. It seems they changed the name of the package recently. I have updated the post.