How to limit network bandwidth in Linux
 There may be cases when you need to limit network bandwidth in Linux. Learn how to limit the network bandwidth in Linux globally and application-specifically with two simple programs: wondershaper and trickle.
Content
Why limit network bandwidth?
There may be multiple reasons why you need to limit network bandwidth in Linux.
One of our subscribers says that the internet data prices are high where he lives, he wants to limit his network bandwidth to reduce the internet spending. As a former Windows user, he used to run Netlimiter for that. Now, he looks for a Netlimiter alternative in Linux.
Traffic limiting is also useful when the internet speed is low. Applications will compete for the traffic, and setting traffic limits on some applications helps to prioritize how the traffic is used.
In another case, a server admin had to limit the outbound traffic, so that the server will not go down due to heavy activity at peak times.
In this article, you will learn how to limit the network bandwidth in Linux globally and application-specifically with two lightweight and user-friendly applications.
Limiting the bandwidth per network interface with Wondershaper
Wondershaper is a simple command-line utility that can limit the network bandwidth in Linux. It can be configured to limit download and upload speed for each network interface of your Linux machine. Let’s have a look.
Install Wondershaper
To install Wondershaper, search for it in your Linux package manager. It is an open-source application that should be available in all Linux distros. This is the installation I recommend. In Ubuntu and other Debian-based distros, you can run this command:
sudo apt install wondershaper
If you want the latest version of Wondershaper, you can install it from GitHub:
git clone https://github.com/magnific0/wondershaper.git
cd wondershaper
sudo make install
Hopefully, this installation goes without errors for you. It is a less reliable way to install Wondershaper than using the version provided with your distro. I have tested this installation on Ubuntu 20.04.3, it works fine. But if you have problems with the Github version, remove it by running this command from the wondershaper git-cloned directory:
sudo make uninstall
If you decide to keep the GitHub version of Wondershaper, keep in mind that unlike the version included with the distro, it will not update itself when the new version is released. You need to update it manually. You can do it by entering the wondershaper folder, pulling the updates from GitHub, and re-installing:
cd wondershaper
git pull
sudo make install
If you are a complete Linux newbie, I recommend you learn the basics of the Linux command line.
Learn the syntax of Wondershaper
Depending on the version of wondershaper, it may have a different syntax for configuration. You can check it with the man command:
man wondershaper
It will give you an output similar to this:
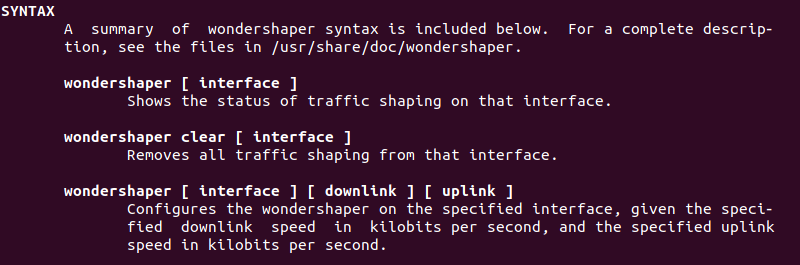
It is just a sequence of the interface, download and upload speed limit in my case:
wondershaper [ interface ] [ downlink ] [ uplink ]
More recent versions require specifying the option names:
wondershaper -a [interface] -d [downlink] -u [uplink]
Find out the network interface name
Now, when you know the syntax of wondershaper, you only need to find out the network interface name to set the limits on it. In most modern Linux systems, you can list the available network interfaces with this command:
ip addr show
However, some older systems may require to run ifconfig from net-tools:
sudo apt install net-tools
ifconfig
In my system, I only have the Ethernet interface enp0s3:
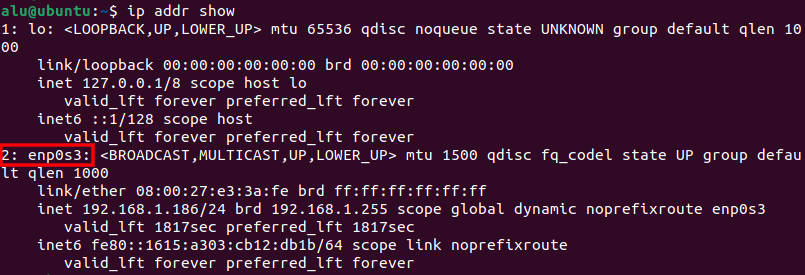
You may also have the Wi-Fi interface listed as wlan0 or similar.
Test Wondershaper
Knowing the network interface name, we can test wondershaper. For example, let’s set the bandwidth limit to 6 MB/s for download, and 1 MB/s to upload on the Ethernet interface enp0s3:
sudo wondershaper enp0s3 6144 1024
Now, you can check if these settings have been applied by testing your internet speed at Speedtest.net. This is the results I get with these settings:

If I clear all the limits:
sudo wondershaper clear enp0s3
And test my internet speed again, I get these values:

Note, if you have both the Wi-Fi and Ethernet connections, make sure you set the limit and test the same interface.
Run Wondershaper persistently
The settings we tested above work only until you reboot your Linux system. To apply the limits persistently, you need to create a systemd configuration and service files for Wondershaper.
Open the configuration file:
sudo nano /etc/systemd/wondershaper.conf
And paste the following content with your interface and limit settings:
[wondershaper]

# Adapter
IFACE="enp0s3"

# Download rate in Kbps
DSPEED="6144"

# Upload rate in Kbps
USPEED="1024"
Then create a service file:
sudo nano /etc/systemd/system/wondershaper.service
With the following content:
[Unit]
Description=Bandwidth shaper/Network rate limiter
After=network-online.target
Wants=network.target

[Service]
Type=oneshot
RemainAfterExit=yes
EnvironmentFile=/etc/systemd/wondershaper.conf
ExecStart=/usr/sbin/wondershaper $IFACE $DSPEED $USPEED
ExecStop=/usr/sbin/wondershaper clear $IFACE

[Install]
WantedBy=multi-user.target
Note, if your Wondershaper uses option names, you need to edit the ExecStart and ExecStop lines to:
ExecStart=/usr/sbin/wondershaper -a $IFACE -d $DSPEED -u $USPEED
ExecStop=/usr/sbin/wondershaper -c -a $IFACE
FYI, if you are not familiar with the nano editor, to save the changes press Ctrl+O and to exit press Ctrl+X.
Now, activate Wondershaper to run persistently:
sudo systemctl enable --now wondershaper.service
The Wondershaper will now limit network bandwidth in your Linux even after you reboot your system.
If you want to disable the persistent run of Wondershaper, execute:
sudo systemctl disable --now wondershaper.service
Limiting the bandwidth per application with trickle
Trickle is a lightweight bandwidth shaper that can be used to set the data limits per application. By using the Unix loader preloading, it adds a new version of the data transferring functionality to an application through sockets and then limits traffic by delaying the sending and receiving of data over a socket. Unlike Wondershaper, trickle does not require root privileges, so you do not need to use sudo when you run it.
Install trickle
Trickle is available in most Linux distributions. In Ubuntu, you install it with this command:
sudo apt install trickle
How to use trickle
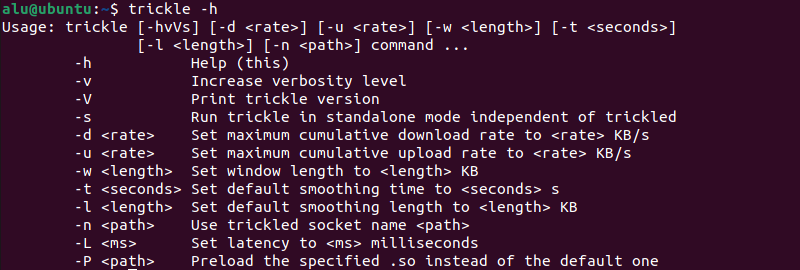
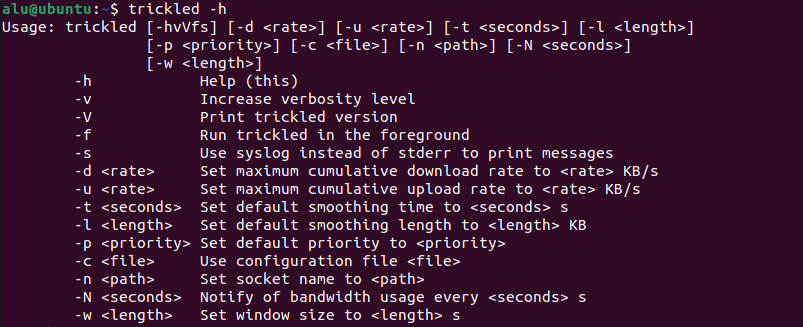
You can see all available options and how to use trickle with its help message:
trickle -h
In most cases, you only need to set the download/upload limits and the application name:
trickle -d [ download speed ] -u [ upload speed ] [ application/command ]
Here is an example of 6 MB/s limit for download, and 1 MB/s to upload in Firefox:
trickle -d 6144 -u 1024 firefox
You can also set download and upload rates separately if you want to limit only one of them:
trickle -d 6144 firefox
You can also limit network bandwidth for Linux commands. For example, you may want to limit the wget download speed:
trickle -d 512 wget https://releases.ubuntu.com/20.04.3/ubuntu-20.04.3-desktop-amd64.iso
You can also launch bash shell with bandwidth limits for all commands:
trickle -d 6144 -u 1024 bash
To reset the bandwidth limits, simply close the bash with the exit command or Ctrl+Q.
You can also add some advanced settings to your trickle command. You can read the detailed description of each option with the man command:
man trickle
where you can find out, for example, what the smoothing time option does:
The smoothing time determines with what intervals trickle will try to let the application transceive data. Smaller values will result in a more continuous (smooth) session, while larger values may produce bursts in the sending and receiving data. Smaller values (0.1 - 1 s) are ideal for interactive applications, while slightly larger values (1 - 10 s) are better for applications that need a bulk transfer.
trickle with rsync
There is a small difference in using trickle with rsync to copy files over ssh. If you simply put trickle in front of rsync, it will not work because rsync forks the ssh process. Thus, ssh will run without trickle limits. To call rsync with trickle limits, run it like this:
rsync --rsh="trickle -d 6144 -u 1024 ssh" SORCE DESTINATION
Test trickle
We can test trickle similarly as we tested Wondershaper at Speedtest.net. Let’s set the download limits to Firefox and add a small smoothing value as it is an interactive application:
trickle -d 6144 -u 1024 -t 0.1 firefox
These settings result in the following network speed for me:

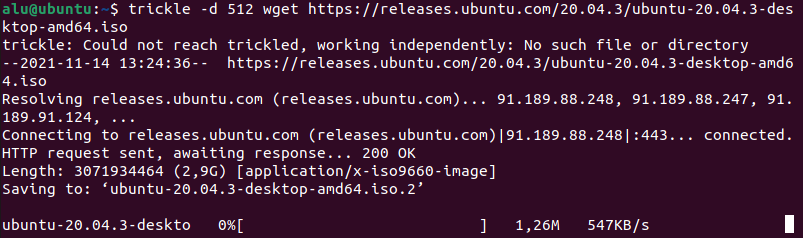
You can also test trickle with wget:
trickle -d 512 wget https://releases.ubuntu.com/20.04.3/ubuntu-20.04.3-desktop-amd64.iso
You will see that the speed is limited to 547KB/s:
Apply application-specific limits persistently
Trickle can also be configured to have permanent network bandwidth limits and these limits can be global e.g. for all applications or application-specific. It is done through the trickled daemon.
See its options with the -h or man:
You can set the default bandwidth limits for all applications launched with trickle:
trickled -d 6144 -u 1024 -s
Now, every application you start with trickle application will have these limits and you do not need to specify the maximum upload and download rates. To keep these options permanent after the reboot, you can add this command to your ~/.bashrc or /etc/profile if you want these settings to be active for all users.
To set how these limits are shared by each application, you need to add them to the trickled.conf file. Open the configuration file:
sudo nano /etc/trickled.conf
And add each application in the following format:
[service]
Priority = <value>
Time-Smoothing = <value>
Length-Smoothing = <value>
We have looked at the time smoothing parameter above. The purpose of the length smoothing is the same, the only difference is that it is defined in KB. It is a fallback of the smoothing time option.
The priority parameter defines how the traffic is prioritized across applications. A lower value has a higher priority, and thus applications with a lower value get more bandwidth than the one with the higher value.
Here is an example of how a real trickled.conf file may look like:
[www]
Priority = 1
Time-Smoothing = 1

[ssh]
Priority = 2
Time-Smoothing = 0.1
Length-Smoothing = 2

[ftp]
Priority = 8
Time-Smoothing = 5
Length-Smoothing = 10
Create trickle launchers for graphical apps
Running trickle application in the terminal may not be the most convenient for graphical applications. Luckily, there is also an option to add trickle to the graphical launchers.
Open the launcher configuration file:
sudo nano /usr/share/applications/application.desktop
For example, to edit the Firefox launcher, create a backup copy and open edit the original file:
sudo cp /usr/share/applications/firefox.desktop /usr/share/applications/firefox.desktop.backup
sudo nano /usr/share/applications/firefox.desktop
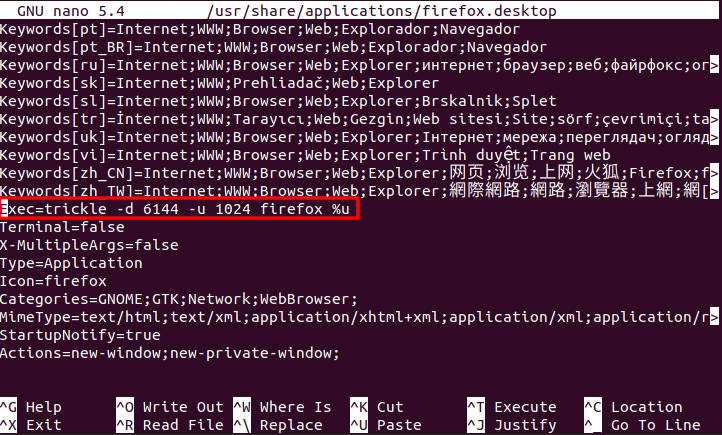
Find the lines starting with Exec= and edit them by adding trickle to each command. There are three such lines in firefox.desktop:
Exec=trickle -d 6144 -u 1024 firefox %u
...
Exec=trickle -d 6144 -u 1024 firefox -new-window
...
Exec=trickle -d 6144 -u 1024 firefox -private-window
Now, every time you click on the launcher in the menu, it will start Firefox with this modified command and limited network bandwidth.
If you want to remove these limits, restore the backup copy:
sudo cp /usr/share/applications/firefox.desktop.backup /usr/share/applications/firefox.desktop
Some applications may not have the application.desktop files in /usr/share/applications/. This is the case for AppImages, snap, and flatpak apps. You can easily create a custom launcher for them by following our tutorial on how to create a custom launcher in Linux.
Disable automatic updates
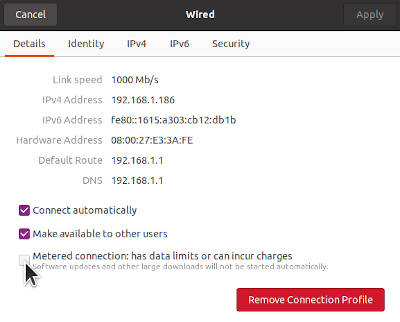
I would like to share with you just one more tip on how to limit the internet traffic in your Linux. You may want to disable automatic updates in your system, so you update less often and when you have access to the faster and cheaper internet connection.
In Ubuntu, you do that by enabling the “Metered connection”:
Settings -> Network -> Wired/Wi-Fi connection settings -> Details -> enable Metered connection
When you need to update your system, you do it manually in the Update Manager or the command line.
Conclusion
I tried to provide simple and clear instructions on how to limit network bandwidth in Linux with Wondershaper and trickle without technical details. I hope these instructions helped you to configure your Linux bandwidth, and it saved you a couple of backs.
If you want to learn more technical things about trickle, you are welcome to read the trickle technical paper. To get more information on Wondershaper, visit the Wondershaper GitHub page.
There is also an option to use the tc command and iptables configuration for traffic shaping, but this is one of the advanced topics which we do not cover on this website. However, you can get an idea of how tc is configured from the Arch Linux Wiki.
If you know more user-friendly tools that can help to limit network bandwidth in Linux, please share them in the comments below.
Comments
John Tate
This is by far one of the worst guides I’ve ever seen in 20 years. When it has those ‘examples that may’ it barely defines any of the syntax/keywords within. It overcomplicates using systemd for persistence when you can just use post-up syntax in /etc/network/interfaces (and similar shit in NetworkManager). Whoever wrote this needs to quit, and find something they are good at.
HighCo
Tripped me up: Wondershaper settings are in kbits per second and not MB (MegaBytes) per second