30 Things to do After Installing Ubuntu 18.04/20.04 LTS
These 30 things to do after installing Ubuntu 18.04/20.04 will help you to make your Ubuntu faster and your user experience better.
Content
- Configure the update manager and repositories
- Install Drivers
- Install Synaptic package manager
- Install codecs, MS fonts, Flash, Java.
- Install microcode
- Activate minimize to Dock
- Decrease Swap use
- Enable Drive Cache
- Reduce SSD Writes
- Set up Firewall
- Configure Ubuntu settings
- Move Applications menu in Dock
- Install GNOME Tweaks
- Install GNOME Extensions
- Install Arc Menu
- Install additional themes
- Change Firefox Settings
- Enable Netflix support in Firefox
- Tweak LibreOffice
- Enable Google Drive Integration
- Schedule Backups
- Remove unnecessary software
- Turn off startup applications
- Clean system (Bleachbit)
- Install VLC
- Install Google Chrome
- Install Dropbox
- Install Skype
- Install Spotify
- Laptop Tweaks
You can watch the video tutorial or continue reading below.
1. Configure the update manager and repositories
You can make the update process and program installation faster by configuring the software sources.
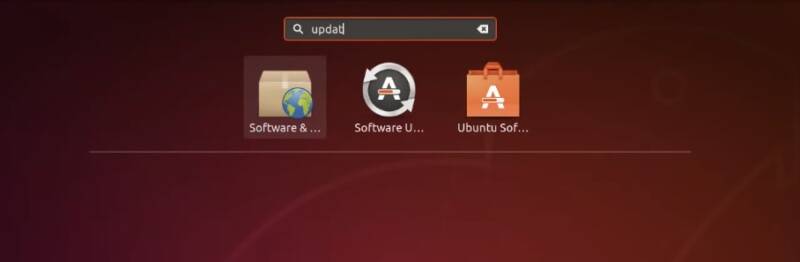
Open the Software & Updates manager form the main menu.
Check if all repositories except the Source code are enabled.
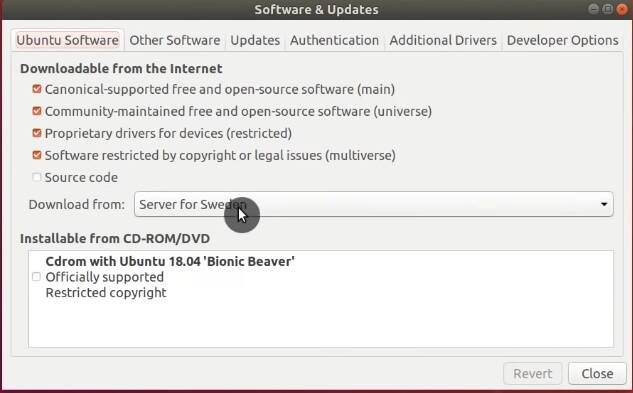
These official Ubuntu repositories should be selected in the Ubuntu Software tab:
- main
- universe
- restricted
- multiverse
Use the fastest download server
During the installation, Ubuntu selects the default server in your country to download updates. But this server is not necessarily the fastest.
To switch to the fastest repository server, click on Download from → Other → Select Best Server. This will initiate a test to locate the fastest server relative to your location.
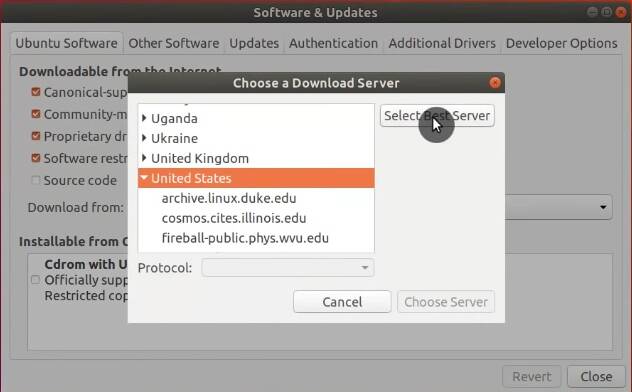
After the test is done, select the recommended server and apply the change. Now, you will be downloading the updates from the fastest server.
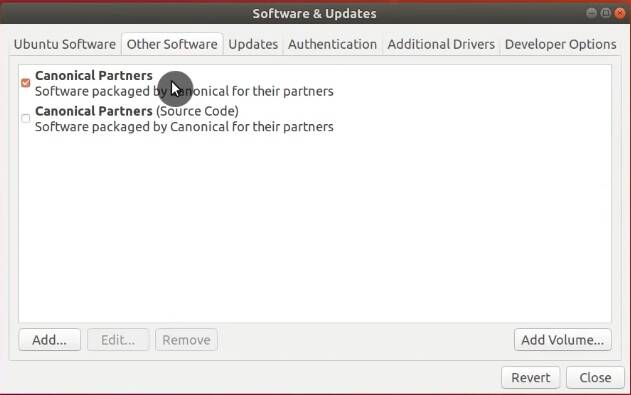
Enable Canonical Partners repository
I recommend enabling the repository of Canonical Partners. This will expand the amount of available software you can install. This repository includes, for example, flash player.
Click on the Other Software tab and enable Canonical Partners.
Configure frequency and type of Updates
In the Updates tab, you can configure what kind of updates to receive and how often to check for updates. I recommend to sign up for all update types.
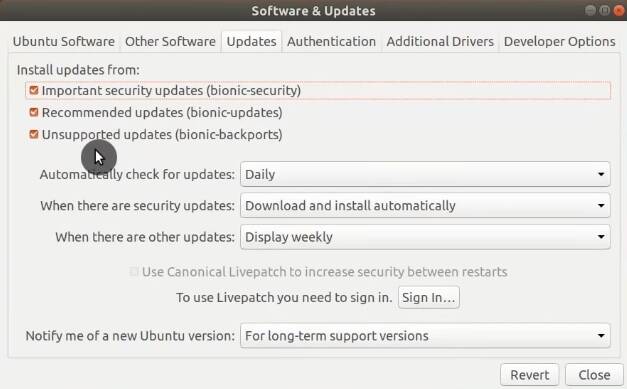
Sign up for LivePatch
Livepatch is a technology developed by Canonical to allow installing Kernel security patches without the need to reboot the system.
To sing up for Livepatch, click on the Sign in button in the same Updates tab. Then enter your Canonical account credentials. If you don’t have an account, you will be able to create one.
Update the system
After you have done all Software & Updates settings, you can launch the Software Updater program and install all the updates.
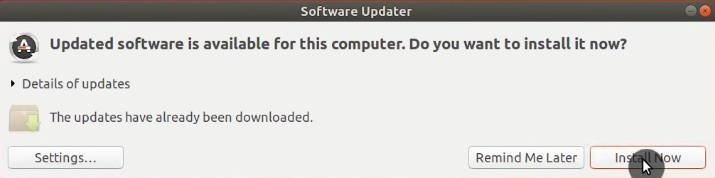
When you have installed the updates, restart your Ubuntu.
2. Install Drivers
The next key thing to do after installing Ubuntu 18.04/20.04 is to install the essential drivers.
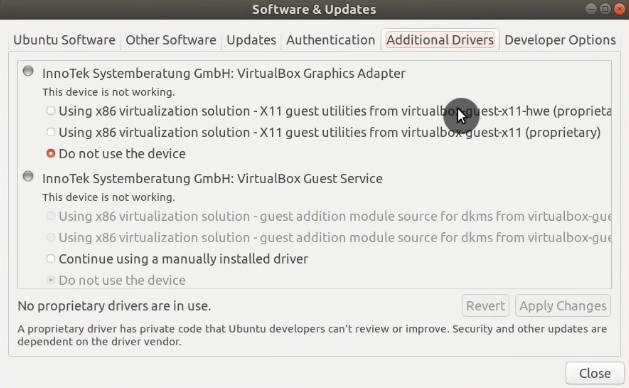
You can install them from the Software & Updates application. Go to the Additional Drivers tab and wait for some time while the program will be analyzing your system. If you have any hardware that requires proprietary drivers, Ubuntu will show you options for installing them. Install the suggested drivers and restart your system.
3. Install Synaptic package manager
Synaptic is not the most user-friendly package manager, but it is extremely reliable. Unfortunately, Ubuntu Software Center doesn’t work well all the time. So, I recommend using Synaptic instead.
Search for Synaptic in the launcher and there should be an option to install it.
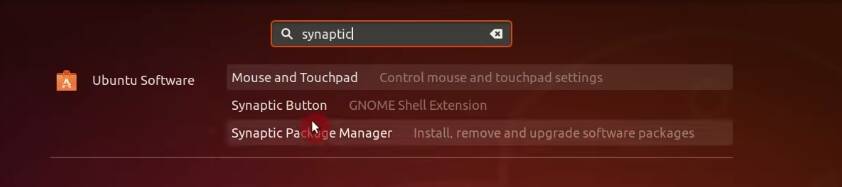
You can also install it from the Software Center. I show how to use Synaptic in the next thing to do after installing Ubuntu.
I also recommend you to install the apt-xapian-index package, which is a quick search engine for Synaptic.
4. Install codecs, MS fonts, flash, and other useful packages
Ubuntu has all basic packages installed by default. But it doesn’t include some non-free and restricted packages that may be essential for many users. For example, if you want to play specific video formats and use such fonts as Arial, Times New Roman, you need to install the packages listed below.
Install Codecs
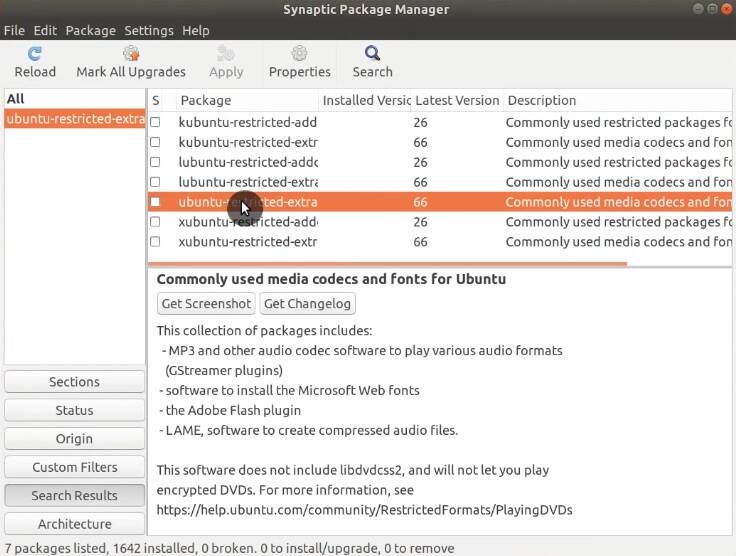
To be able to play all video and music formats, you need to install additional codecs. You can try to use Synaptic for that.
Open Synaptic, and in the Search field, type ubuntu-restricted-extra. Next, mark it for installation with the right mouse button and click Apply.
If you are going to play DVDs, then also install the libdvd-pkg DVD library.
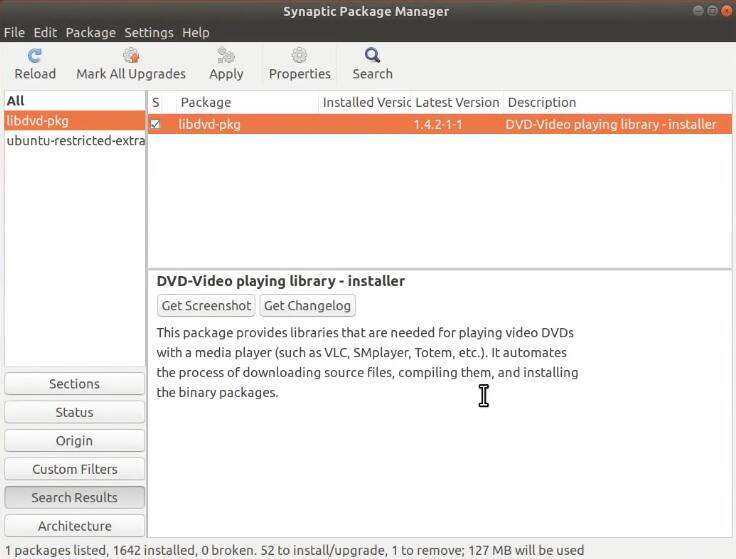
During the installation, the libdvd-pkg package will request to run one terminal command to complete the configuration.
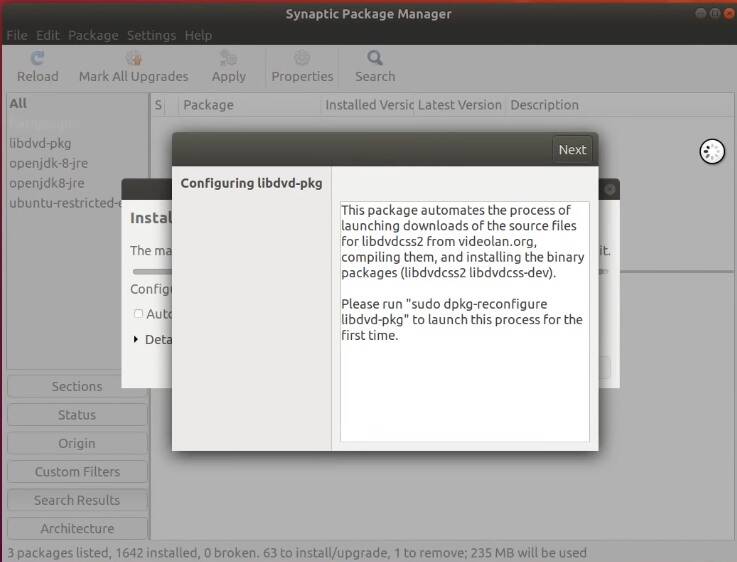
Copy the command that appears during the installation process as in the image above. Once the whole installation process is over, open a terminal and execute it.
sudo dpkg-reconfigure libdvd-pkg
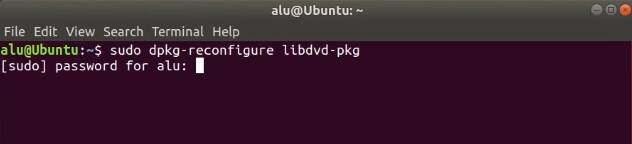
You should now be able to play all media files in your Ubuntu 18.04/20.04.
Install Microsoft fonts
When you open documents created in Microsoft Office, they may not look correct because they use Microsoft fonts. So, to fix this problem, you need to install Microsoft fonts in Ubuntu. If you are a new Linux user, you probably will also use these fonts often because they are more familiar to you.
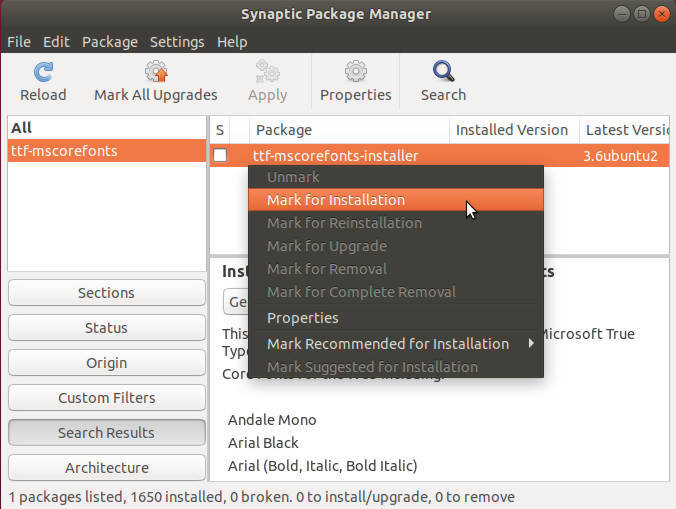
To install these fonts, install ttf-mscorefonts-installer through Synaptic.
Install Flash player
Flash player is considered to be a security risk nowadays. But there are still cases when you need to access some websites that use this outdated technology.
To install the flash player for your browser, search for flashplugin-installer in Synaptic and select it for installation.
Install Java
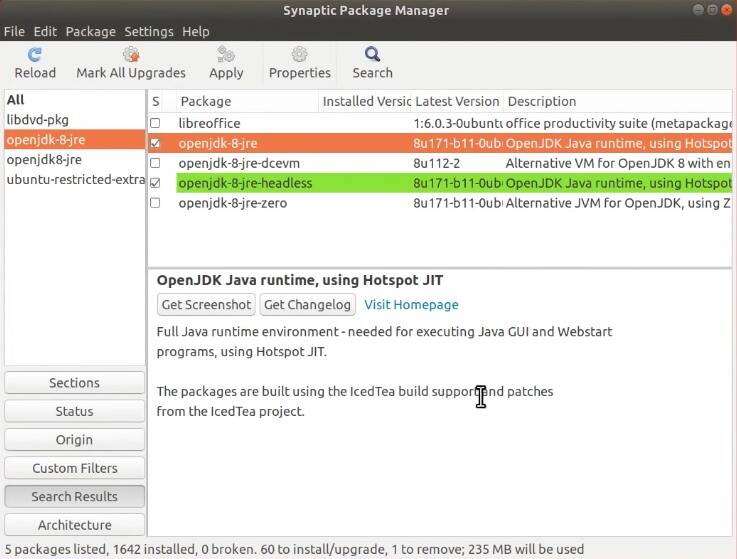
If you need to run Java applications, search for openjdk-8-jre and openjdk-8-headless packages in Synaptic and install them.
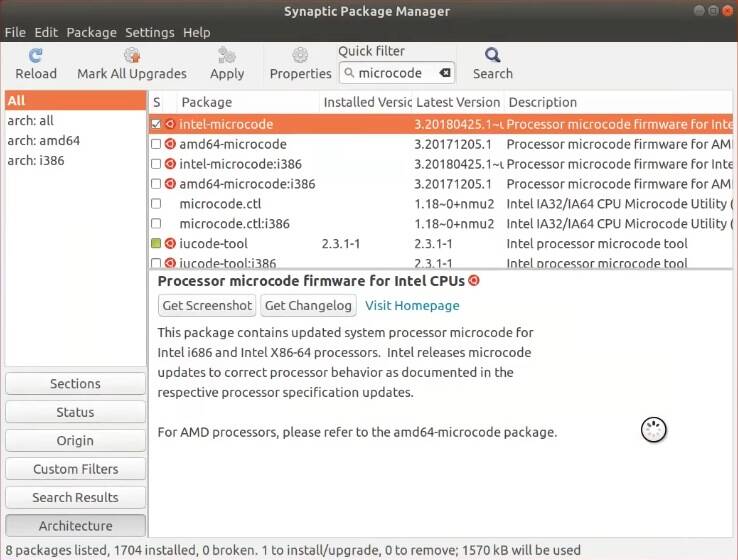
5. Install microcode
Microcode is the firmware for your processor. It is recommended to install for better performance and to receive the processor firmware updates.
Open Synaptic, and search for microcode. You will see two options:
intel-microcodeamd64-microcode
Choose one of them according to the type of your processor.
I have an Intel processor, that’s why I install the intel-microcode package.
6. Activate minimize to Dock
If you click on the icon of any application in the dock, it will not minimize. There are two ways to fix this issue:
- through the command line
- with a graphical program
With the command line way, you only have to open a terminal and run:
gsettings set org.gnome.shell.extensions.dash-to-dock click-action 'minimize'
To do the same graphically, you must install the dconf-editor package through Synaptic.
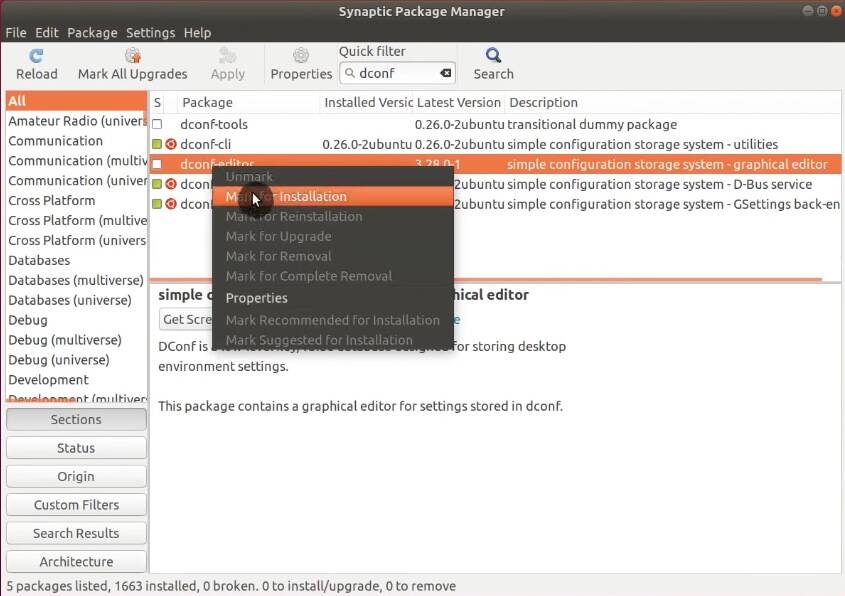
Open Dconf-editor, go to org → gnome → shell → extensions → dash-to-dock. Scroll down until you find click-action and switch off the default value and select minimize.
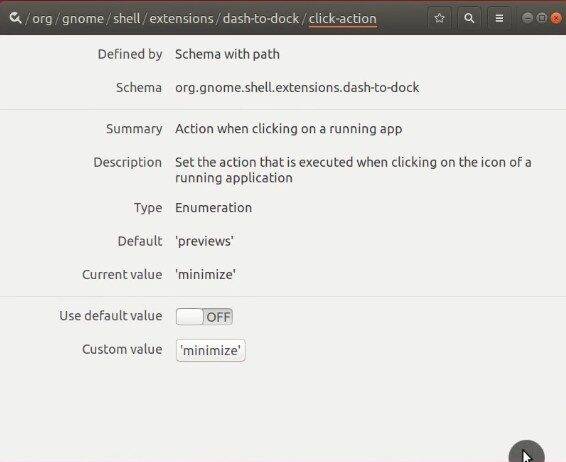
After you apply this setting, applications will minimize when you click on their icons in the dock. On the second click, they will maximize. This is way better than the default behavior.
7. Decrease Swap use
Swap is the space on your hard drive that is used to store the data when there is not enough RAM. RAM is faster than your hard drive, so it is better to use it at maximum and reduce swap use. By default, Ubuntu has a balance swappiness value of 60, but you can force the system to use as much RAM as possible and write to the disk only when most of the RAM is in use.
To check your current swappiness value, run in a terminal:
cat /proc/sys/vm/swappiness

Next, decrease the default value. Open the configuration file:
gedit admin:///etc/sysctl.conf
Scroll down the file and add this line at the end:
vm.swappiness = 10
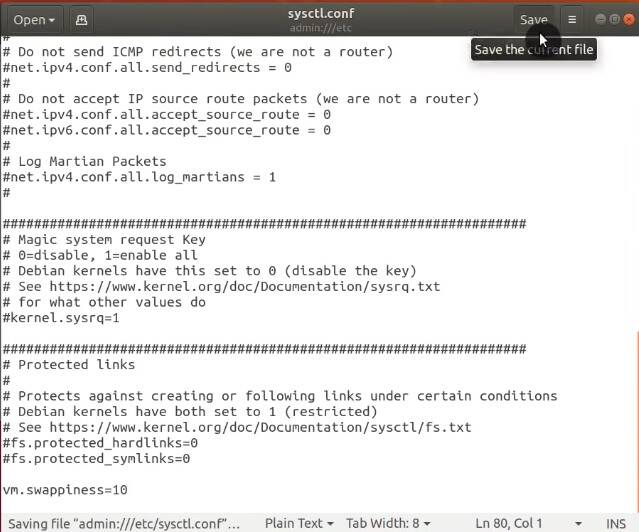
Save the changes and restart your computer. Now, your Ubuntu will start writing files from RAM to a hard drive only when the RAM use reaches a high level.
8. Enable Drive Cache
Usually, the program waits until the data is written to the disk and it proceeds to the next step only after the write event. However, you can force your programs to cache the data and write it to the disk with some delay. This can considerably improve the performance of your system. But there is a small risk of losing data if your computer experience power outage. I think this option is safe for laptops, but if you use a desktop and experience a frequent power outage, maybe you better skip this step.
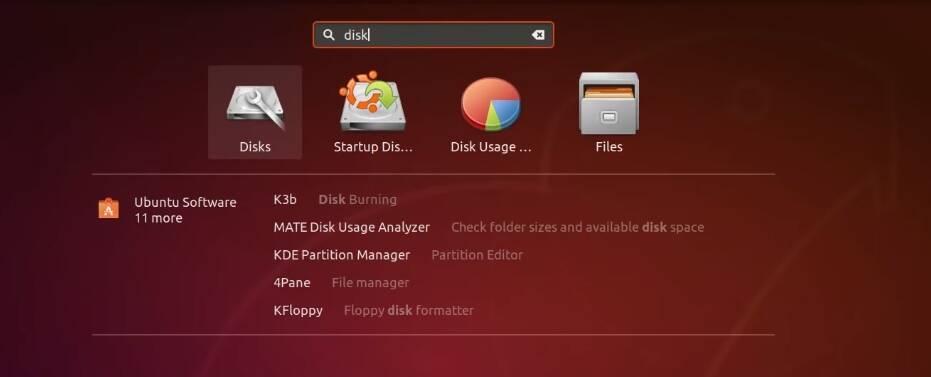
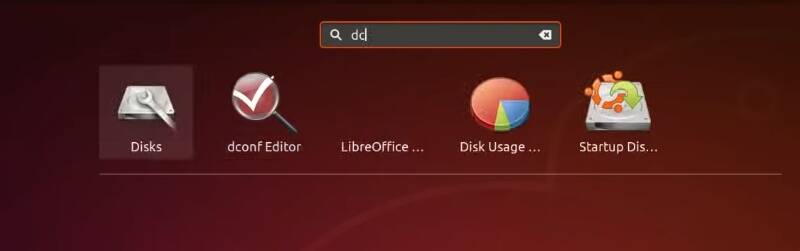
To enable the hard drive cache, open the Disks application from the menu.
Select the disk where Ubuntu is installed, go to the Drive settings menu and enable Write cache:
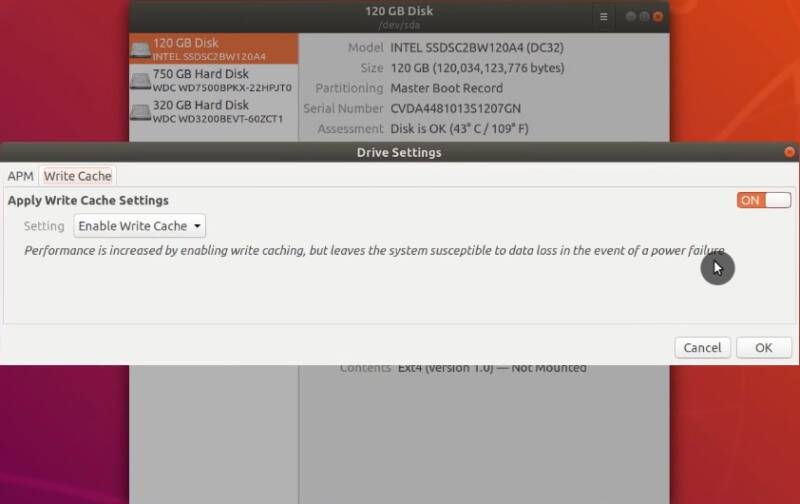
This should slightly improve the performance of your hard drive.
9. Reduce SSD Writes
Two things are necessary for good performance and a longer lifespan of an SSD drive. The first thing is Trim and the second is to reduce write cycles.
Ubuntu 18.04/20.04 already has trim enabled, so there’s no need to do anything.
However, the write to SSD cycles is not reduced by default. But, there is an option to enable it.
Run in your terminal:
gedit admin:///etc/fstab
Find your SSD partitions, likely it is the partition that has sda in its name. Find the right partitions based on their size. And add noatime before the word errors. But DON’T do it for the Swap partition.
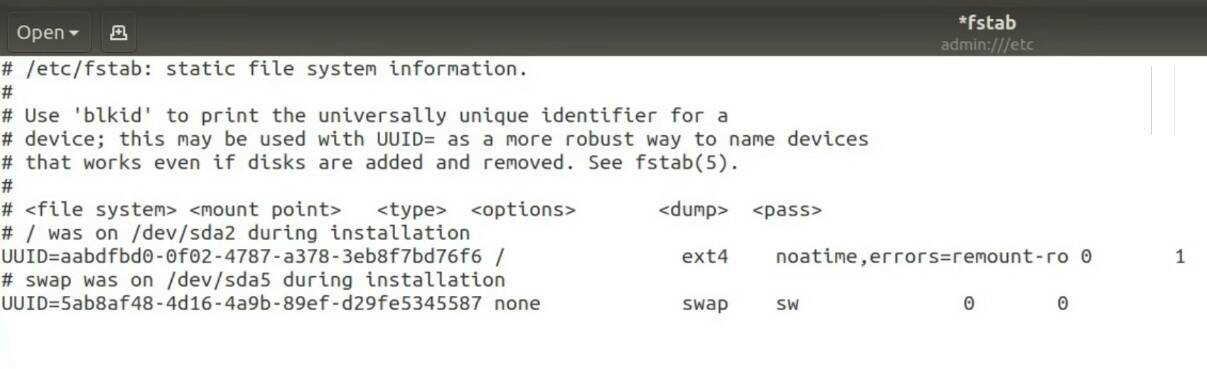
Save and close the file. Write to SSD cycles will be reduced.
10. Set up Firewall
Ubuntu is already secure and activating a firewall is not an essential security measure. However, it is better to be extra safe. Besides, a firewall uses little resources of your system.
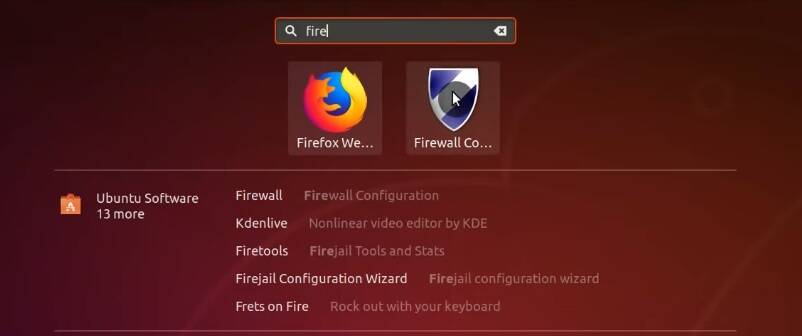
Open Synaptic and install the gufw package.

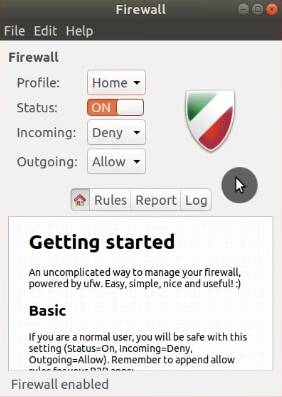
Once installed, open it. During its launch, you will be prompted for your password.
The settings are simple. You just need to enable it. This should be fine for most of the users.
Although if you needed to make a new rule, you can add them in the Rules tab. For example, you may want to use KDE Connect, select it among the applications, mark it with Allow and Both Directions.
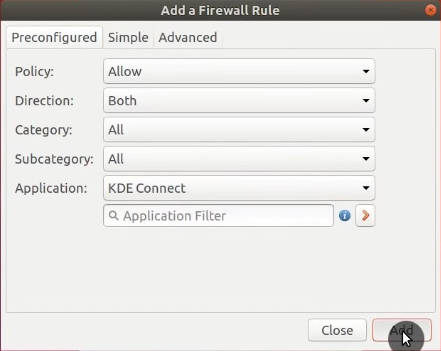
The process is the same for other applications.
11. Configure Ubuntu settings
This section shows how to configure a few things after installing Ubuntu 18.04/20.04 to improve the desktop experience.
Ubuntu Dock
If you do not like the default look of Dock, you can configure it in the Ubuntu Settings:
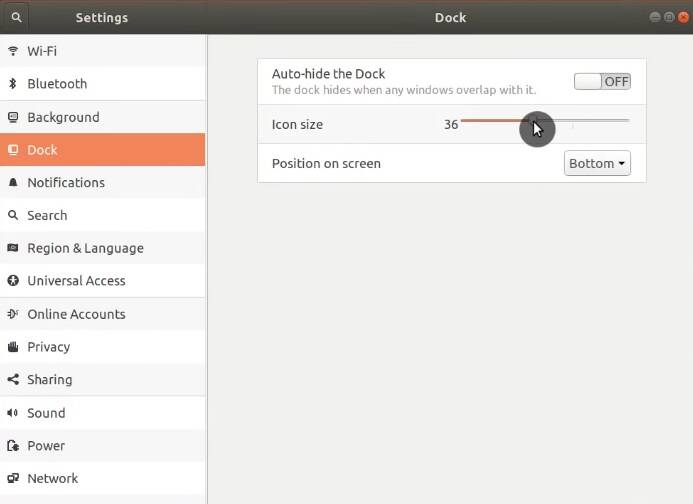
You can move the dock panel to the bottom and also decrease or increase its size.
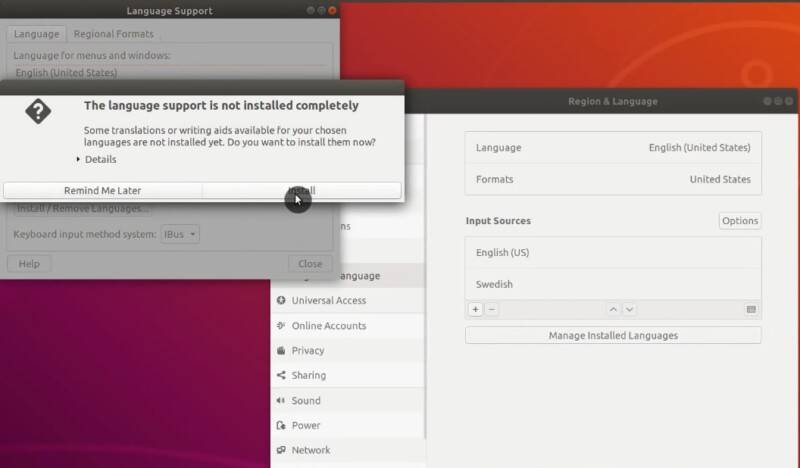
Languages
If you need any additional input languages, go to the Region & Languages tab and add it:
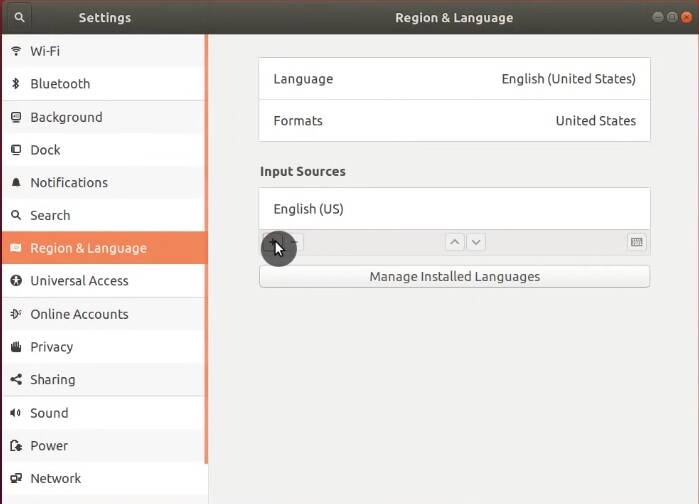
In the options, I recommend setting different inputs for each window.
Also, click on manage installed Languages and install the necessary packages.
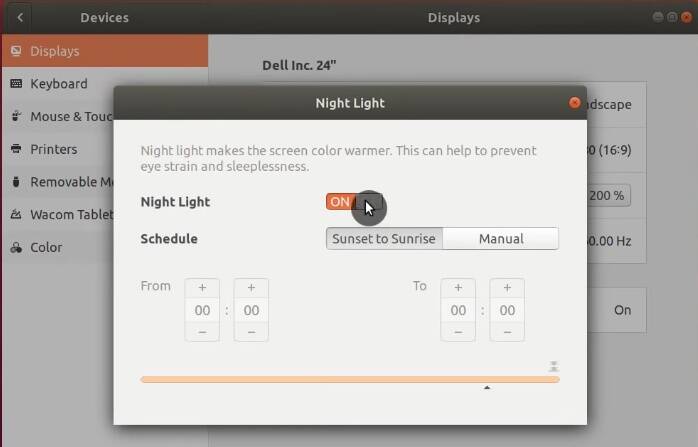
Night mode
Night mode will reduce the amount of blue light at night time. In other words, it is great for your eyes and sleep. To enable it, go to Devices → Display and activate the Night mode option.
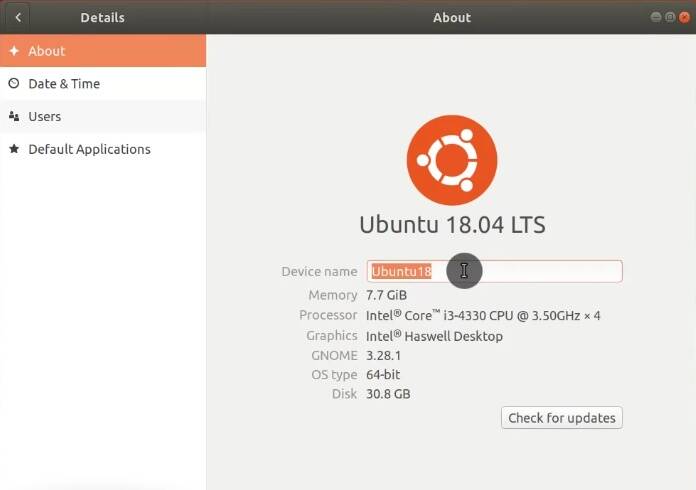
Change the name of your Ubuntu computer
If you do not like the name of the computer you assigned during Ubuntu installation, you can change it. Go to the About tab in Settings and type the new name of your computer.
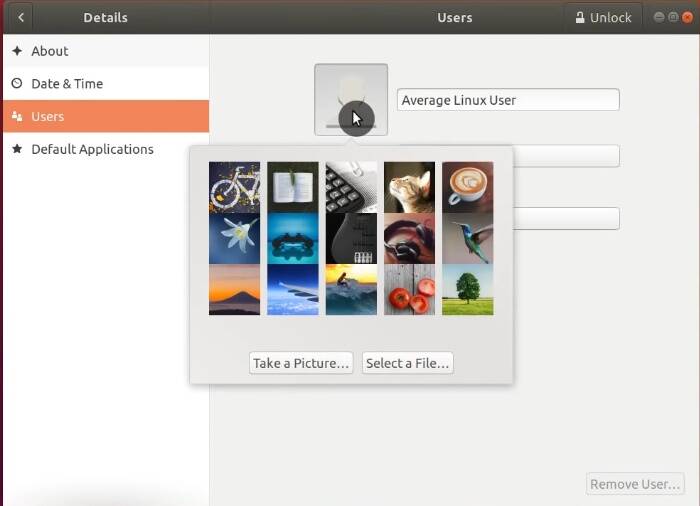
Set your profile picture
It is also nice to have a profile picture. To add, go to the Users section in the Details tab and add a picture:
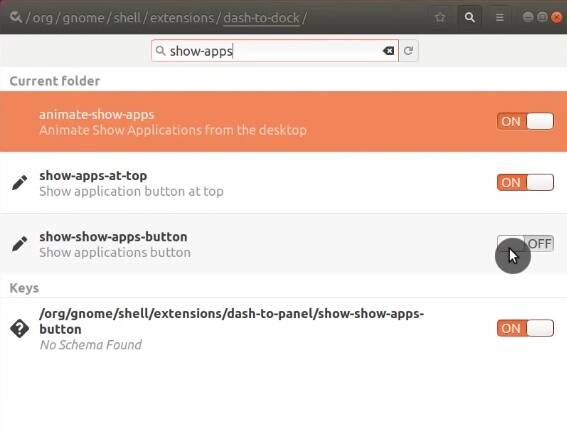
12. Move Applications menu in Dock
If you moved the Ubuntu Dock to the bottom, the location of the application menu is not the most convenient (on the right). I suggest to move it to the left.

To move it to the left or up, depending on where your panel is, open Dconf-editor.
Go to Org > Gnome > Shell > Extension > Dash-to-dock. Search for Show-apps-at-top and turn it on.
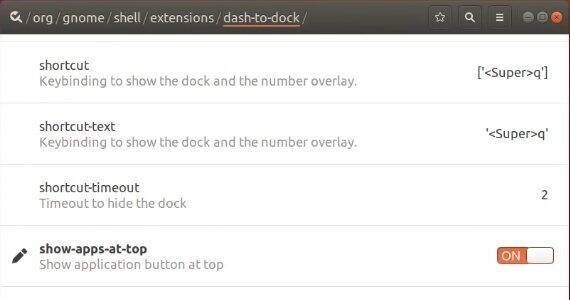
And your Applications button will move to the left side which is a more traditional place.
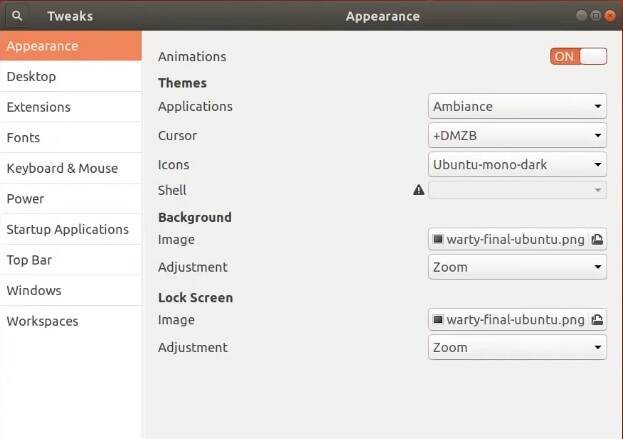
13. Install GNOME Tweaks
If you want to modify your GNOME desktop, you need to install GNOME Tweaks. It may greatly improve your Ubuntu experience.
Search for gnome-tweak-tool in Synaptic.

If you open Tweaks, you will find many useful settings for the GNOME desktop. For example, you can change themes, modify system fonts, or configure the energy management. You are welcome to explore these settings. You will also see some of these settings later in this list of things to do after installing Ubuntu 18.04/20.04.
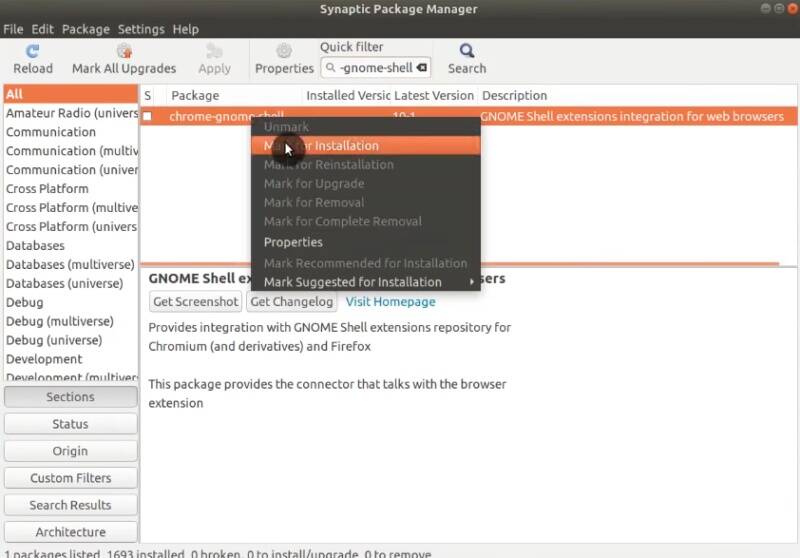
14. Install GNOME Extensions
You can search and install GNOME Extensions trough the Ubuntu Software Center. But if you enable the installation from the Gnome Extension website, you will have access to more extensions.
To enable the installation from the extensions website, install the chrome-gnome-shell package in Synaptic.
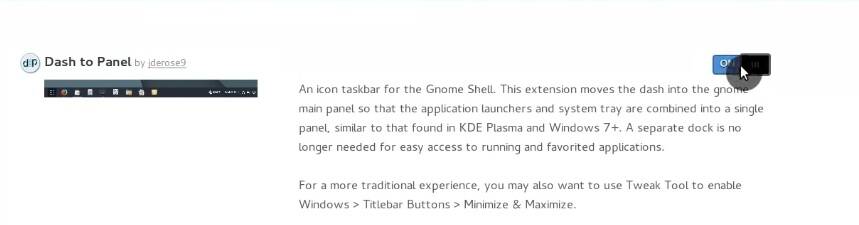
Next, go to the Gnome Extension website and search for extensions you like.
For example, you can try installing Dash to Panel. You will be requested to install the browser extension extensions.gnome.org. Click Allow, next Add and finally Ok.

Now, enable Dash to Panel extension:
Once the new extension is enabled, you will see it in action automatically.
If you don’t like an extension, you can disable it from GNOME Tweaks.
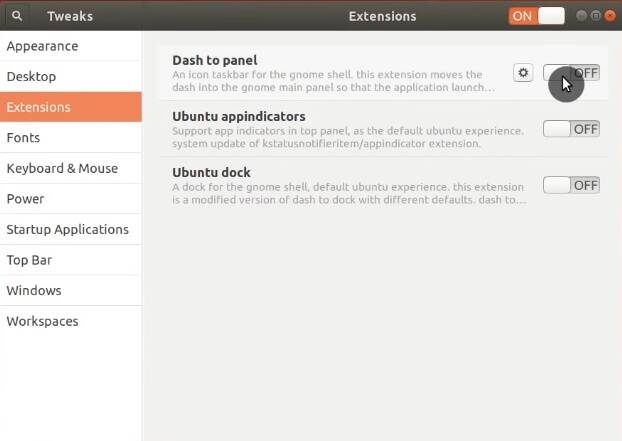
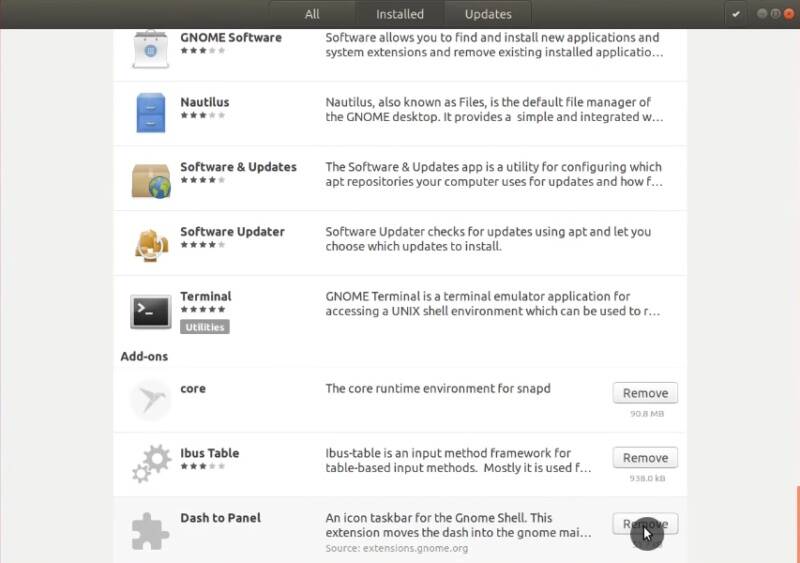
To uninstall any extension, you open Software Center → Installed → Scroll to the end and remove extensions you don’t like.
15. Install Arc Menu
Arc Menu is another GNOME Shell extension, and it’s a more traditional menu. You may like it much more than the default Ubuntu Dash.
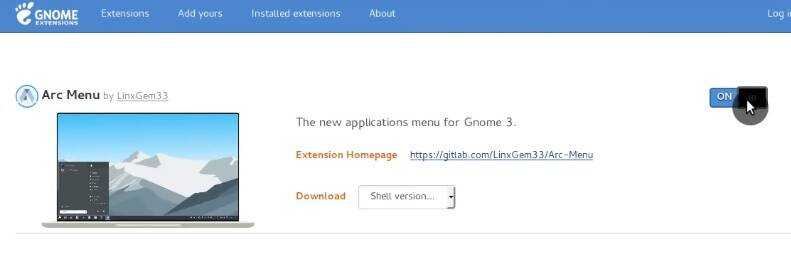
This is how it looks like:

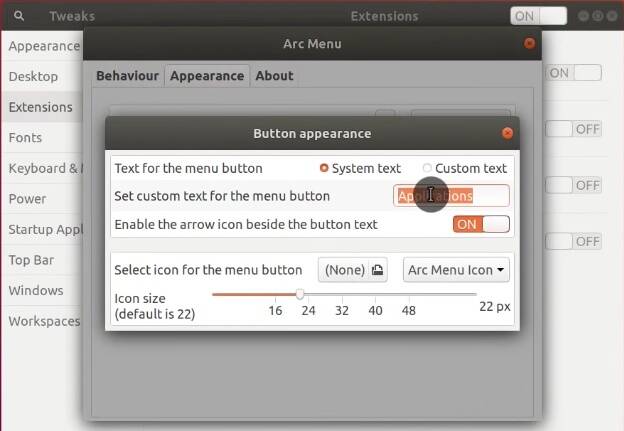
You can go to GNOME Tweaks and change its settings.
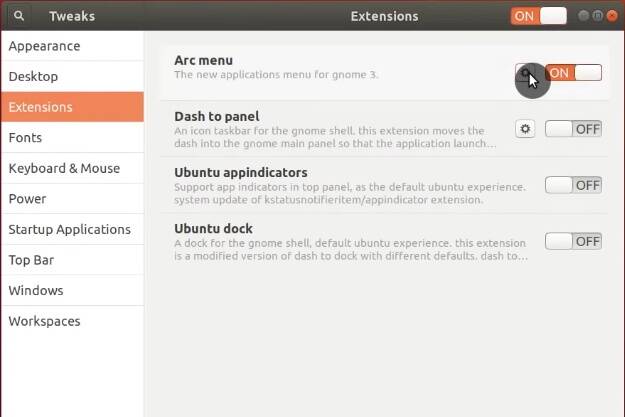
For example, you can change its appearance.
If you still have the Dashboard application menu in the bottom panel. To remove it, open Dconf-editor. Go to Org → Gnome → Shell → Extension → Dash-to-dock → disable Show-apps-button.
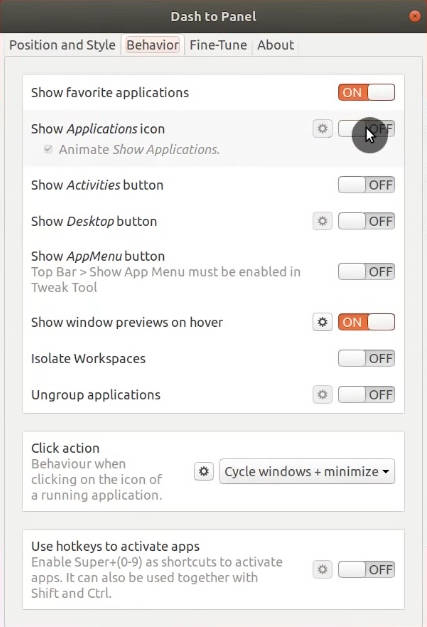
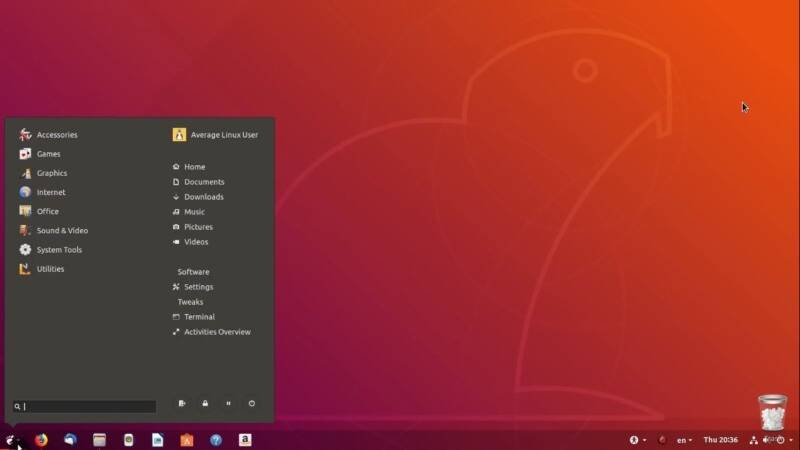
You can also integrate this Arc menu with Dash to Panel. To that end, open GNOME Tweaks, and enable Dash to Panel extension. In the setting of Dash to Panel, go to Behavior tab and disable the Application icon.
Your desktop will look like this with Arc menu and Dash to Panel extensions:
16. Install additional themes
Ubuntu is a very customizable operating system, that is, you can install many themes and change Ubuntu’s appearance.
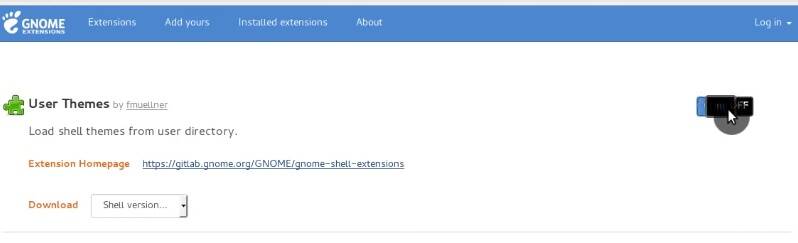
First, you have to install User Themes GNOME Shell extension from the web and you will be able to install other themes.
Add theme repository
For example, you can try Flat Remix theme. Open Synaptic, go to the settings of the repositories. Then, other software tab and here click add and paste this repository address.
ppa:daniruiz/flat-remix
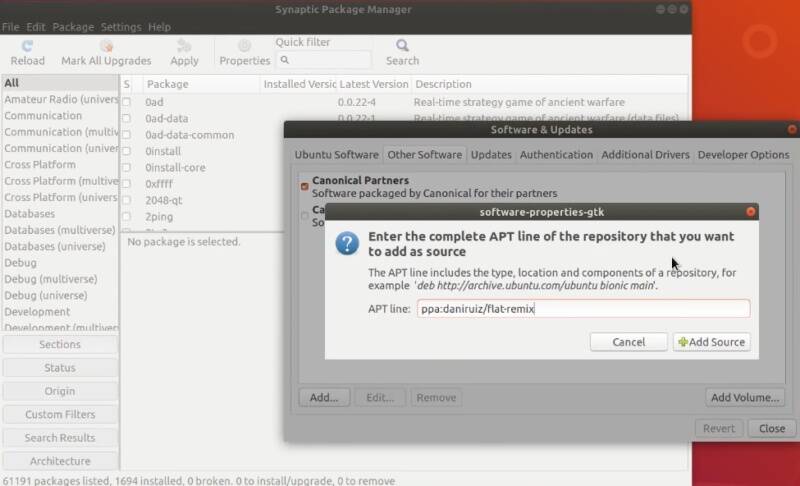
When you will be asked to reload packages cache, do so.
After that, search for flat-remix package in Synaptic and install flat, flat-remix-gnome and flat-remix-gtk.
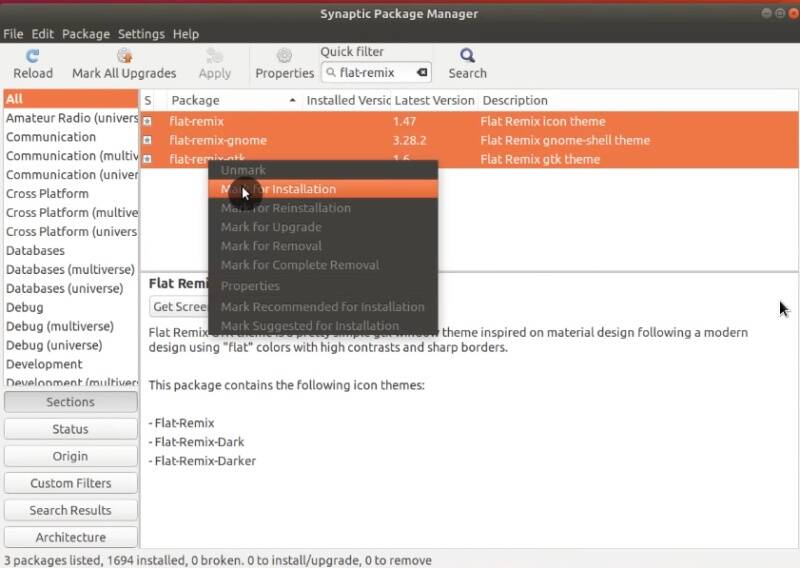
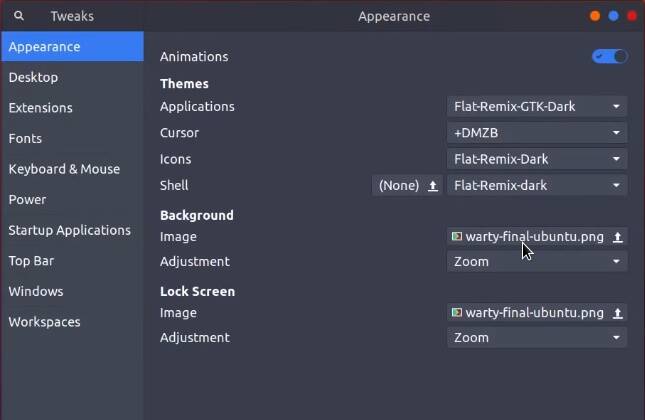
Close Synaptic and open Tweaks. Now, you should be able to select Flat remix theme among the available themes.
Install theme from DEB package
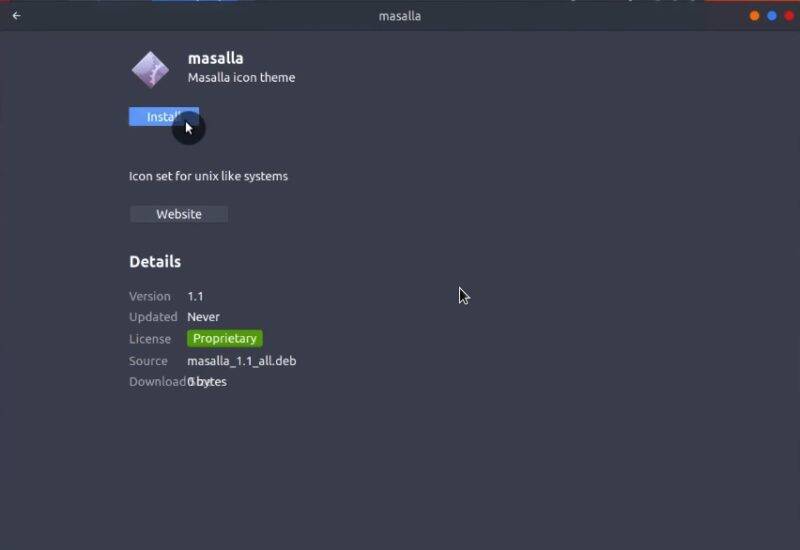
There are many more themes on the website gnome-look.org. Some of these themes are available as DEB packages. For example, Masalla icon theme.
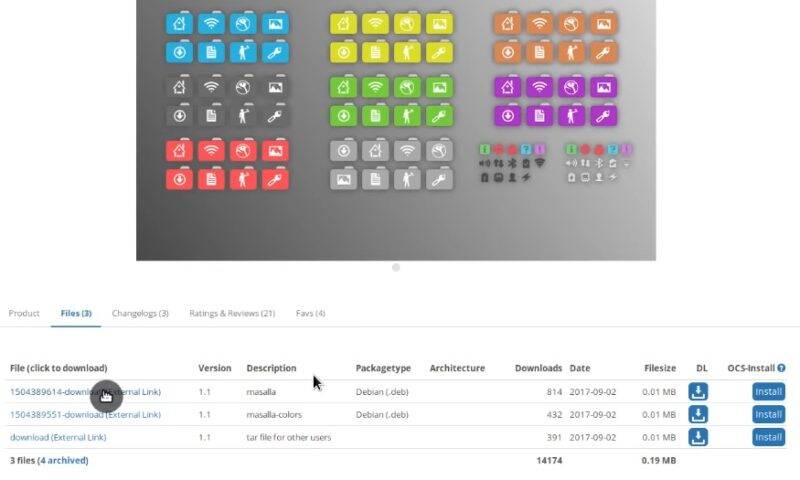
Download masalla-colors_1.1_all and masalla_1.1_all packages. You can install such DEB packages simply by double-clicking on them and installing through the Software Center.
Install theme from tar.gz
You can also find some themes in a tar.gz archive. For example, Gnome-OSC theme. Download it.
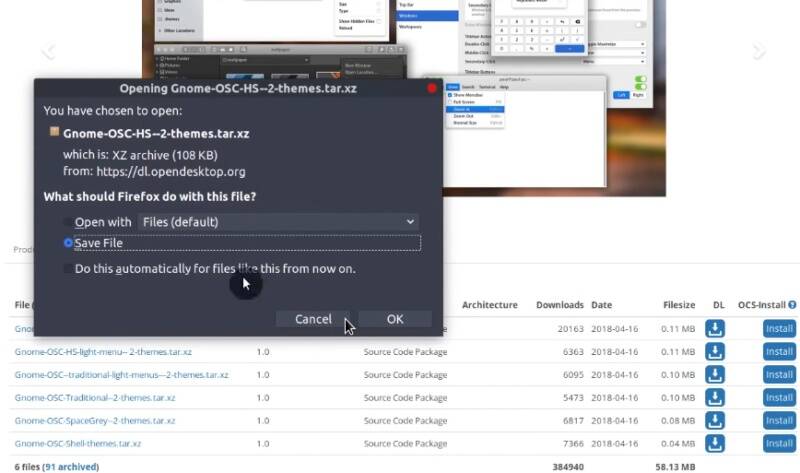
Extract the archive with the right click on the archive and select Extract here. Then, copy the content of the extracted archive. Go to your home folder and show hidden files through the menu.
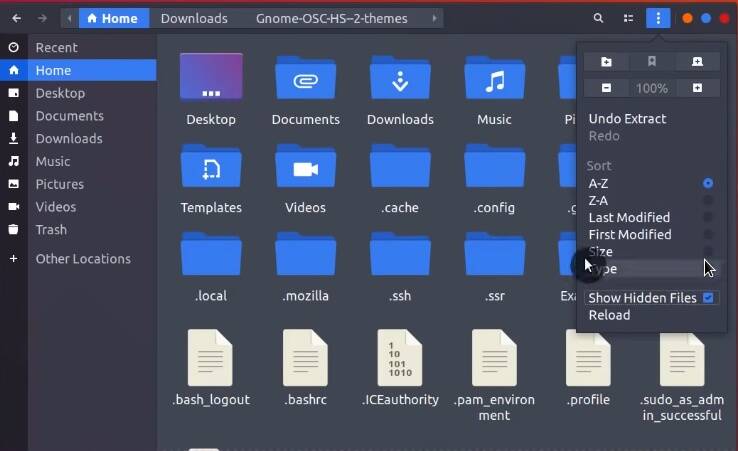
And place them into the .themes folder. If you don’t have such a folder, create it.
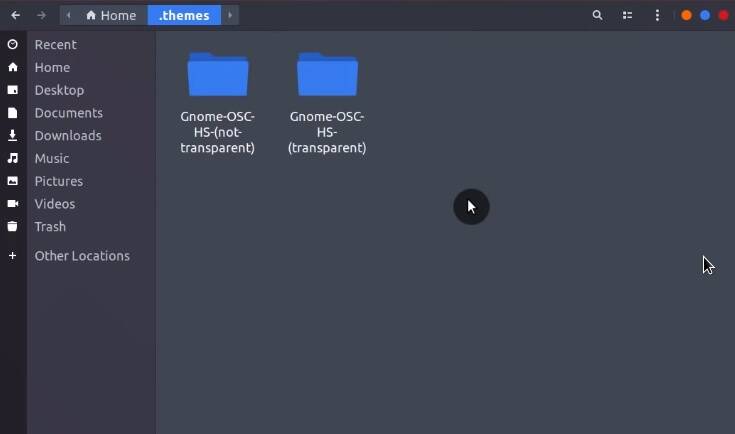
This newly installed theme should become available in Tweaks.
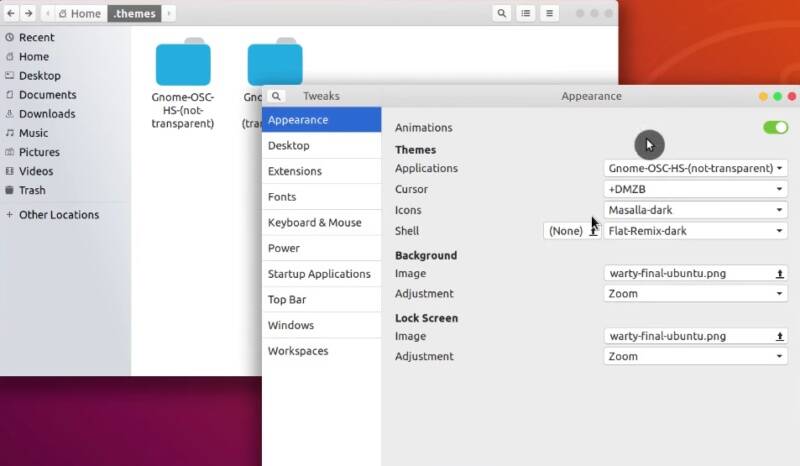
Similarly, you can install Shell themes. Just place it in the .themes folder and then activate from GNOME Tweaks.
To install icons, and cursor themes, you extract them into the .icons folder, then apply the change in GNOME Tweaks.
You can read a more detailed post about how to customize themes, icons, and layouts of Ubuntu 18.04/20.04.
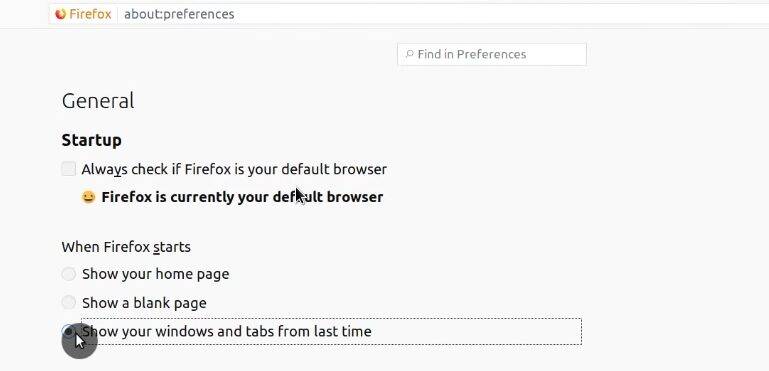
17. Change Firefox Settings
There are two things I always do to improve the Firefox browser experience.
First, Open Preferences, in the section, When Firefox starts, enable Show windows and tabs from last time. With this option every time Firefox starts, it will show the tabs you had open before closing it.
Next, modify the Firefox panels. Click on the Firefox main panel and select Customize and add the Search field.

This search field works better than the URL/Search bar. For example, if you type an email address in the URL bar, it will open the email application instead of searching for this email address online. Whereas the search field will perform the search.
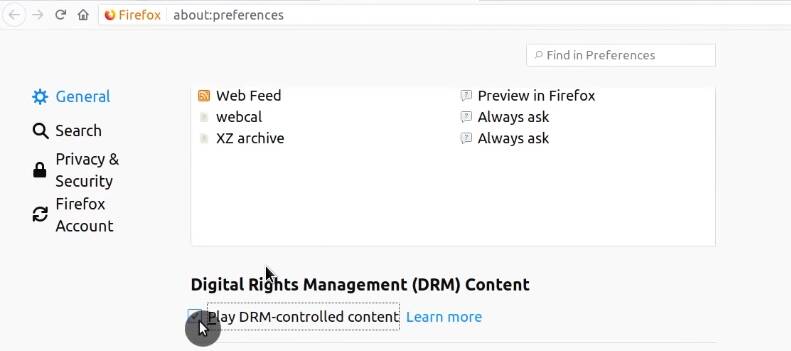
18. Enable Netflix support in Firefox
By default, Firefox does not support video playback from Netflix. Luckily, this can be easily fixed.
Navigate to Firefox Preferences and search for DRM. Activate the Play DRM-controlled content checkbox.
Close Firefox, and go to Synaptic. Search for libavcodec-extra package, and install it.

With this, you can enjoy Netflix in Firefox without any problems.
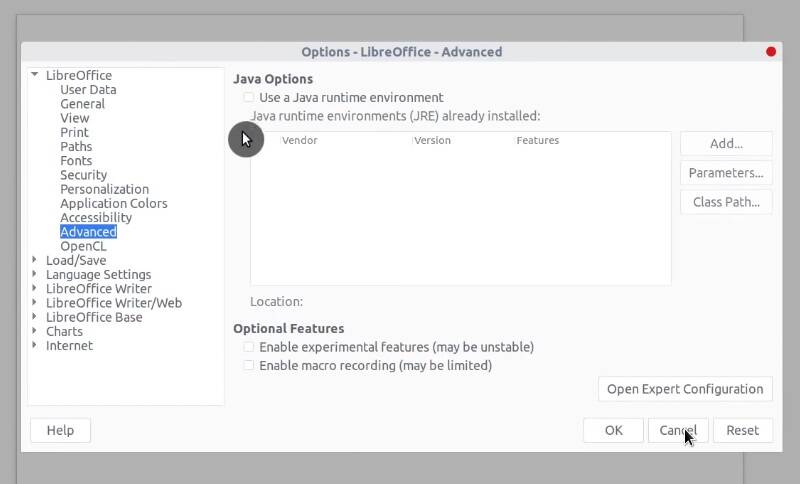
19. Tweak LibreOffice
Speed up LibreOffice
You can speed up the open process for LibreOffice by disabling Java. Go to Tools → Options and disable Use Java run-time environment in the Advanced tab.
Change LibreOffice look
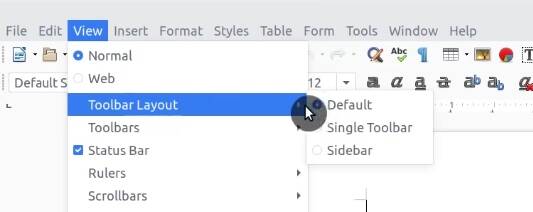
You can also change the panel view of LibreOffice. Go to View → Toolbar Layout, you will see three options Default, Single Toolbar, and Sidebar. Of the three, I prefer Single Toolbar. Try them and choose the one you like.
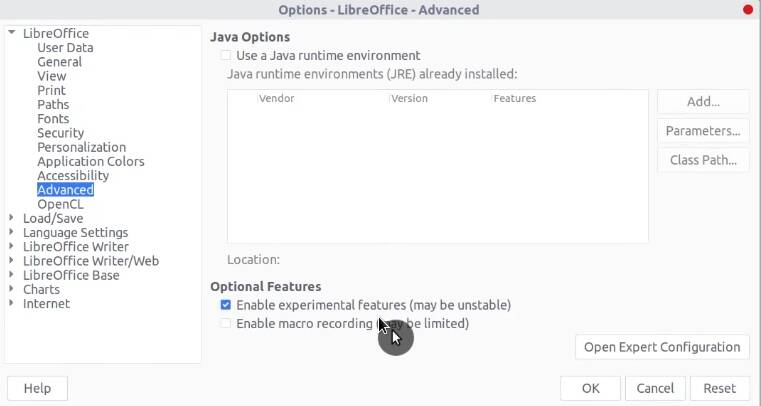
Some users may prefer the Ribbon layout of LibreOffice, i.e. Microsoft Office-like look. You can activate it by going to the menu Tools → Options → Advanced → check Enable experimental features.
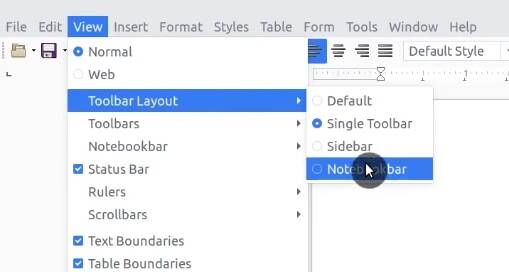
Restart LibreOffice. Go to View → Toolbar layout and select Notebook.
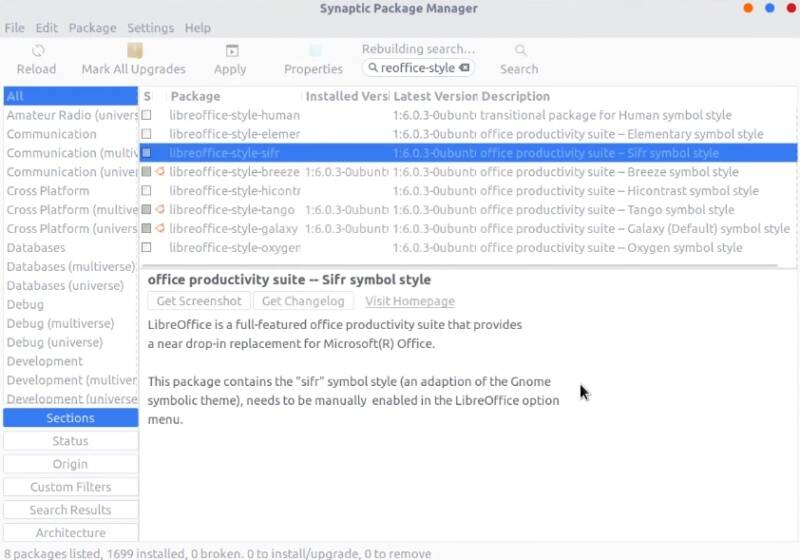
Finally, you can also change the icons of LibreOffice. Open Synaptic and install libreoffice-style-sifr package.
After the installation, open LibreOffice, go to Options → View and select Sifr in the Icon style dropdown menu.
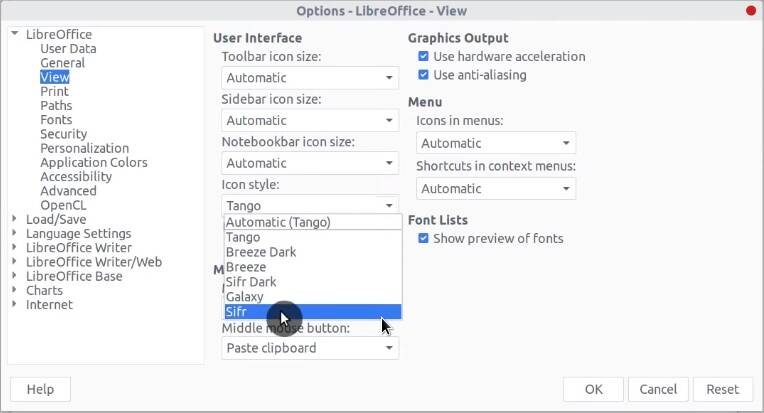
LibreOffice with Sifr icons will look like this:

20. Enable Google Drive Integration
Ubuntu has built-in Google Drive integration. To enable it, you need to go to Settings → Online accounts → click on Google.
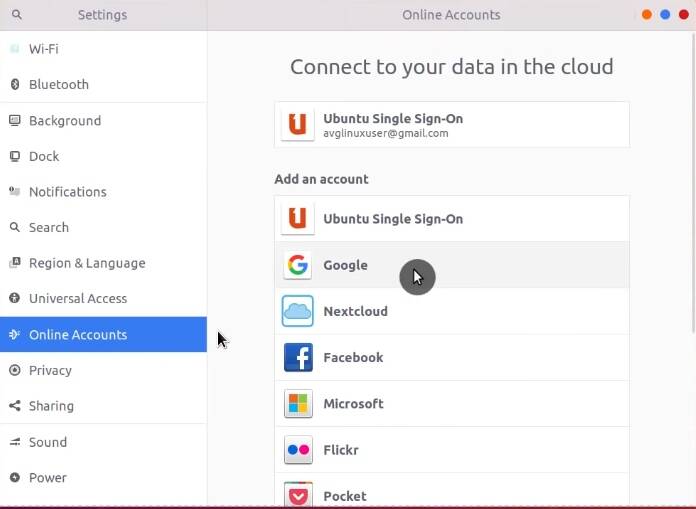
Type your username and password. Next, give it permission to access your data.
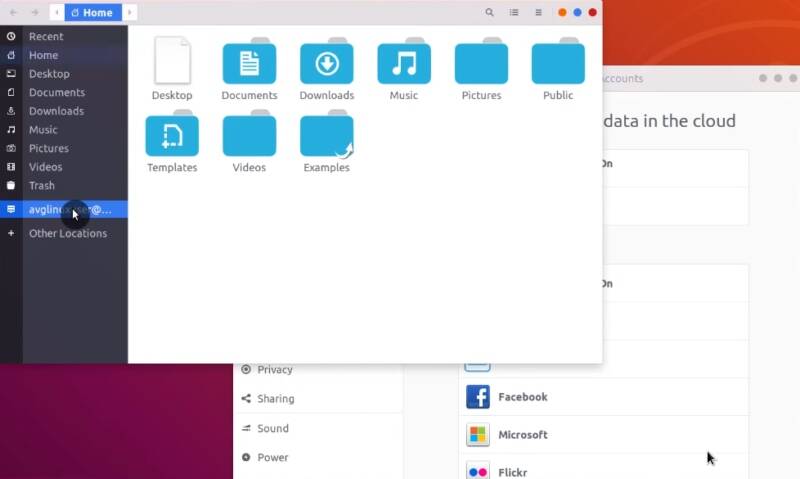
Now, your Google Drive is available from the left panel of your file manager. If not, try to reboot your system
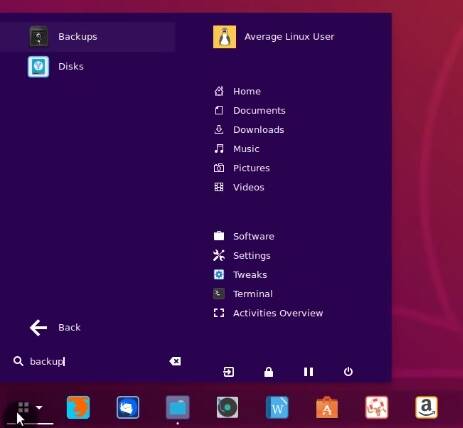
21. Schedule Backups
It is essential to make regular backups of your system. Ubuntu already has a simple backup program. Open Backups from the menu.
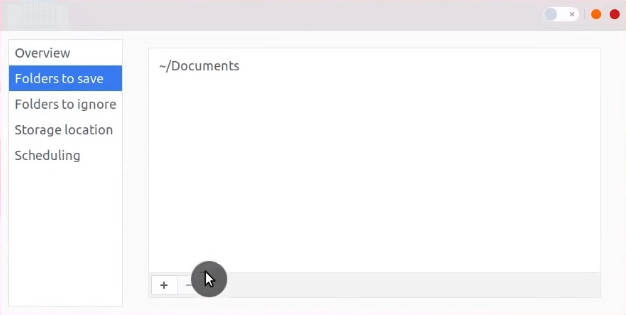
In the Folders to Save section, you can define what folders to back up.
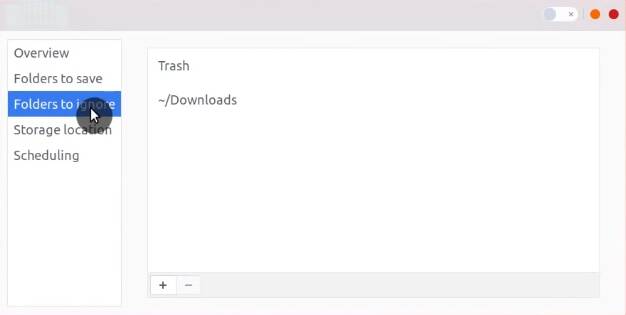
The application also lets you set which folders to exclude from the backup in the Folders to ignore section.
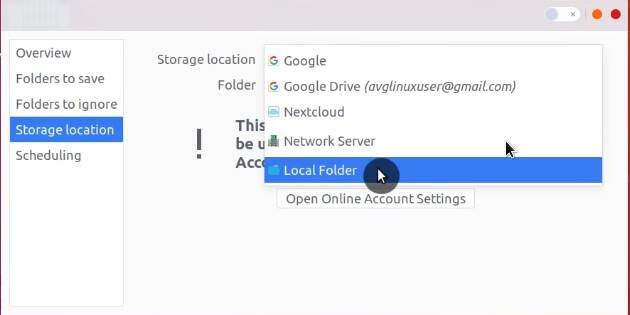
In Storage Location you can choose where you want to back up. You can use Google Drive, Nextcloud, Network Server, or a local folder.
If you configured online account or your local storage is permanently connected to your computer, it makes sense to configure the backup schedule.
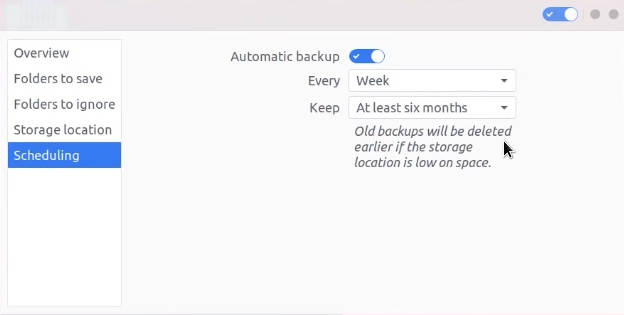
If the program asks you to install additional packages, install them. You can also encrypt your backup with a password.
After these few steps, automatic backup is configured. If you want to be little more advanced, you can also make backups with rsync.
22. Remove unnecessary software
Removing unnecessary programs will make your system lighter. Open the Software Center and go to installed applications and uninstall all programs you don’t need. For example, I uninstall all the games.
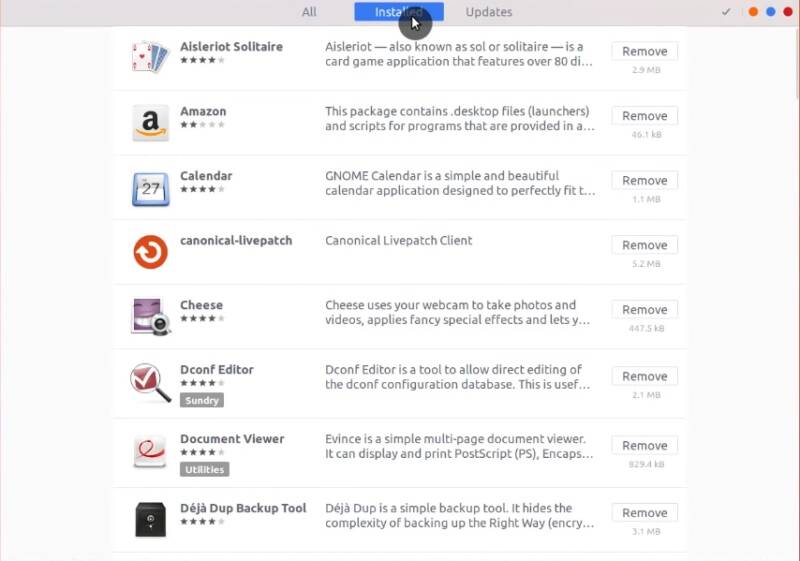
If you are an experienced Linux user, you can remove even more packages through the Synaptic package manager. For example, you can remove Bluetooth packages if you don’t have Bluetooth.

But be very careful. You may uninstall some crucial packages as dependencies. So, if you are unsure, do not remove anything from Synaptic.
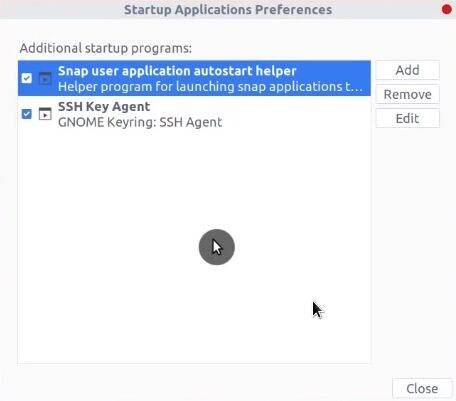
23. Turn off startup applications
I recommend reducing the number of programs your system runs at startup. It will speed up your boot time and make your system lighter.
Search for Startup Applications in the menu and open it. As you can see there aren’t many applications. This is because most of them are hidden.
To show all startup applications in Ubuntu, run this command in the terminal:
sudo sed -i 's/NoDisplay=true/NoDisplay=false/g' /etc/xdg/autostart/*.desktop
After that, you will see the Startup Applications menu loaded with programs.
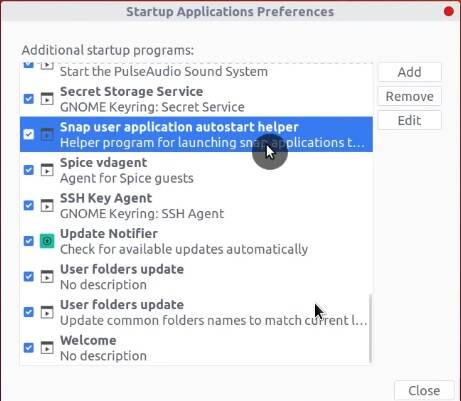
You can disable some of them if you don’t need them. For example, I disable the Orca screen reader.
Remember, the fewer applications are running at startup, the faster your system boots. However, if you are not sure which applications to disable, leave them that way to avoid creating instabilities.
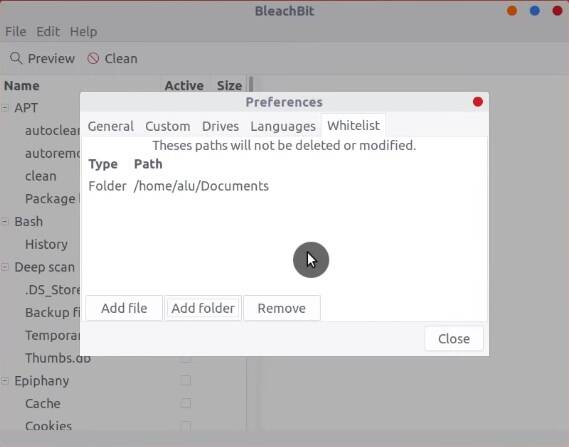
24. Clean system (Bleachbit)
Any operating system gets filled useless files over time. To keep your system clean, you can install Bleachbit.
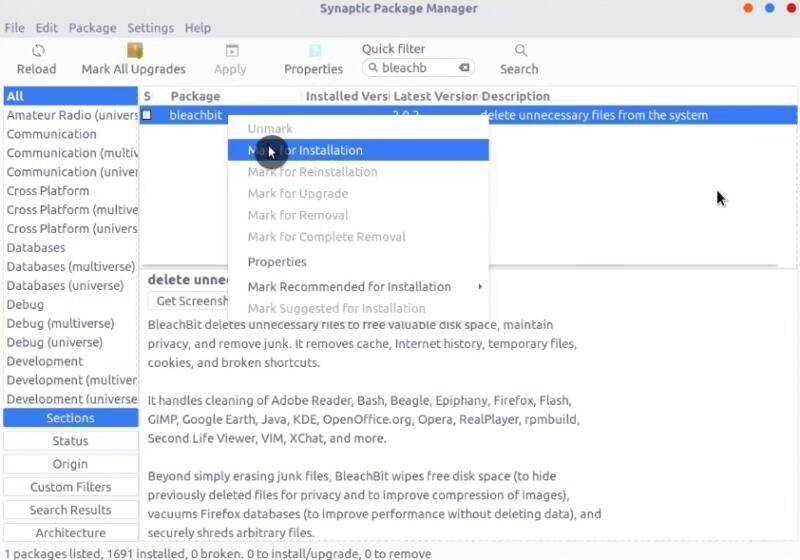
You can tweak its setting. For example, the whitelist will be very useful if you don’t want to remove files from a specific location ever.
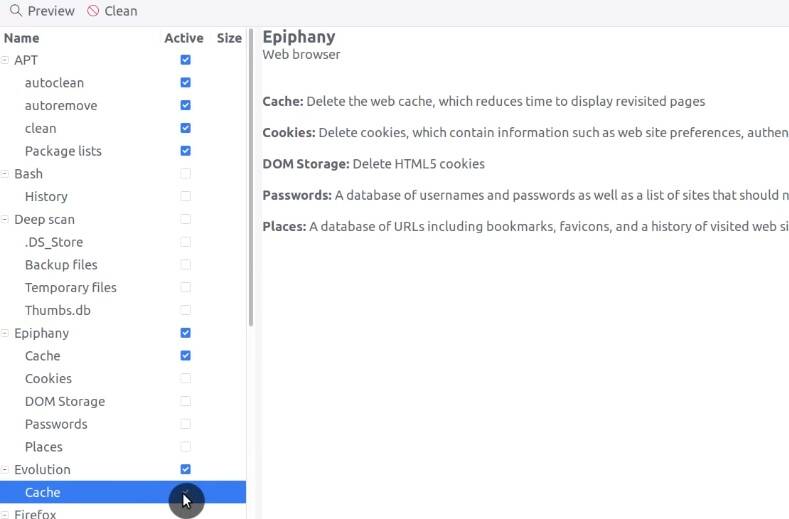
In the panel located on the left side, you choose what you want to clean. It is a good idea to select all APT options. APT is a software manager backend.
You can also delete cookies from your browser as well as the cache of installed applications.
Next, perform this cleaning.
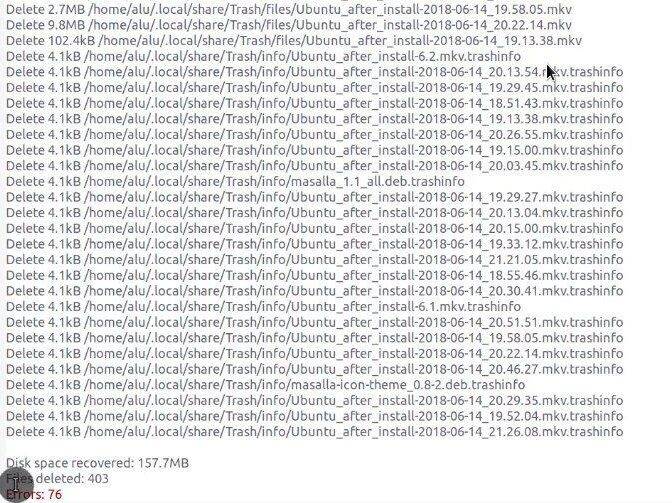
You can see how much space has been cleaned.
If you see Permission denied errors when running Bleachbit, it is because it needs root privileges to perform these cleaning tasks. To fix this error, open Bleachbit (as root) from the Menu.
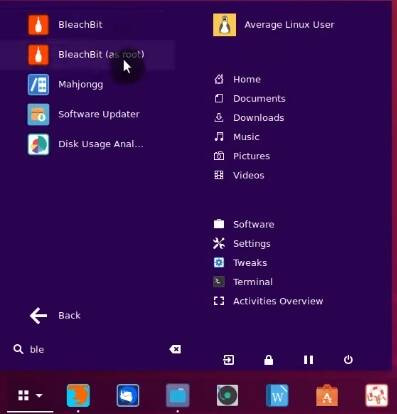
And perform APT cleaning again. It should work.
25. Install VLC
VLC is probably the best video player not only in Linux but even in Windows and Mac. It plays all formats and it has a simple interface. Moreover, you can even extract images from a video with VLC and then make a GIF from them.
You can install VLC through Synaptic, but I want to show you another graphical way to install programs in Ubuntu. You probably didn’t know about it.
Type in your web browser: apt://vlc. Press enter. Select AptUrl.
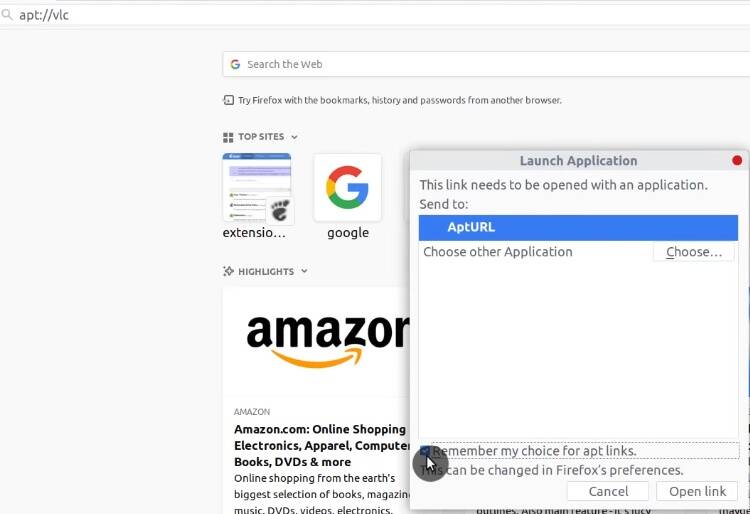
You can see in the description of what is going to be installed. Install VLC.
With VLC you can get the incredible flexibility to play multimedia files. If you want, you can modify its appearance. It also has an equalizer that you can adjust as you like. VLC even has some less known features.
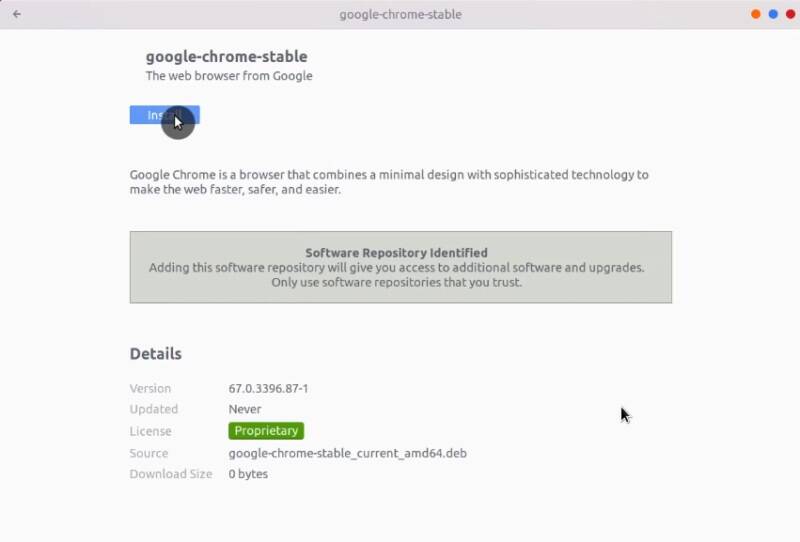
26. Install Google Chrome
I know that some users prefer Chrome over Firefox. There are some valid reasons for this. To install it go to the Google Chrome website and download the deb file.
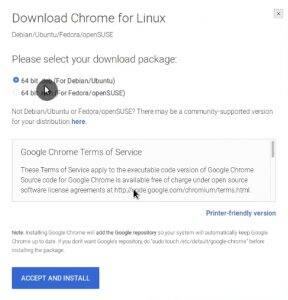
You can install this deb file by double-clicking on it. The Software Center will open automatically and offer you to install Google Chrome:
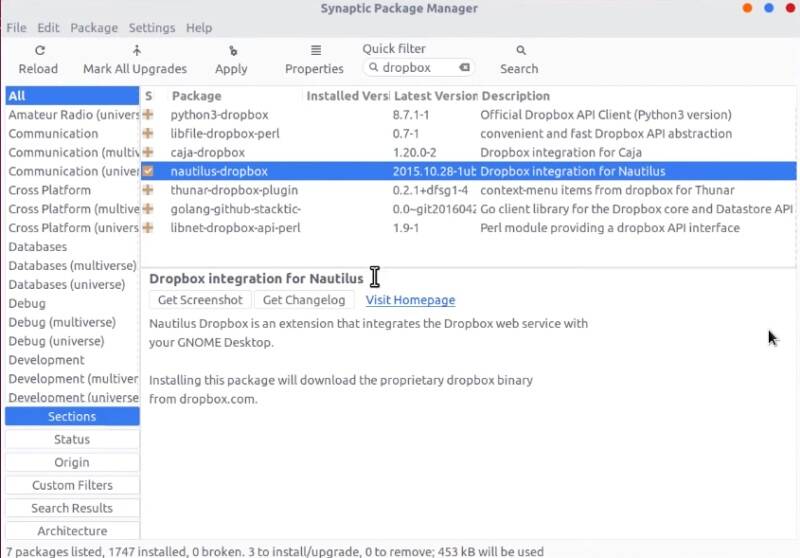
27. Install Dropbox
Dropbox is a very popular cloud syncing application. Many people around the world use it. If you still don’t have a Dropbox account, you can sign up here.
To install Dropbox in Ubuntu, open Synaptic and search for Dropbox. And install nautilus-dropbox package.
After the installation, you can start Dropbox from the menu. It will ask you to *install proprietary packages. Agree to Install them.
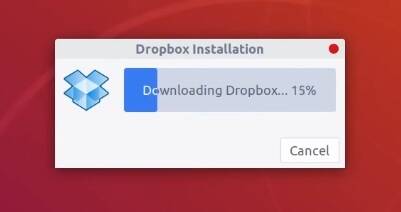
When the installation is completed, a sign in web-page will open. You can also see the Dropbox icon in your system tray. It is already running, you only need to sign in with your account to start syncing.
After you have signed in, you should see the message8 that your computer is linked with your account. The Dropbox icon should change to a syncing icon after that.
28. Install Skype
Skype is getting less popular but it is still widely used especially by new Linux users. Fortunately, Skype for Linus has improved lately. So, you can install it from the Software Center.

Your Skype should be available on the menu. Open it.
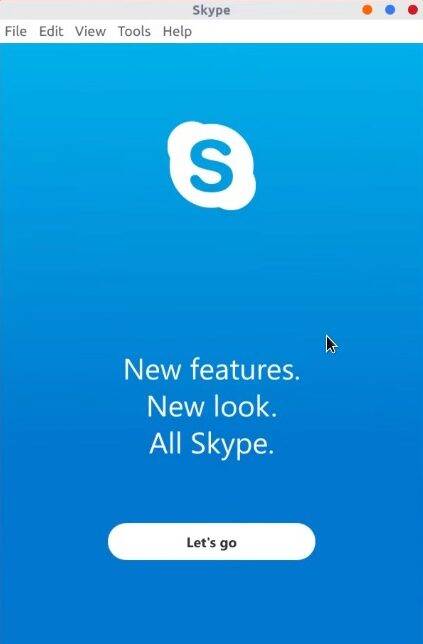
When it opens, you need to sign in and you can start using it.
If you rarely use Skype, I recommend giving a try to Skype for Web.
29. Install Spotify
Spotify is also available in the Software Center. Install it from there.

Log in and enjoy it.
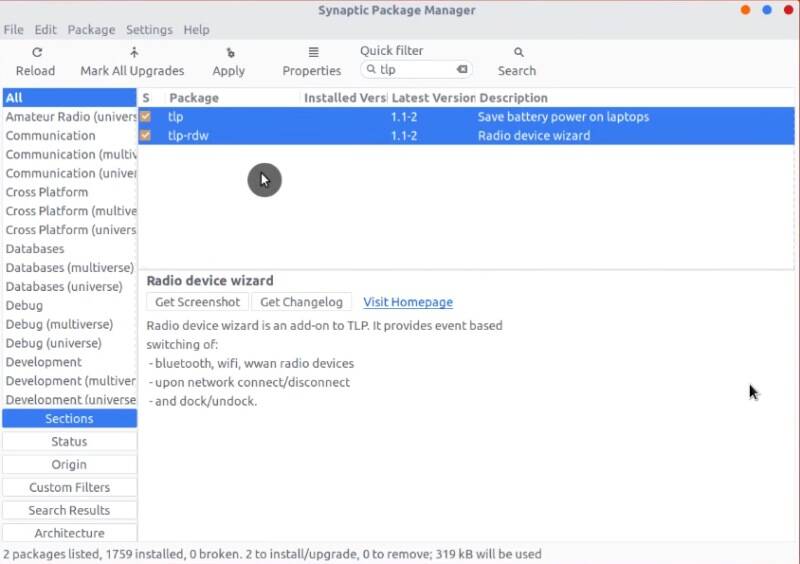
30. Laptop Tweaks
If you are a user of a laptop, you may want to optimize your system for better battery use. You can do that by installing tlp and tlp-rdw packages.
After the installation, open the terminal and start the program:
sudo tlp start

Now, tlp will improve the battery life of your laptop.
Your ideas
And that’s it. I do all these tweaks after installing Ubuntu 18.04/20.04. What about you? Do you find anything of these 30 things to do after installing Ubuntu useful? Would you add anything to this list? Let me know in the comments below.
Comments
Browny Ponvelil
Thank you so much for the video and the text version of your tutorial. Helped made me do the installation as well as custom/manual settings easily with your help. Thank you so much… God bless!!
Average Linux User
You are welcome, Browny!
Júlio
Great tutorial! Thanks for your effort to help other people.
Average Linux User
Happy to help. Thanks for the comment!
Cristian
Please add quit title bar on Firefox
Average Linux User
What do you mean by “quit title bar”?
Cornel
1.EXCELLENT !!! I am an Ubuntu beginner (20.04 installed) and for the first time I understood all because the content of the post is very exactly. 2.I not manage at all the grub customizer: it is about colours, backround colour, fonts colours, resolution ! Please, make a post !
Average Linux User
Cody Jordan
Ty for this, I was debating going back to windows 10. It was slowing down my development
Average Linux User
Happy to hear you stayed in Linux 😃
Mehul Arora
thank you very much, it was very helpful. Can you also tell how to enable fingerprint login in ubentu……
Average Linux User
Unfortunately, fingerprint support in Linux is very poor and like it won’t work 🙁
Chris
Definitely gotta change the DNS server to 1.1.1.1, usually a VPN will do this, but I don't use VPNs as I'm sure many don't!
Cloudflare DNS is the way to go man.
Average Linux User
Thanks for the advice
ariel
Really awesome. Good and new ideas.
Average Linux User
Thank you very much!
Jadson Charles Pawlowski
Help me! i don't got the installation, i have so many solutions but this isue input/output error is terrible! i put a hdd and thats it what are a solution probably, don't have a patch or new .iso? i have 18.10,… verion.
Average Linux User
Your description of the problem is not clear. Maybe reading my Linux Installation guide will help you. It is exactly the same process for Ubuntu.
clyde marchioni
Thank You very much very helpful.
Average Linux User
You are welcome.
Dario Privado
Please, consider deleting number 8 or at least expanding the consequences of such option.
Average Linux User
Thanks for your suggestion. I clarified it now.