A step by step Arch Linux installation guide
Many Linux users are stopped from using Arch Linux because they cannot install it. This Arch Linux installation guide will solve this problem. It shows the whole Arch Linux installation process step by step.
Content
- UEFI or legacy mode?
- Before you start
- Arch Linux installation
- Check network connection
- Partition
- Install the system
- Generate fstab file
- Chroot to the installed system
- Set locale
- Set the time zone
- Set local time
- Set hostname
- Enable network
- Set root password
- Install GRUB
- Reboot
- Swap File
- Add user
- Install X window system and audio
- Install desktop environment
- Start GUI
UEFI or legacy mode?
There are two possible options of Arch Linux installation:
- legacy mode
- UEFI mode
I personally think that the Arch Linux installation in the legacy mode is more conservative, simpler, and reliable. However, the UEFI mode is more up-to-date and some modern hardware supports only the UEFI installation.
This Arch Linux installation guide will use the UEFI mode, but I will point out the steps and commands that are different for the legacy mode. So, regardless of what mode you choose, this guide will help you to install Arch Linux with a minimal graphical environment.
The UEFI means Unified Extensible Firmware Interface and here are some of its benefits:
- UEFI replaces the Basic Input/Output System (BIOS) interface.
- UEFI is compatible with GPT tables.
- It supports larger hard drives.
- It is more configurable and, as a result, it boots faster.
Also, I will use a GUID Partition Table (GPT). It is more advanced than a master boot record (MBR) partitions. It works with volumes larger than 2TB and supports up to 128 partitions. However, if you decide to do the legacy installation, use the MBR table.
So, let’s get started with the detailed Arch Linux UEFI installation guide.
Before you start
Download Arch Linux ISO
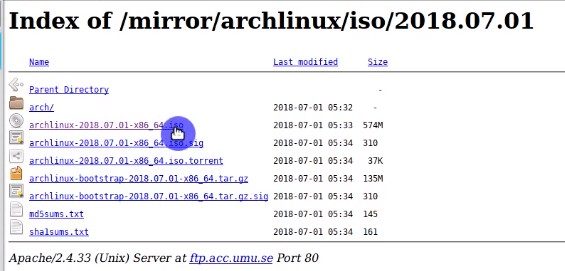
First, download the Arch Linux installation ISO from the Arch Linux website.
You can download the torrent file or use the direct link. Just find your country and click on the link. Among the variety of files, choose the ISO archlinux-xxxx.xx.xx-x86_64.iso and signature archlinux-xxxx.xx.xx-x86_64.iso.sig files:
When the ISO is downloaded, you need to check its signature to make sure it has not been compromised:
gpg --keyserver-options auto-key-retrieve --verify /path/to/archlinux.iso.sig
If you see “Good signature from …“, this means everything is alright:

Next, you need to write it to your USB flash drive. Open the Linux terminal and use the following command:
dd bs=4M if=/path/to/archlinux.iso of=/dev/sdx status=progress && sync
where /path/to/archlinux.iso is the path to your downloaded ISO file; /dev/sdx is your flash drive. You can find out this name with the command sudo fdisk -l and the size of your USB flash drive.
Alternatively, you can use a graphical program to write ISO to a USB.
Practice your Arch Linux installation in VirtualBox
You may try the Arch Linux on a virtual machine first. It will help you to experience the installation and avoid errors in the future real installations. To run the Arch Linux in VirtualBox, do the following steps.
- Create a new machine and name it Arch Linux.
- Give it 2GB of RAM. If you lack the RAM on your PC, keep it at 1GGB.
- Create a new hard disk. Select VDI (VirtualBox Disk Image) and dynamically allocated size.
- Give the VDI 20GB and click Create.
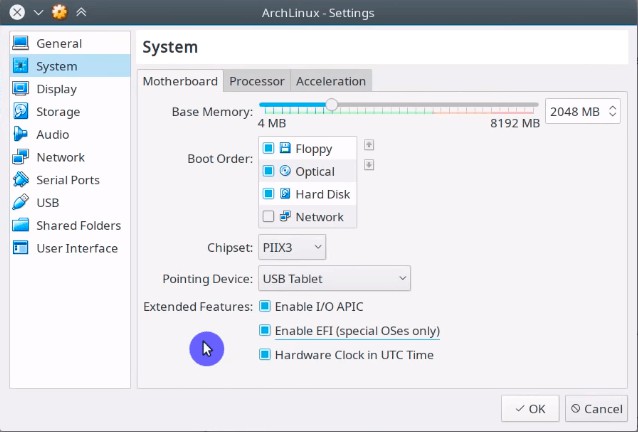
- Click on the Settings icon. In the System tab, enable the UEFI mode.
- Click on the Start icon or just double-click on the Arch Linux.
- Specify the path to the downloaded Arch Linux ISO.
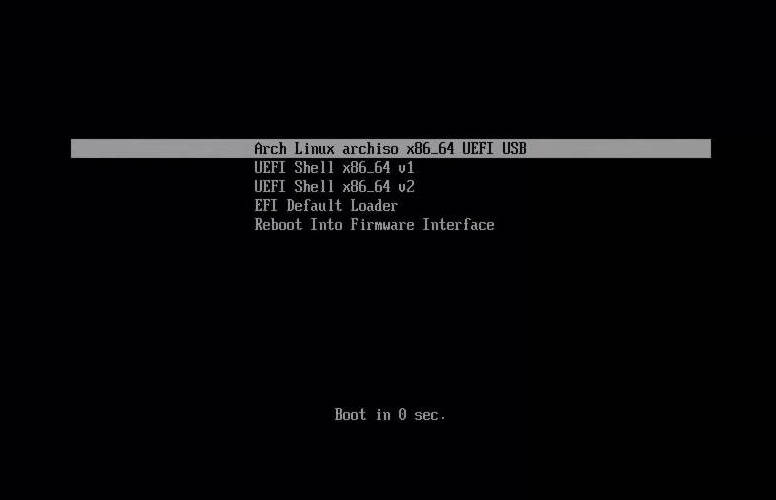
The boot process of live Arch Linux in the UEFI mode can be very slow. If you just see the back screen, this is normal. Just wait some time. When the system is loaded, and you can start the Arch Linux installation.
Arch Linux installation
Check network connection
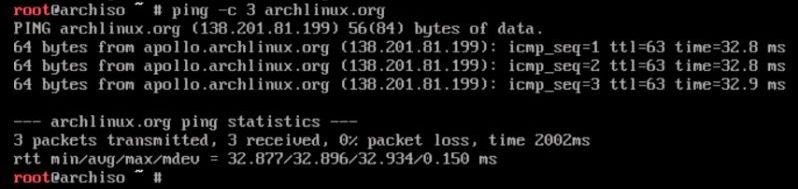
First of all, check the internet connection. I recommend you to use a wired connection. To check if your internet works, you need to ping to any server, for example, the Arch Linux website:
ping -c 3 archlinux.org
If you are not sure what interfaces are available, use
ip link
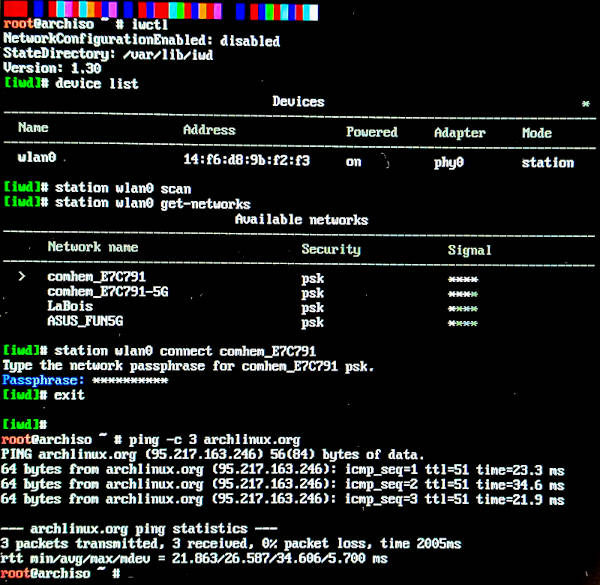
If you use a wired connection, it is usually picked up automatically. Wi-Fi requires some additional settings. For Wi-Fi, launch iwctl prompt:
iwctl
List available devices:
device list
You should see your Wi-Fi available with a name like wlan0.
Scan for networks and list available Wi-Fi networks:
station wlan0 scan #this command outputs nothing
station wlan0 get-networks
Finally, to connect to your Wi-Fi network:
station wlan0 connect my_wifi_name
You will be requested to enter the passphrase of your Wi-Fi and your Wi-Fi connection will be established.
Exit the iwctl and test the connection again:
exit
ping -c 3 archlinux.org
Here is the screenshot of how I executed these commands to configure Wi-Fi in my Arch Linux installation session:
Mobile broadband modems can be configured with the mmcli utility. Unfortunately, I have no mobile broadband modem to demonstrate it.
Partition
The next step in our Arch Linux installation guide is to partition the hard drive.
List the available partitions and disks:
lsblk
Most probably, you will have only two hard drives:
- the USB drive with the Arch Linux ISO
- your computer HDD/SSD.
If you have several hard drives, use fdisk to look at their size and define which one you want to use for the Arch Linux installation.
fdisk -l
If you already have a partition table, skip this step. If your hard drive is brand-new as in the case of a virtual machine or you want to re-partition your hard drive, run this command to create a new partition table:
cfdisk /dev/sda
Note! Back up all your data, because creating a new partition table will erase everything from a drive.
In the label type window, select GPT.
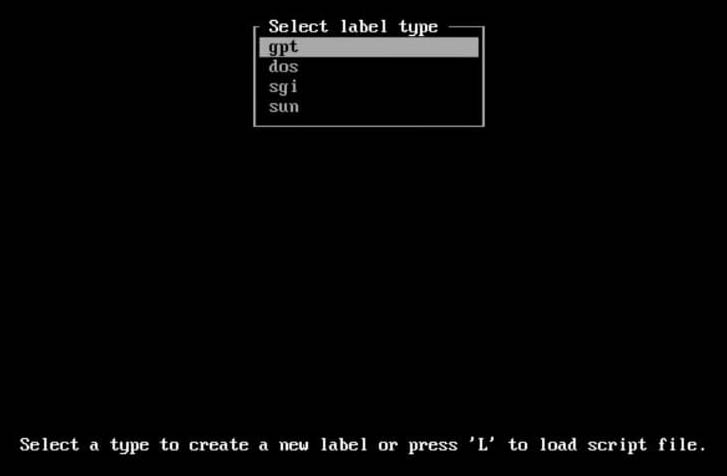
Legacy mode! If you do the legacy installation, choose the dos partition type and do not create the UEFI partition.
Use the arrow keys and Enter to create 3 partitions with cfdisk:
- /dev/sda1 # choose 512Mb of space (UEFI)
- /dev/sda2 # choose at least 10 GB of space (root)
- /dev/sda3 # choose all the left space (home)
Write the table to your hard drive and quit.
If you are not familiar with cfdisk, watch the video tutorial above.
Now, list the partitions again:
lsblk
The /dev/sda disk should have three partitions. We need to format them.
The first partition is the UEFI partition. It needs to be formatted with a FAT file system:
mkfs.fat -F32 /dev/sda1
Legacy mode! If you do the legacy installation, skip the step of UEFI formatting because you should not have the UEFI partition.
The other two partitions can be formatted in any Linux file system. I recommend using EXT4:
mkfs.ext4 /dev/sda2
mkfs.ext4 /dev/sda3
Next, mount the root partition:
mount /dev/sda2 /mnt
Create a folder to mount the home partition and mount it:
mkdir /mnt/home
mount /dev/sda3 /mnt/home
Check mounting points whether they were created successfully:
lsblk
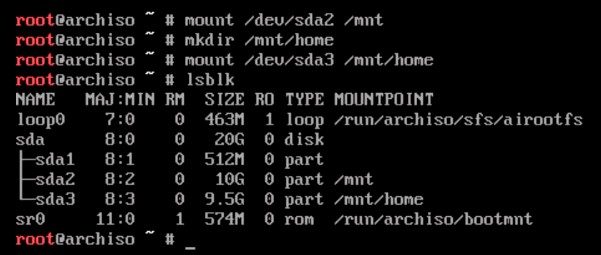
Note, the root mounting point is the folder where the system will be installed.
Install the system
Now, we start the installation process by installing the minimal Arch Linux system:
pacstrap -i /mnt base linux linux-firmware sudo nano
When the system requests to choose the components to install, select all and yes. Wait some time until it completes.
Generate fstab file
Next step in this Arch Linux installation guide is to generate the fstab file:
genfstab -U -p /mnt >> /mnt/etc/fstab
To learn what -U and -p mean, type genfstab -help to see the description of these options.
Chroot to the installed system
Next, chroot (change root) to your system that is mounted to /mnt using the BASH environment:
arch-chroot /mnt /bin/bash
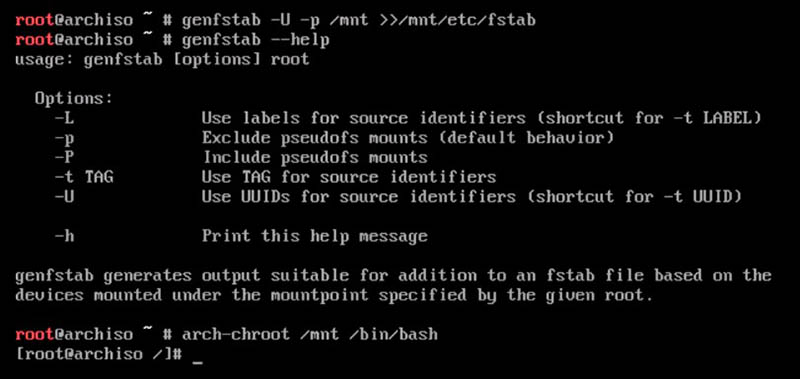
You change your live ISO environment to the root environment of the installed Arch system. This way, you access the system as a root user. A bit later, you will also add the regular user.
Set locale
To set the localization, you will have to work in Nano editor. Type:
nano /etc/locale.gen
and press Enter.
Find the language you are going to use. In my case, I am going to install American English. Activate the search option by pressing the shortcut Ctrl + W (the shortcuts are listed at the bottom of the screen) and type #en_US. Press Enter.
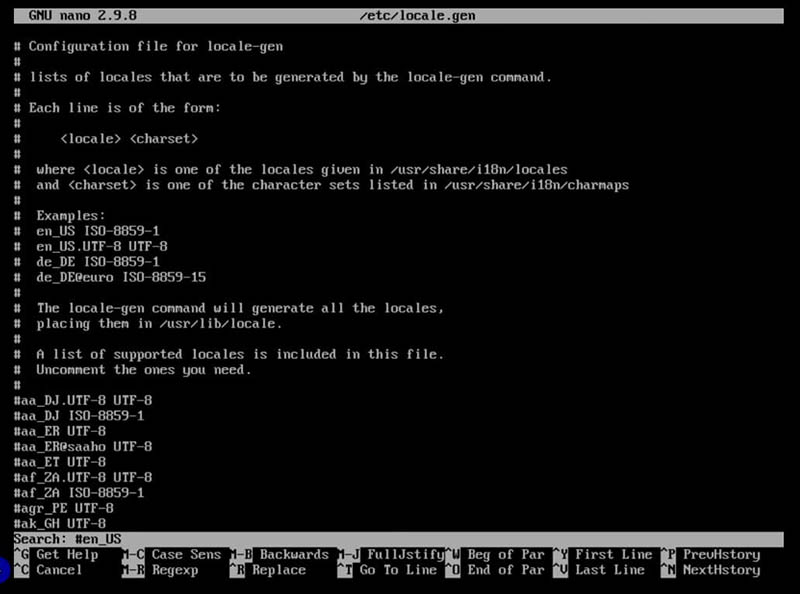
You should jump to the line #en_US.UTF-8 UTF-8
Uncomment it by removing the # sign. Press Ctrl+O Enter to save and Ctrl+X Enter to exit the editor.
Next, you have to generate the locale. Run:
locale-gen
And create the locale.conf with corresponding language settings:
echo "LANG=en_US.UTF-8" > /etc/locale.conf
Set the time zone
To set the time zone, type:
ln -sf /usr/share/zoneinfo/
and press the Tab key to see all the available options. In my case, I need to use Europe. Again, you can press the Tab key, and you will see all the available cities. I will use Stockholm. Save this link to /etc/localtime. The final command will look as follows:
ln -sf /usr/share/zoneinfo/Europe/Stockholm /etc/localtime
Instead of Europe and Stockholm, you can select your region and time zone.
Set local time
To set the time for the system, run this command:
hwclock --systohc --utc
And check the time:
date
If the time is incorrect, go back and make sure you have set the timezone correctly.
Set hostname
A hostname is the computer’s name. Let’s name it archPC.
Use the following command:
echo archPC > /etc/hostname
You also need to add this name to the /etc/hosts file. Type:
nano /etc/hosts
and press Enter.
In the Nano editor, add these lines at the end of the file:
127.0.0.1        localhost
::1              localhost
127.0.1.1        archPC
If you use a static IP address, replace 127.0.1.1 with your static IP address given by the Internet provider. Press Ctrl+O Enter and Ctrl+X Enter to save and exit the editor.
Enable network
First, install the network manager:
pacman -S networkmanager
Then enable it:
systemctl enable NetworkManager
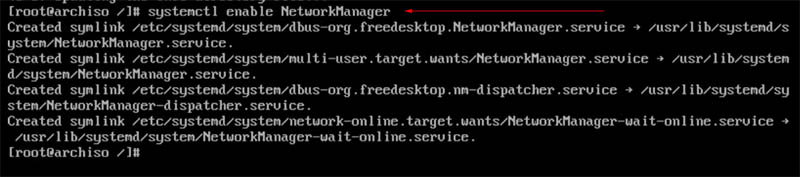
Now, the system will be able to run a network manager at the system boot and connect to the Internet automatically. Remember, these settings work only for the wired internet connection.
Set root password
Next, set the root password. Type:
passwd
and type your password twice. Be attentive, as you will see nothing while typing.

Install GRUB
There are several bootloaders you can install on Arch Linux. I recommend the GRUB bootloader. It is the most popular, highly configurable and easy to use bootloader.
Install the GRUB bootloader and EFI boot manager packages:
pacman -S grub efibootmgr
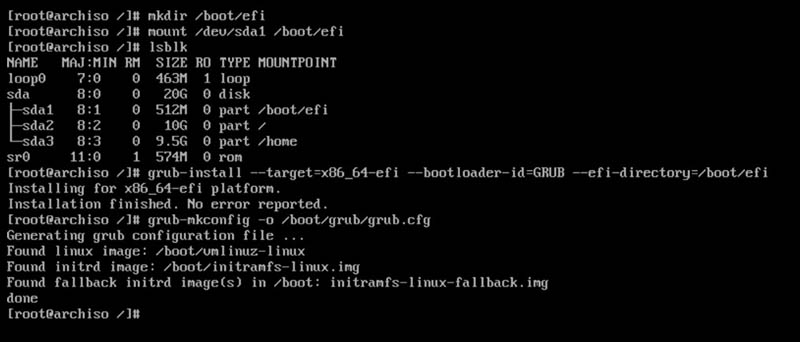
Next, using these packages, install the bootlader on your system and generate its configuration files by running these commands one by one:
mount --mkdir /dev/efi_system_partition /boot/efi
lsblk # to check if everything is mounted correctly
grub-install --target=x86_64-efi --bootloader-id=GRUB --efi-directory=/boot/efi --removable
grub-mkconfig -o /boot/grub/grub.cfg
Legacy mode! If you do the legacy installation, install the GRUB in this way:
pacman -S grub
grub-install /dev/sda
grub-mkconfig -o /boot/grub/grub.cfg
Basically, the minimal installation of Arch Linux is complete.
Reboot
Next, exit from the system root account, unmount all mounted partitions and reboot the system by running these commands:
exit
umount -R /mnt
reboot
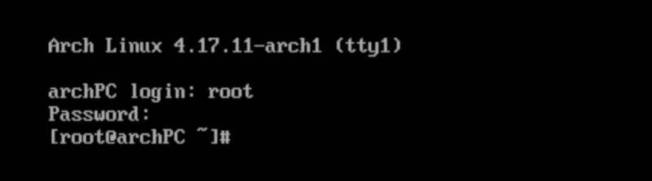
If you did everything correctly, after the reboot, you will see the GRUB welcome screen with Arch Linux installed.
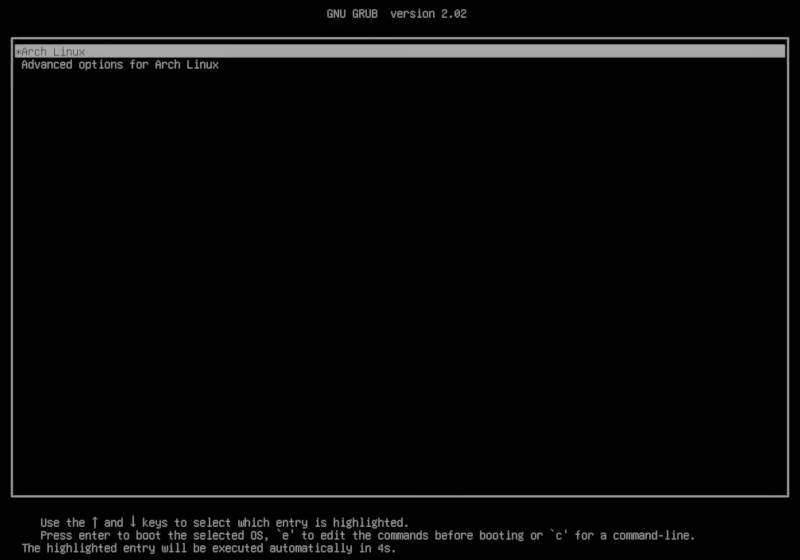
To continue, log in as a root user with a previously set password.
Swap File
You probably have noticed that I have not created a Swap partition. This is because I recommend to use a Swap file. Let’s create a swap file for this Arch Linux installation too.
Create a Swap file of 3G or whatever your RAM size is:
dd if=/dev/zero of=/swapfile bs=1M count=3072 status=progress
Change its access rules, format and enable it:
chmod 0600 /swapfile
mkswap -U clear /swapfile
swapon /swapfile
Also, add this Swap file to the /etc/fstab:
echo '/swapfile none swap defaults 0 0' >> /etc/fstab
And check if the Swap file is working:
free -m

Add user
It is not a good idea to constantly work from the root account. So, after the login, create a user account:
useradd -m -g users -G wheel -s /bin/bash username
Write your name instead of username.
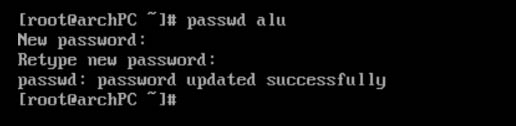
Also, create a password for the new user:
passwd username
Instead of username, use the name you created in the previous step. Type the password twice.
Next, enable sudo privileges for a newly created user:
EDITOR=nano visudo
Using the arrow keys, scroll down the screen and find the line:
# %wheel ALL=(ALL) ALL
Uncomment it, by removing the # sign.
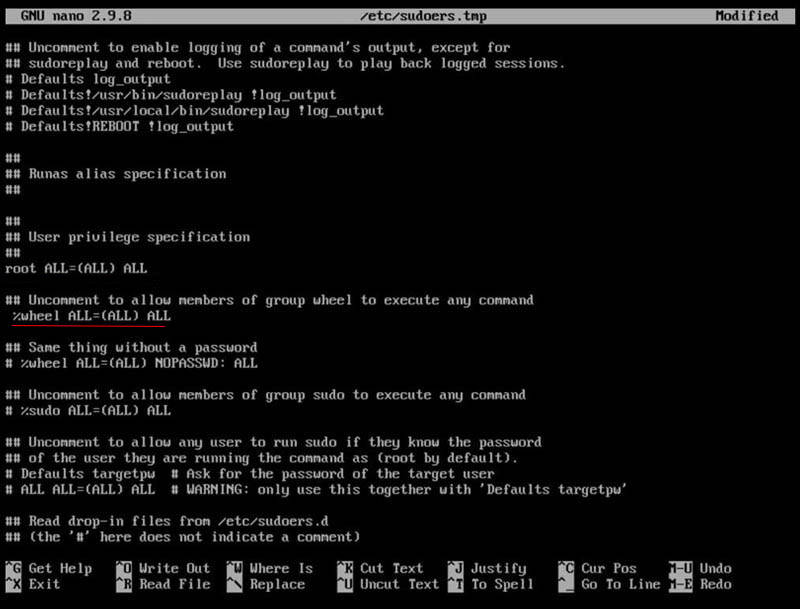
Press Ctrl+O Enter to save and Ctrl+X Enter to exit the editor.
Now, exit the system by running the command:
exit
And log in with the regular user credentials which you have just created.
Install X window system and audio
To make the new system usable, install X Window System and audio. I will install XFCE as a desktop environment example.
pacman -S pulseaudio pulseaudio-alsa xorg xorg-xinit xorg-server
When you press Enter, the system will offer to choose the components to install. Just press Enter twice to apply the default settings. After that, the system will request to choose the driver for the video card:

If you have a discrete video graphic card, select the second option. When you use the integrated Intel video card, select the first option. The utility will install many packages. Wait some time until it completes.
If you install the system on VirtualBox, also install guest addition:
pacman -S virtualbox-guest-utils
Install desktop environment
I install XFCE desktop as an example of the graphical interface:
pacman -S xfce4 lightdm lightdm-gtk-greeter
echo "exec startxfce4" > ~/.xinitrc
systemctl enable lightdm
Xinit file allows to start an Xorg display server automatically.
You can also install other desktops:
Plasma 5:
I showed how to install and configure Plasma 5 in Arch Linux previously.
GNOME:
echo "exec gnome-session" > ~/.xinitrc
sudo pacman -S gnome
Cinnamon:
echo "exec cinnamon-session" > ~/.xinitrc
sudo pacman -S cinnamon mdm
systemctl enable mdm
Mate:
echo "exec mate-session" > ~/.xinitrc
sudo pacman -S mate lightdm lightdm-gtk-greeter
systemctl enable lightdm
Unity:
Unity installation is tricky - see the Arch Linux Wiki.
Budgie:
echo "export XDG_CURRENT_DESKTOP=Budgie:GNOME" > ~/.xinitrc
echo "exec budgie-desktop" >> ~/.xinitrc
sudo pacman -S budgie-desktop lightdm lightdm-gtk-greeter
systemctl enable lightdm
Openbox:
echo "exec openbox-session" > ~/.xinitrc
sudo pacman -S openbox lightdm lightdm-gtk-greeter
systemctl enable lightdm
i3:
echo "exec i3"  > ~/.xinitrc
pacman -S i3 rxvt-unicode dmenu
Awesome:
echo "exec awesome"  > ~/.xinitrc
sudo pacman -S awesome
Deepin:
echo "exec startdde"  > ~/.xinitrc
sudo pacman -S deepin
Also, edit the file /etc/lightdm/lightdm.conf to have this line:
greeter-session=lightdm-deepin-greeter
LXDE:
echo "exec startlxde"  > ~/.xinitrc
sudo pacman -S lxdm-gtk3 lxdm
I would like to point out that I have not tested all these desktops. In particular, some Login Managers may not work with a given desktop. For the full list of Login Managers look at Arch Linux Wiki and try the one you like.
Start GUI
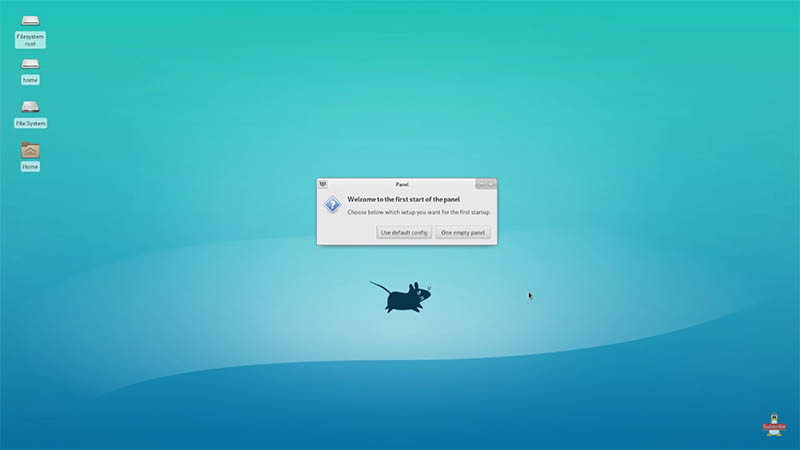
To test whether your graphical environment works, run:
startx
The system must launch the graphical interface.
To further check that everything works fine, shut down the system and start it again. Hopefully, it will boot again and you will be able to log in.
Arch Linux installation is done!
This is a very minimal installation. From this point, you can install what you want and configure your Arch Linux as you want.
So, this step by step Arch Linux installation guide is over. As you can see, the Arch Linux installation process is a little complicated but manageable. This system is still not complete and you will need to install many more packages and configure it. Nevertheless, the most difficult part is done and you have a good starting point.
Do you want to share your experience or have any questions about how to install Arch Linux? Leave your comment below.
Comments
DevMirakulix
Hi, I followed the video and when I rebooted and continued the instructions in the video I got to this problem. Ididnt have internet and the command iwctl gave me bash: iwctl: command not found. So how do i connct to my wireless network? I dont have cabel…
x86_64-fan
for UEFI systems; I recommend installing the bootloader like this
File: /boot/loader/loader.conf
timeout 0 console-mode 0 default arch editor 0
(save the file and exit nano)
you will see something like this in the file:
/dev/sda2: UUID=”ed46a94b-90cf-4069-a501-afdbeb6364a2” TYPE=”ext4” PARTUUID=”93ecd4b1-93c3-6f41-b8e1-4aab53057a2e”
remove all of it except for the UUID section ; keep the double quotes
File: /boot/loader/entries/arch.conf
title Arch Linux initrd /initramfs-linux.img linux /vmlinuz-linux options root=UUID=(your UUID)
(replace (your UUID) with your UUID) (save the file and exit nano)
the bootloader is installed.
i386-pc
for UEFI systems; I recommend installing the bootloader like this
File: /boot/loader/loader.conf
timeout 0 console-mode 0 default arch editor 0
(save the file and exit nano)
you will see something like this in the file:
/dev/sda2: UUID=”ed46a94b-90cf-4069-a501-afdbeb6364a2” TYPE=”ext4” PARTUUID=”93ecd4b1-93c3-6f41-b8e1-4aab53057a2e”
remove all of it except for the UUID section ; keep the double quotes
File: /boot/loader/entries/arch.conf
title Arch Linux initrd /initramfs-linux.img linux /vmlinuz-linux options root=UUID=(your UUID)
(replace (your UUID) with your UUID)
the bootloader is installed
Jonathan
Thanks for the great guide! So far I managed to work out everything on Virtualbox.
But when I go to the terminal and type “lsblk”, somehow my sda1 is not mounted to anything, not even /boot/efi. Is this normal or I should change something?
i386-pc
try remounting it ?
i386-pc
The /etc/hosts file is incorecct.
here is an example of a correct /etc/hosts file.
#(hostname)#
127.0.0.1 localhost ::1 localhost 127.0.1.1 (hostname).localdomain (hostname)
i386-pc
I would install base-devel and use linux-lts or linux-zen as the kernel and install a command line filemanager and browser
$ pacstrap -i /mnt base base-devel linux-lts linux-lts-headers linux-firmware nano mc links networkmanager grub efibootmgr
. I would also enable gpm to get a mouse cursor in console mode
###### $ systemctl enable gpm ######
i386-pc
here is the /etc/hosts file.
https://drive.google.com/file/d/1YZU5-5OCmp-r4QjQ8o9K_yxFqWz_zbEI/view?usp=sharing
Master
Its not hard i use arch gui am a windows user testing distros for switch to linux
Abhishek
how do i install qtile?
Me
Hi alu for me this is not worked. It is all good but when i type “startx” it says unable to conect to server. Please help me
Average Linux User
denis bopp
Hey, I want to install Archlinux on my Dell that have a dedicated Nvidia GPU and a intel on board, but I can´t put her to run, can you make a tutorial about it.
Brian Farnell
Great tutorial, this really helped me get started! On i3wm… Better install instructions would be “pacman -S i3 rxvt-unicode dmenu” and then accept all when it offers choices for i3. The package i3 is a package group that contains a few necessary things. You really can’t do much without a terminal and i3 comes configured to launch programs through dmenu so you should add rxvt-unicode and dmenu.
Average Linux User
Hi Brian, Thanks a lot for this contribution. I have edited the i3 part accordingly.
Moha
Do not install Budgie Desktop Enviroment because it may fail during the startup.
Moha
Hi! I have a problem with the Unified Extensible Firmware Interface installation. When I type startx it just says oh no! something has been wrong.
Moha
Thank you for this installation guide of arch linux!
Ben WEston
Thanks for this. It really helped filling in the gaps in the official installation instructions.
archuser
I cant get network access ?? when I ping google.com
ping:google.com: Temporay failure in name resolution
mankm
can't get audio to work despite installing the packages you mention in the audio section. Any ideas what can it be?
Ray
After trying several other tutorials, all resulting in numerous problems, yours was flawless. Thank you! :-)
Damien
Hi, I'd just like to say thank you very much for your guide. I was able to install arch with the budgie desktop and your instructions were simple and quite easy to follow along. Do keep up the great work!
Senki
Does not work for me sadly. I did everything as it's written here but when I reboot it's booting into my usb. If I pull out the usb it says I need to insert an installation media. Strange…
gewaaid
Good tutorial, I used it in addition to the Arch Linux wiki. I tried tot install Cinnamon with mdm but mdm is no longer available as a package. You need to get it from the AUR repository. I didnt do that. I installed Cinnamon together with gdm.
Thanks a lot
reluctant_linux_user
Great tutorial! Tried several ways to install, including the GUI interfaces like Archfi and such, but still had trouble due to my computer's hardware. This really help as I was able to load the barest necessities and back-into the installation.
Thank you!
Victor
I don't have enough word to tell you this, but thanks, like really thank you for this tutorial!
Average Linux User
Thank you, Victor!
Below Average Linux User
Great artice. I want to point out an issue I had - I installed on a laptop with no ethernet connection so had to use wifi. wifi-menu didn't manage to connect no matter what I tried, I eventually tried with iwd and managed quite easily by just following the instructions on Arch wiki https://wiki.archlinux.org/index.php/Iwd, one thing to note is that you have to configure dns also (which is also explained in the arch wiki)
Aditya Shankar
Great guide man. One of the most comprehensive ones out there. But just one issue I had to edit the lightdm.conf file to get the lightdm-gtk-greeter working.
Chelo
Hi ALU! With the release of the Kernel 5.7.2, swapfiles created with fallocate do not longer work. I fixed the issue by removing my old swap file, which was created with fallocate, created a new one with dd and the issue disappeared. Check https://bbs.archlinux.org/viewtopic.php?id=256503 Cheers!
The worst Linux in 2020 that so much complicated. And 90% chance to no instilled properly. Who have that much time.? Fucking Linux distro. Back to 90's
Arch Linux very frustrating Linux distro. jobless people is trying this on 2020. Don't know why people say it's very good ha ha ha ha.
Average Linux User
Arch Linux is peculiar and it is not for everyone. You can install Ubuntu, Debian, Linux Mint, elementary OS.
Rais
This is a great tutorial, however, if you're in uefi mode, after installing grub, you have to add a new boot option using efibootmgr using this line below: efibootmgr –create –disk /dev/sda –part 1 –loader /EFI/BOOT/BOOTX64.efi –label “Arch Linux” –verbose
Reference: https://wiki.archlinux.org/index.php/Unified_Extensible_Firmware_Interface#efibootmgr
Average Linux User
Thank you for the information, Rais!
I installed the bootloader to the default EFI boot location with
--removableinSo, EFI will find the bootloader by default and there is no need to create a new boot option.
Didn't it work for you?
Reference: https://wiki.archlinux.org/index.php/Unified_Extensible_Firmware_Interface#UEFI_boot_loader_does_not_show_up_in_firmware_menu
i386-pc
You could have installed all the packages that you need using the pacstrap command,
but why you didn’t ?
Oby
Thank you very much for the work done on this article and video, had to do it two times , but got it working, and most importably now understand concepts, terms, logic better.
Average Linux User
My pleasure. Thanks for leaving a comment.
Rommel Ilano Dasal
Thanks for this wonderful tutorial! Awesome!
Ricardo P. Silva
I got no errors,.. and I have installed deepin DE, so at the very end, when I executed “startx” nothing happened and the GUI is not launched, and I see no errrors,..
any idea of what's going on?
Average Linux User
It is difficult to say without error message. Maybe check the Install X window system step.
KB
Thank you very much. Your guide has made the install easy and your site is the one I come to for all my linux howto's. Just one thing…I see in the screenshot that “xorg-server” is already part of the “xorg” group. Is it necessary to list as a separate package when doing install?
Average Linux User
Things change. Some packages may be in a group then they are removed from there. So, I keep both to be safe. But you can try to install only the
xorggroup.Chuck
Worked out great. Thank you for this tutorial.
Average Linux User
Thanks for the feedback. Enjoy your Arch Linux instllation
Arthur
NMAN FUCK IT YOURE A GOD I HAVE BEEN FOR 3 DAYS TRYING TO INSTALL THIS, YOUR TUTORIAL HELPED ME SO MC=UCH I WOULD LET YOU HAVE MY GF BC YOUR WORTH IT., TGANKS!!!!
Average Linux User
You are welcome :)
Conor McGrory
Hi! I just installed Arch using this guide, and the only issue I had was that because the 'linux' package isn't included in 'base-devel' anymore, I wasn't able to set up the bootloader correctly. Installing the 'linux' package with pacman fixed this for me, but I think you could just add it to the 'pacstrap' command in the beginning, and everything would work.
Thanks for this guide!
Average Linux User
Yeah, the installation process has changed recently. I have updated the article.
Pieps
You fucking saved me with this. I tried using the official guide, but got stuck at the bootloader part for it is not explained at all(merely states “you need a linux compatible bootloader”). Thanks to you I got both GRUB, which I know and love, and got it finally running after several frustrating hours.
Very grateful to you!
ChevX
Hey just wanted to let you know that linux and mkinitcpio are not inluded in the base package anymore and need to be installed manually.
Average Linux User
Thanks. I have updated the article.
Dznutz
All of that could of been added at base pacstrap ignore
Sasha
First of all - your guide simply the best. I’m completely new to linux and, in the end of the day, I have the system up and running. I’ve done it on dell xps 9350 laptop and faced the only not covered issue on my way - grub-mkconfig was not successful since it couldn’t find linux images. “pacman -S linux” heals it fast; however, I’m not sure why it wasn’t there after previously used “base-devel” command. Thanks!
Average Linux User
The instructions have changed recently. Now, you need to include
linuxin the installation command. I have updated the article.Brad
Could you please explain the reason for the editing efi boot loader section after grub has already been installed?
Average Linux User
It was necessary in the past. I have updated the article. Now, you do not need to do that.
Juan Carlos Churata Quispe
Very good the guide intale arch with the kde desktop, but I have a problem, when I insert a usb device it does not recognize it and then please I would like you to help me solve that problem, thank you very much in advance
Average Linux User
Try the manual way to mount USB. If something is wrong with the USB, you try to clean and re-format it
suite
Very, very,very precise guide to the installation of Arch Linux. One of the best on the internet for UEFI based computers…Macbooks.. especially older Macbooks.
ps. did i mention how precise it is?
Average Linux User
Thank you very much for your nice comment.
Anonymous
You have a slight issue with your instructions.
You clearly state: In Nano editor, add these lines:
You do NOT want to put “exit” in the file. You want to only insert the first line.
Average Linux User
You are right. I wrongly read my notes when I recorded the video. Having exit won't hurt though. But I have corrected the post.
George
I'he been using linux for a while, even set up Arch years ago. I've recently been trying to set up a pc to try out various tiling wm's, but have run into issues with the uefi. Your article was very helpful, however, I'm still unable to reboot into the installed system. The only thing that did not go exactly as described in you article was when I did the grub-install. I get the following error (twice). EFI variables are not supported on this system. When it's time to reboot, I get the live CD menu, I arrow down to “Boot existing OS”, but instead of getting a grub menu, I end up back at the live CD menu. I've tried looking for help on Arch wiki, but no joy so far.
Average Linux User
There are several possible reasons for this error.
efivarfsmanually:See Mount_efivarfs
pluscpu-x86_64
To check whether if it’s UEFI or CSM, you can just tell by the startup screen of the archiso, if it is CSM/BIOS, it will look much nicer and if it is UEFI, it will only be a black screen with some options. This method is much easier.
Sohrob Tahmasebi
This was the first ever guide that actually worked for me, thank you for posting this! I feel as though the Arch Linux installation guide is sorely lacking in a lot of areas and assumes a lot of previous knowledge in order to complete a successful install but yours was very detailed and exact which I appreciate. I have one problem however, when I installed Arch I was unable to download any new packages. When I would use Pacman in the terminal to try and install something I would get a message saying something like “config file /etc/pacman.d/mirrorlist, line 9: directive 'United States' in section 'core' not recognized.” Do you know what could be going on and how I can fix it?
Average Linux User
Thanks for your comment. I am glad it worked. Regarding the mirror list error, the best solution to fix that error is to use Reflector https://wiki.archlinux.org/index.php/Reflector Reflector will generate the mirror list for you. I showed how to use it in this older video https://youtu.be/GKdPSGb9f5s?t=60
Jny
I am really looking forward to attempting an Arch install. Still in research mode. ALU is one of my Linux Jedis. This looks like a perfect tutorial for me, comments included. A couple comments will be key in my build. Thanx all.
Average Linux User
Just give it a try in a Virtualbox.
James
Great man! I'm a total noob in linux and I was stuck how to install a desktop and such! Thanks a lot I'm gonna try it now!
Average Linux User
I recommend doing the first install in VirtualBox, especially if you are a total noob ;-)
airbutre
Hi, after going through this tutorial everthing is working ;-) the last command (To test whether your graphical environment works, run: “startX”) has to be written “startx” to start my cinnamon-desktop (don't know if this helpful). cu airbutre
Average Linux User
Thanks for the correction.
startxis the correct way. It was a typo, I corrected it.Ullas
This is the very first time I am attempting Arch Linux. I am a Distro-hopper since 2006 but never had the interest to try Arch Linux. I have used Chakra Antergos RevengeOS and other variants of Arch. You are the inspiration to make me try Arch Linux directly.. article is not perfect in a sense that it covers does not everything, example it needs extra configuration to install alongside windows 10 in a UEFI GPT setup otherwise the boot menu will not show Win 10. Anyway that's alright as long as you decide to take your time to master it. Thank you ALU. I am a fan of your YouTube channel.
Ullas
You forgot to add ntfs-3g in the list of apps. without that you start to wonder why my drive is not opening. the good thing is Arch takes care of the dependencies and kernel config automatically with sudo pacman -S ntfs-3g.
Average Linux User
Thanks for adding this package. It is only needed if you use Windows formatted hard drives. I believe most of Arch Linux users are Windows free :-)
Average Linux User
Thank you for the feedback. I think if you use Arch, it is time to forget about Windows :) P.S. I will make some dualboot videos, but probably I will start with some Debian-based popular distros.
Ullas
No ALU, I use QFIL Flash Tool, SP Flashtool, MTK FLASHTOOL and Odin a lot which is trouble getting it to work in Linux so I still need Windows.
Average Linux User
That is unfortunate :-(
Josh Freeno
Oh. Lol I forgot I had already requested stuff from you. Well I have learned a whole lot since then. Don;t forget to add a hook to systemd boot so that boot gets updated. Thats the most important thing. It is in systemd wiki.
Average Linux User
Thanks, I will have a loot at the systemd boot.
Josh Freeno
sudo systemctl enable NetworkManager.service Also I have installed Arch 2 times in past 5 months and the system time is never right when I use this method so I started waiting until I reboot and just before I start graphical enviroment I use sudo timedatectl set-timezone America/Chicago and then hwclock –systohc –utc and my time is correct ans stays correct so I don't know what is going on with the setting the link way but it never works out for me and as matter of fact one time it messed me all the way up. Another thing is you do not have to do this the xinit way. It can be done two ways or more but these work. echo “exec startxfce4” > ~/.xinitrc sudo systemctl enable lightdm sudo systemctl enable lightdm sudo systemctl set-default graphical.target Systemd boot is much better for me and for users only using Linux then systemd boot should be what is used. It is simple to install and after that that you can install LTS kernel and use mainline as fallback.
Average Linux User
Hi Josh, Thank you for the additional information. I agree that systemd may be a faster and thus better option. I have not tried it yet. When I do, I will write an article and make a video about it.
Josh Freeno
Can we have a little more detail and systemd boot install because I have been using it on antergos and loving it. I am bout ready to make the switch to full Arch though. Make sure if you do systemd boot to include intel-ucode and tell users to go to arch wiki after install for the directions to set the hook to update systemd boot automatically.
Average Linux User
Hi Josh, Thank you for your request. I have not tried systemd boot yet. I will make post about it after I test it.
Jerontius
In the graphic relating to the [b/]pacstrap -i /mnt base base-devel[/b] coomand you truncate the graphic before the next prompt. What should a novice do with this prompt? I'm giving up at this point. Attention to detail is important because this oversight suggests there will be others. You have worked really hard but it's still not good enough.
Average Linux User
Thanks for the comment. The output for that command it very long. See the video. It was not possible to include everything in one image, but the key parts with choices are shown.
Julian
Hi! In the video you did “grub-mkconfig -o /boot/grub/grub.cfg” also for the UEFI installation, but for this tutorial you only do it for the legacy installation. Also in the file /boot/efi/startup.nsh you wrote : bcfg boot add 1 fs0:\EFI\GRUB\grubx64.efi “My GRUB bootloader” … but in the image you put : bcf boot add 1 fs0:\EFI\GRUB\grubx64.efi “My GRUB bootloader” Which one is the correct? Thank you for your tutorial! You rock!
Average Linux User
Thanks for pointing out those mistakes.
grub-mkconfig -o /boot/grub/grub.cfghas to be done in both EFI and legacy. This is correct:bcfg boot add 1 fs0:\\EFI\\GRUB\\grubx64.efi “My GRUB bootloader”Mario
Before typing reboot, the user doing a Legacy installation have to type exit. The tutorial doesn't say that. It was a great tutorial. Thank you. Greetings from Peru.
Average Linux User
Could you please explain why one needs to
exitbefore reboot?Ullas
It is because you are still in chroot and the system wont let you reboot hence the exit command
OneCore
Thanks man … Your post really helped me
Average Linux User
Thank you for visiting the website.
liOnux
Excellent ! I'm using Gentoo, but why not try Arch with your installation guide. Good job ;-)
Average Linux User
Thank you for the comment. Well, if you are using Gentoo, Arch will be easy for you :-)
Alberto
i did tks to you. <33333333333333