Debian 10 Installation Guide
Unfortunately, installing Debian 10 is not as straightforward as installing other Linux distributions. There are many obstacles that stop new and even experienced Linux users from installing Debian.
These obstacles include:
- Which ISO image to download? There are many Debian images.
- How to use the Debian partition manager. Its multiple windows may be confusing even for experienced Linux users.
- What if your Wi-Fi doesn’t work. This is the most common issue that stops many users from installing Debian.
- How to install Debian to get a sudo working?
- How to fix the repository CD-ROM error does not have a release file. Many new Debian users get this error after the installation and do not know how to fix it.
This Debian 10 installation guide will explain how to overcome these issues and give you an overview of Debian 10 installation.
Content
Debian 10 installation ISOs
New users can be confused by the variety of the ISO images Debian offers. Debian doesn’t have a single download button:
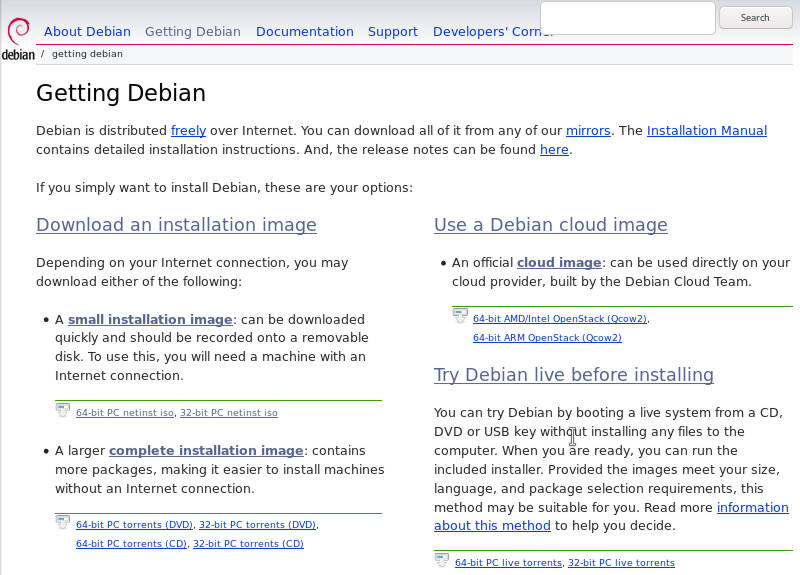
There are several options to download the installation ISO:
- Small installation image
- Complete installation image
- Cloud image
- Live images
- Unofficial non-free images
Let’s have a look at each of them and figure out which one is the best for you.
Small installation image
A small Debian installation image has only a minimal set of packages. It is enough to boot the system and launch the installer. The rest is to be download from the network.
If you have a fast enough internet, I recommend downloading exactly this small network installation image.
You can also use these buttons to download it:
64-bit netinst ISO 32-bit netinst ISO
Complete installation image
A complete Debian installation image images offer little larger ISOs and can be used without the internet. If your internet is slow, or you have no internet access on the computer where you want to install Debian, I recommend downloading the Debian DVD image.
Cloud images
Cloud Images are tailored for Cloud systems. These images are 64-bit and can be used for Amazon EC2, Azure, GCE, OpenStack, Plain VM.

But if you need to run Debian in the cloud, usually you do not need to worry about installing it. For example, I use UpCloud and it provides a very simple way to get Debian running. You select Debian as your OS, click deploy and your Debian cloud server is ready in a few minutes. You can test it for free. Use the button below to register at UpCloud.com and you will get $25 to your account.
UpCloud provides the fastest servers with great reliability and very responsive support.
Live images
If you do not know which Debian flavor to install, you can try them all with Debian Live images.
Each image has Debian with a specific desktop. You can write these images to a USB stick and test Debian in a Live mode on your hardware.
There is also an option to install Debian from this Live images with Calamares installer. You can also reboot and launch the standard Debian installer.
Earlier, Debian did not recommend using Live images for installation, but it seems to be not the case anymore. Nevertheless, I recommend using the installation ISO to install Debian instead of Debian Live ISO. The Calamares installer has just been introduced to Debian 10. So, it may contain some bugs.
Unofficial non-free images
Non-free Debian images are less known Debian images. They include proprietary packages such as Wi-Fi and Video drivers. Debian insists on using exclusively free software, so that’s probably why these images are so hidden.
You won’t find them on the Debian website right away. They are not available on the Download page. You need to make some effort to find them. Luckily, you can use the button below to get to the non-free image of Debian.
If you experience any problem with Wi-Fi connection or Video performance when you use the standard Debian ISO, try using a non-free image. It should fix your issue.
Install Debian 10 Buster
After you have chosen and downloaded the right ISO file, you can proceed with the installation. Below, you will learn how to perform the installation step by step.
Write ISO to a USB stick
You can write the installation ISO to a CD/DVD. But it is more common to use USB sticks.
To write Debian ISO to a USB stick, I usually use the dd command:
sudo dd bs=4M if=path-to-the-ISO of=/dev/sdX status=progress && sync
You can also use some graphical programs to write an ISO to a USB.
Boot from USB/CD-ROM
Paste your installation disk to the CD-ROM or connect the USB to your computer, and turn it on. During the start-up of your computer, you need to open the boot menu. For that, you need to press either Esc, F12, or some other key. It depends on your computer. Just google how to open the boot menu for your computer.
The boot menu should look similar to this:
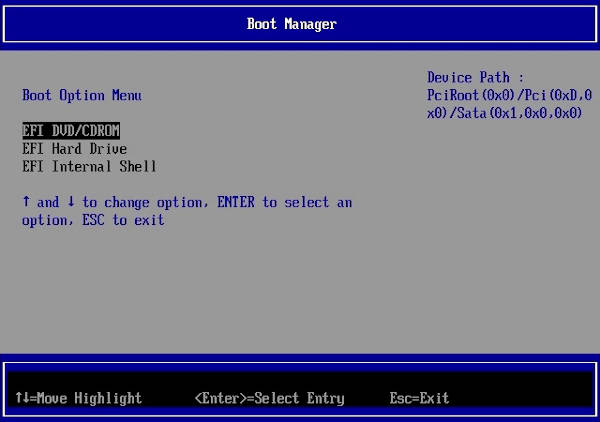
Select boot from a USB or CD/DVD.
There is no need to disable Secure boot anymore, but in case you have problems booting Debian, try to disable the Secure boot.
Hopefully, you will see this Debian installer:
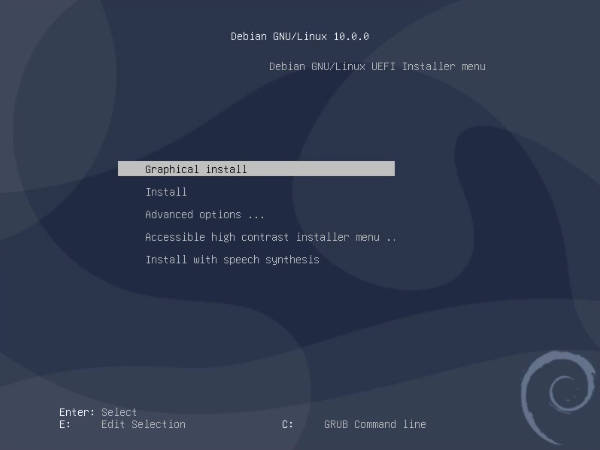
Choose the installer
You can use either the Graphical installer (first option) or the command line installer (second option). I recommend using the Graphical installer.
If you use Debian Live ISO and launch the installer from the Live session, the installed will look different:
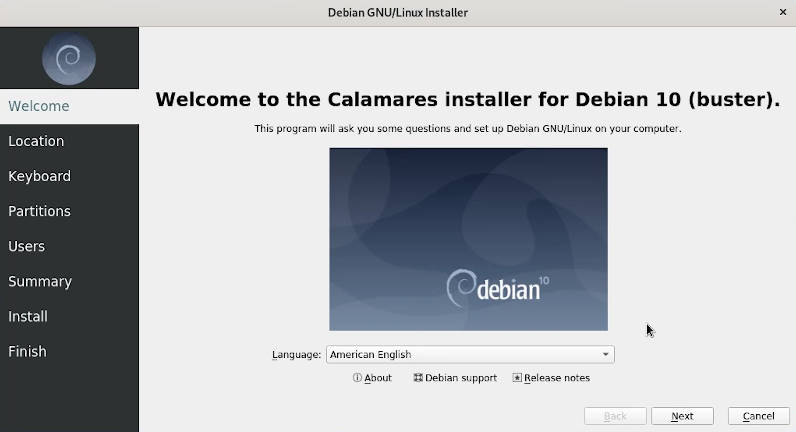
This is the Calamares installer that has just been introduced to Debian. You can use it to install Debian 10, but I recommend using the old installer. It should be more reliable.
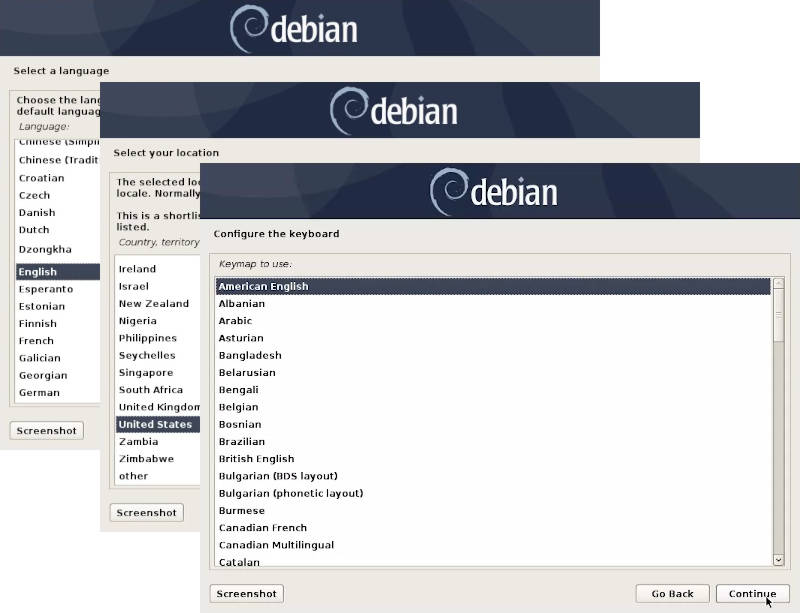
Basic settings
Select your language, location, keymap in the next few screens of the installation process:
Then, the installer will do some hardware detection. Just wait a bit.
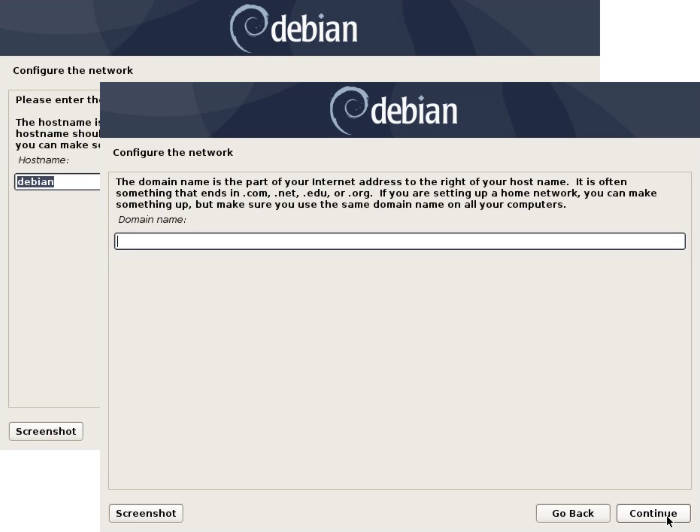
Next, you need to give a name to your computer. The domain name can be kept empty.
Configure the user
This is the first not intuitive part of the Debian installation.
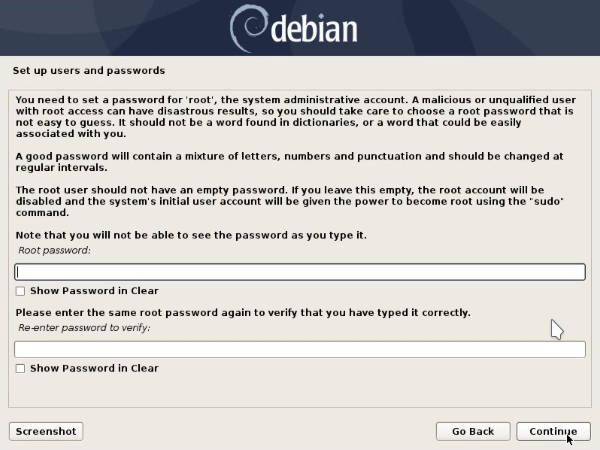
If you set up a root password here, you will not have the sudo access in your regular user. You will need to use the root account for administrative tasks. But if you skip this step, your regular user will be able to run sudo commands. So, click Continue without any typing in the root password field.
On the next screen, create a new user:
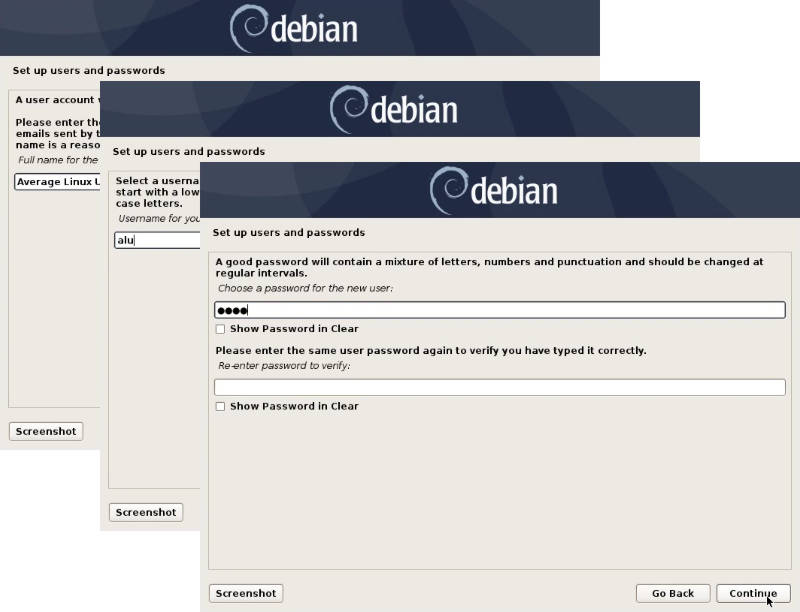
Type your full name, user name, and password.
Since you skipped the creation of the root account, this user will be added to the sudo group. So, you will be able to do administrative tasks with your user password.
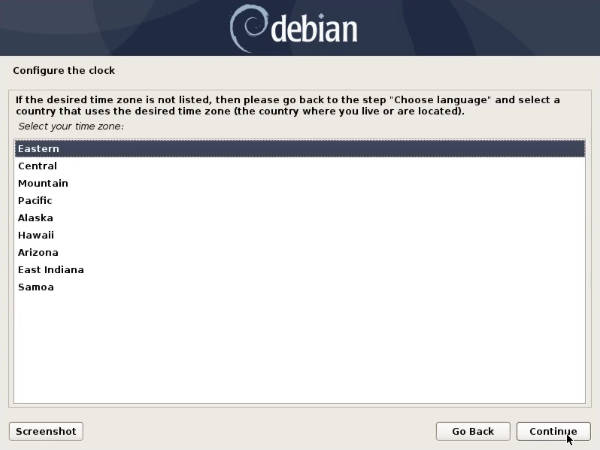
Next, select your timezone:
Partitioning options
Partitioning is the most important step.
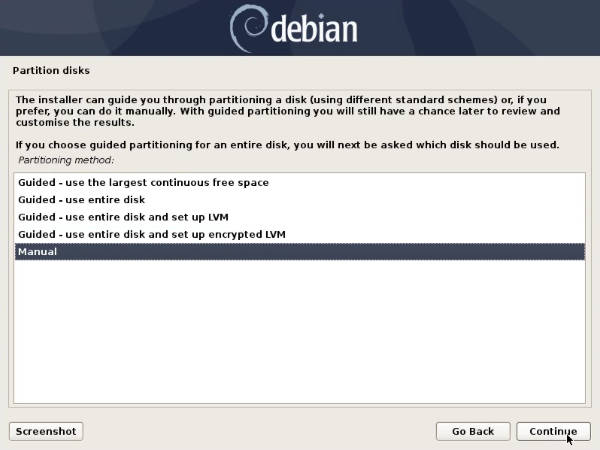
If you are a beginner, you can select the first option. The installer will try to find a free space and install Debian there.
If you what to have only Debian on your system or you have a brand new hard drive, you can tell the installer to use the entire disk. Debian will partition the hard drive for you.
If you are a little advanced user, you can choose the LVM installation including the LVM encryption.
I usually use manual partitioning.
Manual partitioning
Manual partitioning in the Debian installer is confusing. Each step has a different screen and you need to navigate between them. Whereas in many other installers you are presented with all the options at one screen.
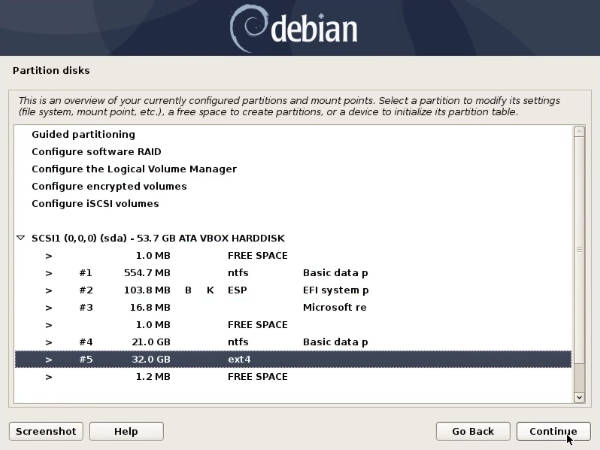
I show a little complicated partition table in this tutorial. It is an EFI system with Windows 10. There is also a Linux partition with ext4 file system. It is suitable for dual-booting Linux and Windows.
If you need a more conservative partition table with the root / and /home partitions, read my Debian 9 installation guide. The partitioning has not changed since then.
The EFI partition is usually recognized automatically. So, I select the Linux partition to install Debian on it. To that end, I re-assign the ext4 file system to it.
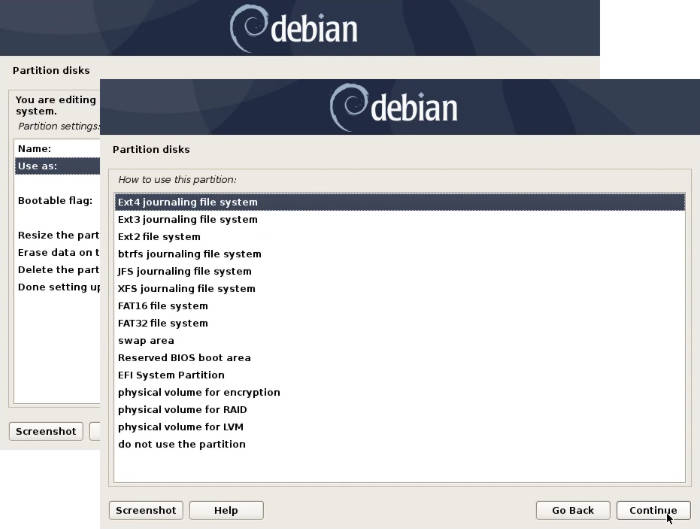
You will see that each of the partition settings opens in a new window. This is unusual if you are used to more user-friendly installers such as the Ubiquity installer of Ubuntu. When you press Continue, you will return to the previous screen. I found it confusing when I was installing Debian the first time. So, you just need to get used to it.
You also need to format this partition. Select the format this partition option and press enter. The setting will be changed to Format it.
I also assigned a mounting point to the root (/) file system. You need to have at least the root mounting point to install the system.

The rest can be kept at default. So, I select Done setting up the partitions and press continue.
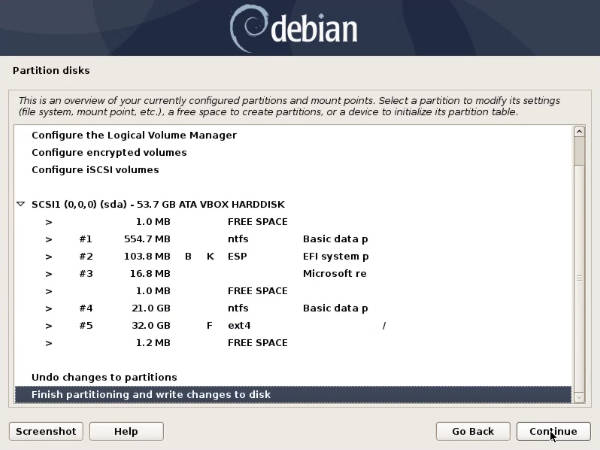
You will be returned to the main partition table screen. Where you will see the new partition table for Windows and Debian dual-boot. Check it before applying any changes. If everything is alright. Select Finish and write changed to the disk.
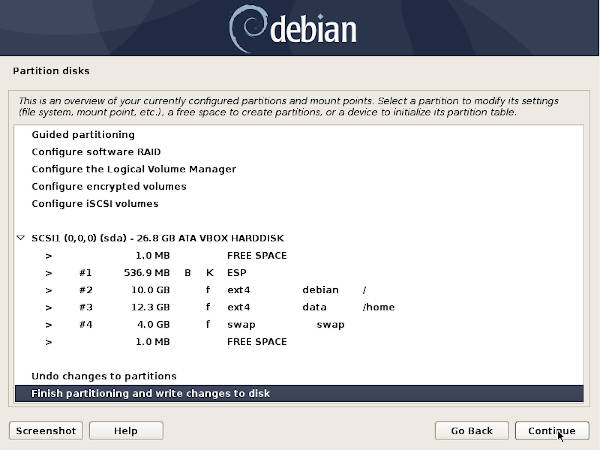
If you install only Debian, a classical Linux partition table would look like this:
If you do not create a swap partition and choose to use a swap file instead, you will see the warning that you have not created any swap partition:
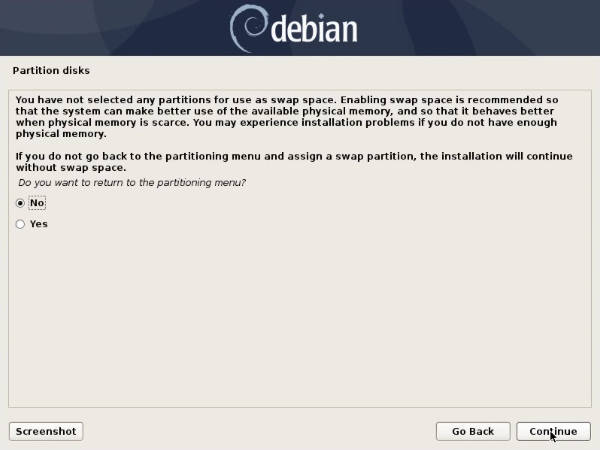
You just select No and press continue.
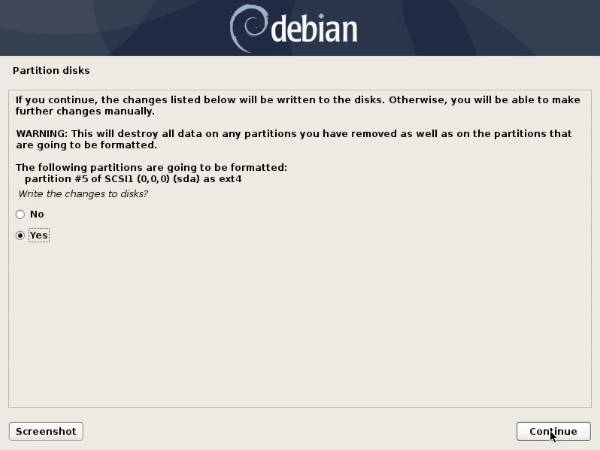
Finally, agree to write changed to the disk. The installation of Debian 10 Buster will start.
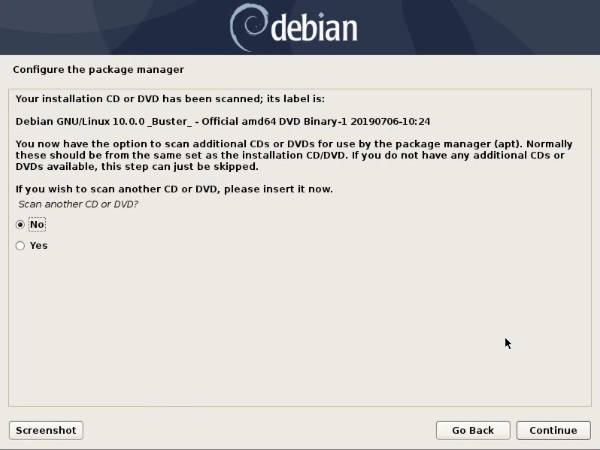
Additional CD/DVD
When you are asked to scan additional CD/DVD, you can refuse to do so.
Network mirrors
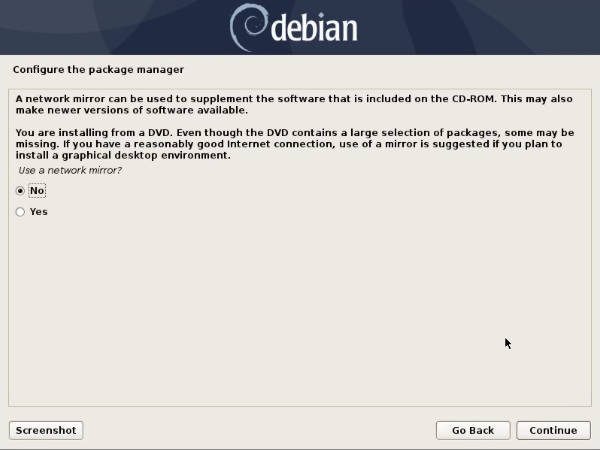
You can also switch a network mirror to the one which is the closest to you. This way you may gain some download speed. But I recommend keeping it at default.
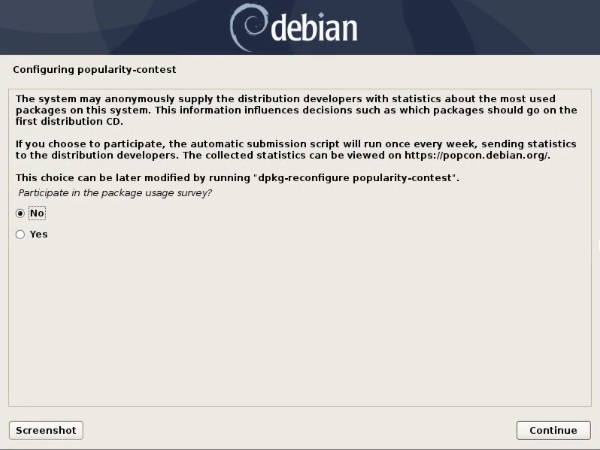
Usage statistics
I recommend participating in the package usage statistics. This will help the Debian developers to prioritize package development.
Desktop environment
The last choice you have to make is to select a desktop environment. GNOME, Xfce, Plasma, Cinnamon, MATE, LXDE, and LXQt are available. The default desktop environment is GNOME.
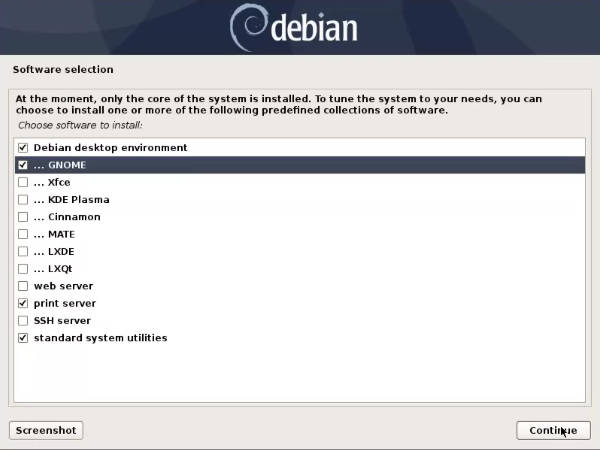
If you need to use SSH to connect to this system, you can also add the SSH server.
Press Continue and then wait around 15 minutes while Debian is being installed.
Bootloader
Since it is an EFI installation, the bootloader will install automatically.
However, if you install in the legacy mode, you also need to choose where to install the GRUB bootloader.
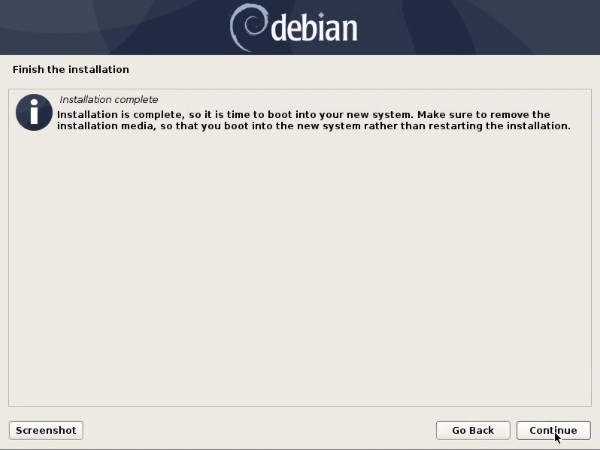
Finish the installation
At the end of the installation, you should see this screen:
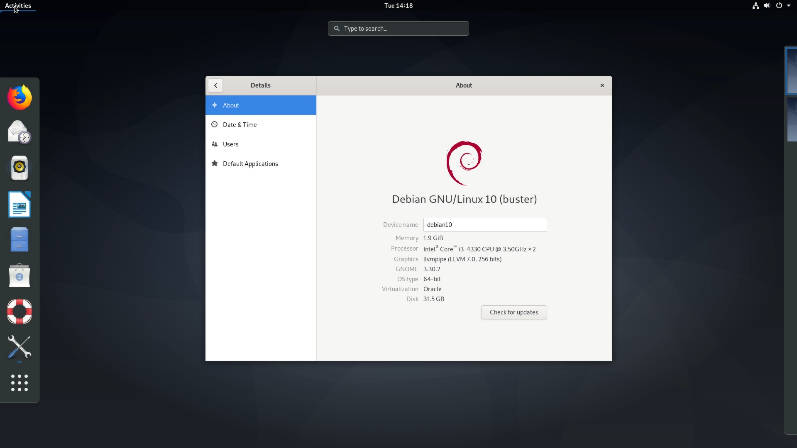
Reboot and you will see your new Debian 10 system:
Create a Swap file
If you did not create a swap partition, you need to create a swap file. You can read more about the Linux swap file. I only briefly show how to create it here.
Create a 2G swap file:
sudo fallocate -l 1G /swapfile
Change its permission:
sudo chmod 600 /swapfile
Format it as swap:
sudo mkswap /swapfile
And add this line at the end of /etc/fstab:
/swapfile swap swap defaults 0 0
Reboot the system and check the status of your memory:
sudo free -h
You should find swap listed as below:

Fix repository CD-ROM error
If you installed Debian from a DVD when you try to update your system you may get the error “the repository CD-ROM does not have a release file”:
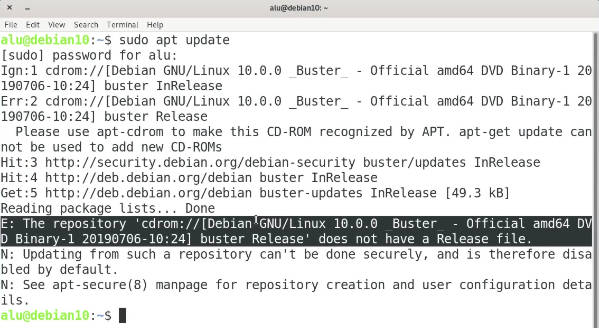
You can fix it by commenting out this line in /etc/apt/sources.list:
deb cdrom:[Debian GNU/Linux 10.0.0 _Buster_ - Official amd64 DVD Binary-1 20190706-10:24]/ buster contrib main
Try to run the update command again. The error should disappear.
Summary
The installation process of Debian 10 Buster is not much different from the installation of Debian 9. The key points include:
- Pick the right ISO.
- Skip the creation of the root password to get sudo working.
- Don’t get lost in multiple windows if you do manual partitioning.
- Choose the desktop environment.
- Create a swap file, if you have not created a swap partition.
- comment out the CD-ROM repository after the installation if you used the DVD ISO.
I hope will get your Debian 10 Buster installed. If not, feel free to ask questions in the comments below.
Comments
Miguel
When I visit the link https://cdimage.debian.org/cdimage/unofficial/non-free/ I get still many folders and options for non free ISO files. Sorry that I’m such a newbie but which ISO file do I need specifically for a non free image in the link you provided?
Mohammad jawad
hi. This is not my first experience with Debian (I had Debian 9.4) but now I have a big problem with Debian 10.04. After installation, its bootloader seems does not work and it shows this message: 'No bootable devices found.' what's wrong with it?
Nils
Thank you very much, I wanted to install Debian 10 for some time but was always afraid to do so, because my initial try on a Virtual machine didn't work out fine. Also I was over-challenged by the official Debian installation guide and the documentation. But now with your guide and your 30 things to do after installing Debian 10 I can proudly say I am writing this comment from a operating Debian 10 system on my Laptop and I am loving it!!!! Only thing I had to figure out by myself was how to include my separate data partition I used to have in Windows right away on boot and get the privilege as normal user to write and edit files on there.
Roger
deb [trusted=yes] file:/media/debian buster main contrib