Deploy Kubernetes cluster with ContainerD
Follow this blog-post, and you will deploy your first Kubernetes cluster with ContainerD. We will use ContainerD instead of Docker because Docker is to be deprecated from Kubernetes. We will build a cluster of one master and two worker nodes, but you can scale it up to more nodes if needed.
Content
- What is Kubernetes?
- 1 - Create servers
- 2 - Configure servers for Kubernetes
- 3 - Set up Master node
- 4 - Set up Worker nodes
- 5 - Deploy pod network
- 6 - Quick test
- 7 - Testing Scaling and Self-healing
What is Kubernetes?
I like how Gordon Haff, a technology evangelist at Red Hat, explains Kubernetes:
Kubernetes is an open-source platform that automates Linux container operations. It eliminates many of the manual processes involved in deploying and scaling containerized applications. In other words, you can cluster together groups of hosts running Linux containers, and Kubernetes helps you easily and efficiently manage those clusters.
Kubernetes is the most suited for deploying microservices. Unlike a monolithic application where everything is working as a single unified unit, a microservices architecture breaks it down into a collection of smaller independent units that helps avoiding bottlenecks and simplifies scaling. Kubernetes makes it very easy to automate, deploy, scale, and operate large projects built on a microservices architecture.
Kubernetes is used with containers to avoid all the dependency problems. Likely you will see Kubernetes used with Docker as a container runtime interface, but Docker is to be deprecated after Kubernetes v1.20. So, we will use Kubernetes with ContainerD that is a more up-to-date way to run Kubernetes.
What you will learn
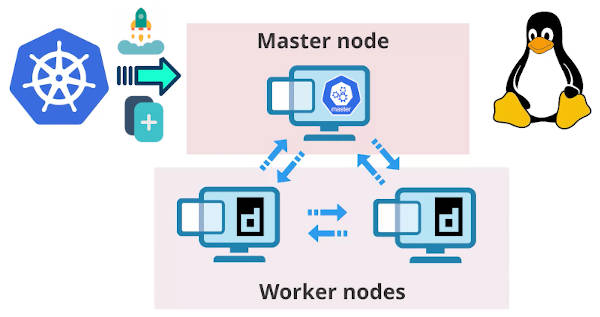
We will create a simple setup of one master node and two worker nodes. But of course, you can use more nodes if needed.
We will install Kubernetes on these machines and make them talk to each other. Kubernetes will act as an orchestrator.
We will deploy an application on this Kubernetes cluster and test some of the key features of Kubernetes, such as
- scaling
- self-healing
Let’s get started!
1 - Create servers
To create our master and worker nodes, we need three servers. You can use any cloud server provider that offers an option to create a network of servers.
I will be using Serverspace.io, a sponsor of this blog-post. Serverspace offers cloud infrastructure for any digital project including a Kubernetes cluster. It bills you in 10 minutes increments. Hence, you can use a VM for 20 minutes and then delete it, and you will only pay for 20 minutes. Also, no linked credit card is required. So, it is perfect for testing.
Use the promo code AVERAGELINUXUSER to double up your first payment at Serverspace:
Log in to Serverspace → Settings → Promo code → enter AVERAGELINUXUSER
Let’s create a Serverspace infrastructure for our Kubernetes cluster.
Create a VMware public network
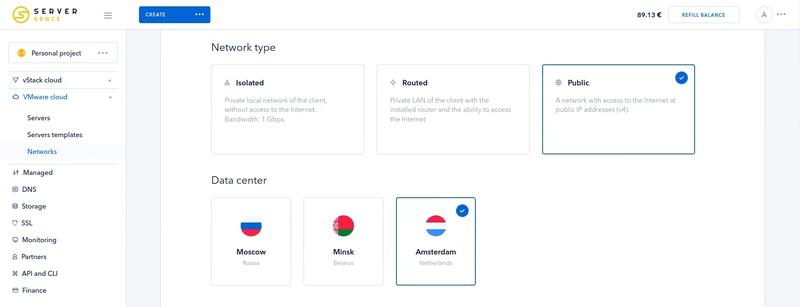
We will start with creating a public network.
Serverspace → VMware Cloud → Networks → Add Network
Network type: Public
Data center: Amsterdam
Network name: Kubernetes cluster
Create 3 servers
Now, we’ll add servers to this network.
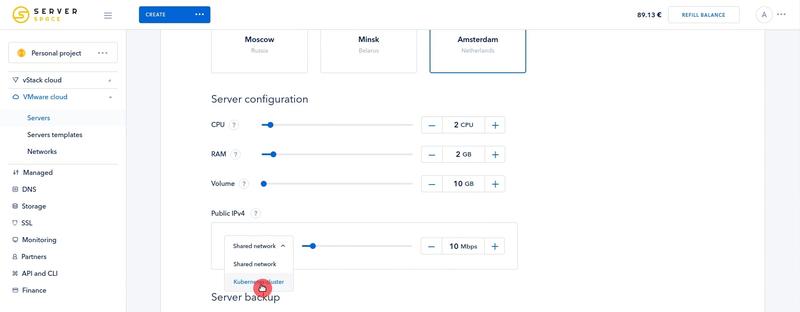
Serverspace → VMware Cloud → Servers → Add Server
Virtual server template: Ubuntu 20.04
Server configuration:
- 2 CPUs
- 2GB of RAM
- 10GB of storage
- Select the newly created Kubernetes cluster as a network
Servers number: 3
Server names:
- master
- worker1
- worker2
Finally, click Create to apply the configurations.
After the servers had been created, we can get their login credentials by clicking on them and checking the Status tab:
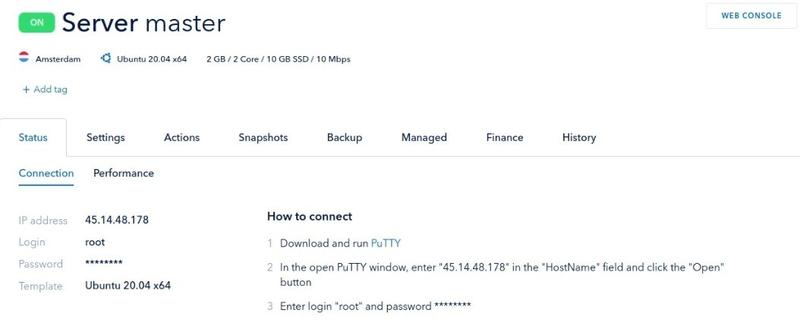
Furthermore, we can modify the configuration (add more CPU, RAM, storage) of these servers, restart/turn off them from this dashboard, create snapshots and enable backups.
Now, log in to each server by using the credentials from the Status panel:
ssh root@<IP address>
Change hostnames
To distinguish these servers, let’s change their hostnames to:
- master
- worker1
- worker2
On each server, open the file /etc/hosts:
sudo nano /etc/hosts
Add master’s and workers’ IPs, which you can get from the Serverspace control panel.
45.14.48.178 master
45.14.48.179 worker1
45.14.48.180 worker2
To remind you, use Ctrl + O to write the changes, and Ctrl + X to exit nano.
We can now use these names instead of typing the IPs.
After that, let’s assign a hostname to each of these servers.
sudo hostnamectl set-hostname master # On master server
sudo hostnamectl set-hostname worker1 # On worker1 server
sudo hostnamectl set-hostname worker2 # On worker2 server
To make the changes take effect, log out and log in on each server.
Now, you should be able to see the server names in your terminal:
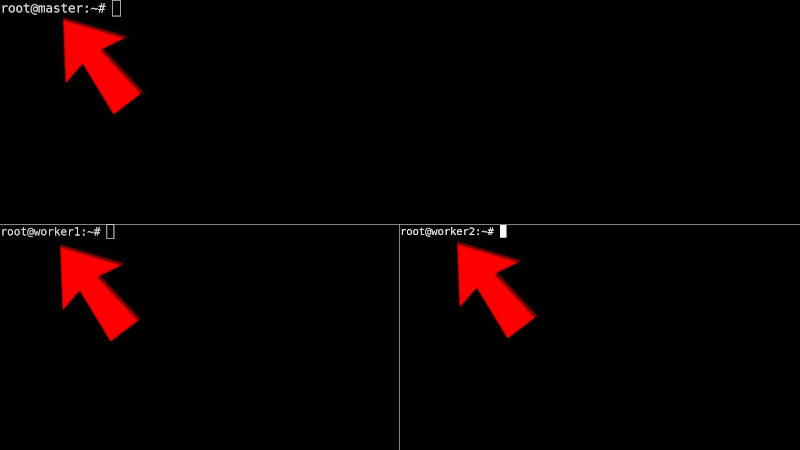
This will make it easier to navigate between different servers.
2 - Configure servers for Kubernetes
Next, we need to install software and perform the necessary configuration on each server.
Install packages
To install Kubernetes and containerd run these commands:
apt update
apt install -y apt-transport-https

curl -s https://packages.cloud.google.com/apt/doc/apt-key.gpg | apt-key add -

cat <<EOF >/etc/apt/sources.list.d/kubernetes.list
deb http://apt.kubernetes.io/ kubernetes-xenial main
EOF

apt update

apt install -y kubelet kubeadm kubectl containerd
apt-mark hold kubelet kubeadm kubectl containerd
apt-mark hold will prevent the package from being automatically upgraded or removed.
Configure Containerd
Load the necessary modules for Containerd:
cat <<EOF | sudo tee /etc/modules-load.d/containerd.conf
overlay
br_netfilter
EOF

sudo modprobe overlay
sudo modprobe br_netfilter
Setup the required kernel parameters:
cat <<EOF | sudo tee /etc/sysctl.d/99-kubernetes-cri.conf
net.bridge.bridge-nf-call-iptables = 1
net.bridge.bridge-nf-call-ip6tables = 1
net.ipv4.ip_forward = 1
EOF

sudo sysctl --system
Configure containerd:
sudo mkdir -p /etc/containerd
containerd config default | sudo tee /etc/containerd/config.toml
sudo systemctl restart containerd
Disable swap
Turn swap off:
swapoff -a
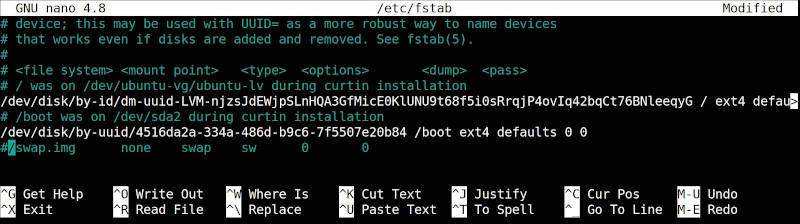
And prevents it from turning on after reboots by commenting it in the /etc/fstab file:
nano /etc/fstab # comment swap
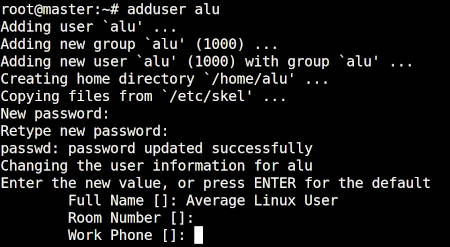
Add a regular user
We also need to add regular user because these are newly created servers which only
has root as user. I will create ALU user and add it to the sudo group on each server:
adduser alu
adduser alu sudo
Make sure to check out our article on how to create a new user on Linux if you are unfamiliar with the process.
Now, we can log out and log in as a regular user, which is also a requirement to run some of the Kubernetes setup commands.
The servers are ready now. We can start configuring our master node.
3 - Set up Master node
We will create a Kubernetes cluster by running the following command on the master node:
sudo kubeadm init
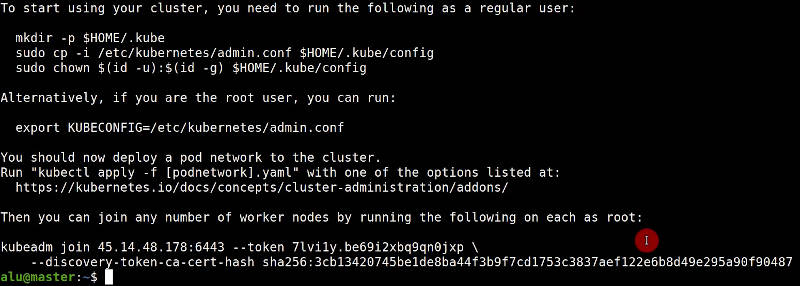
The command takes some time to run (~10 minutes on my end), so after it’s done, make sure that you have a similar output to the one on the image below:
If you get an error that kubeadm could not find containerd automatically,
specify it as Container Runtime Interface with --cri-socket:
sudo kubeadm init --cri-socket /run/containerd/containerd.sock
Now, following the instruction provided in the kubeadm init output, configure the user to run kubectl on the master node:
mkdir -p $HOME/.kube
sudo cp -i /etc/kubernetes/admin.conf $HOME/.kube/config
sudo chown $(id -u):$(id -g) $HOME/.kube/config
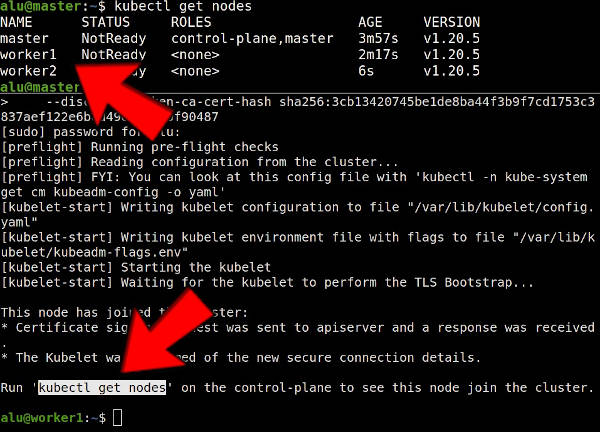
4 - Set up Worker nodes
Run the command for joining worker nodes. It’s a last line in the kubeadm init output and has the following format:
kubeadm join <IP>:<port> --token <TOKEN> --discovery-token-ca-cert-hash <SHA256>
Here is how this command looks in my case:

Note, I use master instead of IP, becuase we specified the IPs earlier in the /etc/hosts file.
Run this command on each worker node (worker1 & worker2 in our case).
If your kubeadm doesn’t detect containerd automatically, specify the
containerd socket with --cri-socket /run/containerd/containerd.sock at the end of kubeadm join ... command.
After the command finished successfully, it will ask you to run this command on the master node:
kubectl get nodes -o wide
It will verify that nodes are connected. You should find both worker1 and worker2 lister as nodes:
5 - Deploy pod network
Now, we need to deploy a pod network to this cluster. We will use the Calico network, but Kubernetes offers other options too.
To deploy Calico, run this command on the master node:
kubectl apply -f https://docs.projectcalico.org/v3.14/manifests/calico.yaml
And check the status of your nodes:
kubectl get nodes -o wide
All nodes should have STATUS of Ready. It may not show up immediately, so make sure to wait a few minutes for changes to take effect.
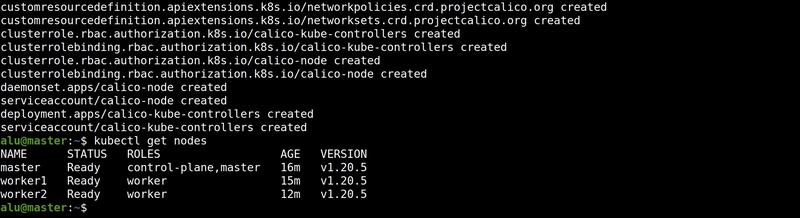
When you see that all nodes are ready, you start testing this Kubernetes cluster.
6 - Quick test
The simplest way to test our setup is to create Apache HTTP Server with a pod
http-page and expose it via service named http-service with port 80 and NodePort type:
kubectl run http-page --image=httpd --port=80
kubectl expose pod http-page --name=http-service --port=80 --type=NodePort
Verify that it works:
kubectl get service http-service
kubectl get pods http-page -o wide
Get the node name and port from the output of the command above and run this command:
curl http://<NODE NAME>:<PORT>
The output should look like this:
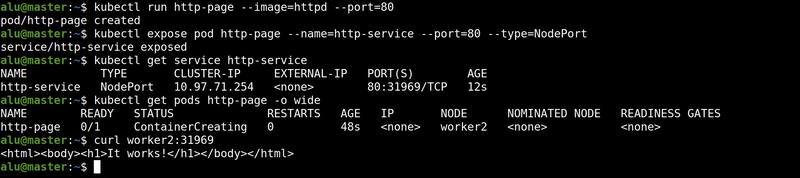
As the message says, it works!
7 - Testing Scaling and Self-healing
To make even more tests, let’s deploy an application, scale it to several replicas and check if Kubernetes will self-heal when one of the replicas breaks.
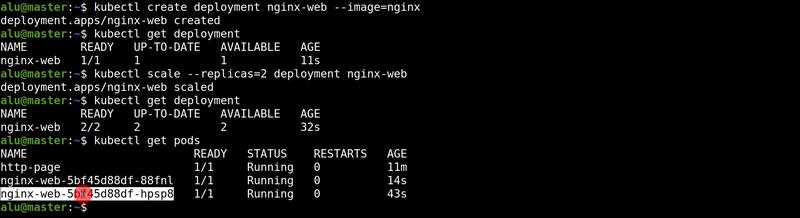
Deployment
Create an NGINX deployment:
kubectl create deployment nginx-web --image=nginx
Verify that the deployment was successful:
kubectl get deployment
kubectl get pods
Scaling
Scale-up this deployment to 2 or more replicas:
kubectl scale --replicas=2 deployment nginx-web
We can check our replicas with these commands:
kubectl get deployment -o wide
kubectl get pods
We can also see more details about this deployment with the kubectl describe command:
kubectl describe deployment nginx-web
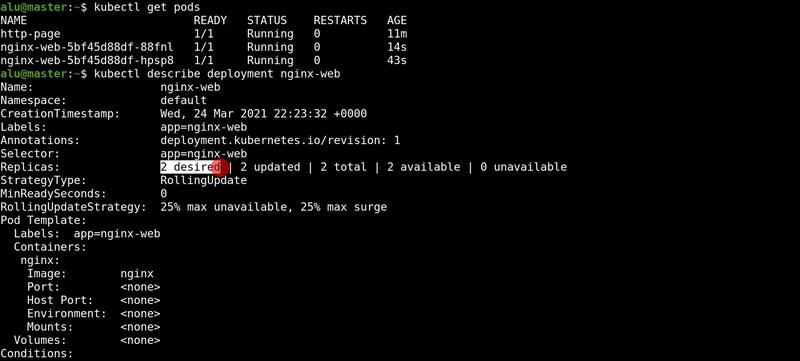
You see that we have two desired replicas and both of them are available now.
Self healing
Now, let’s imagine one of the replicas broke. For example, one of the worker nodes died.
To simulate this, we will kill one of the replicas and see if it is restored by Kubernetes.
Copy the name of one of the pods:
kubectl get pods
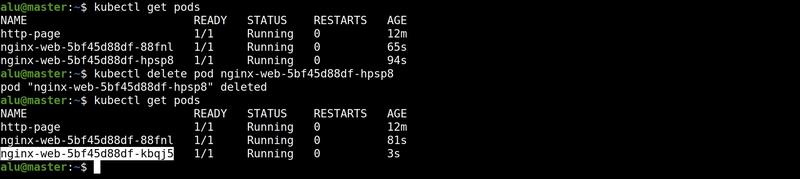
And kill it with the following command:
kubectl delete pod <pod name> &
Check the results:
kubectl get pods
Our pod has been deleted but Kubernetes created a new one (with a little different name) to replace it and our application is running just fine.
Conclusion
Congratulations! You have a working Kuberbetes cluster with ContainerD as a runtime interface.
You can now use it for learning purposes or as a foundation for your real project. You can scale up by adding more nodes and resources to this setup.
Try
Serverspace,
if you are looking for a hosting solution for your Kuberbetes cluster. You will
be able to double up your first payment with the promo code
AVERAGELINUXUSER (Serverspace → Settings → Promo code → enterpromo code).
Comments
Boyan Boychev
Thank you, great article!
I have one question:
containerdorcontainerd.iopackage? (based on official Kubernetes documentation we need usecontainerd.ioone - https://kubernetes.io/docs/setup/production-environment/container-runtimes/#containerd)Richard Chin
When I run the curl command. I get the following error message “curl: (7) Failed to connect to k8s-worker-01 port 32150: Connection refused”.
Warning FailedCreatePodSandBox 3m43s kubelet Failed to create pod sandbox: rpc error: code = Unknown desc = failed to setup network for sandbox “6b734e9c0269c454a4e93c32b5d293d6b0a2614423a9355f8a113d98327354ff”: stat /var/lib/calico/nodename: no such file or directory: check that the calico/node container is running and has mounted /var/lib/calico/
Thank you for the great post.
Richard Chin
I just figure it out.
sharif
Hi Richard,
how did you solve this problem. I am having the same,
grep calico”. The following is the output. I am not sure how to fixed this. Warning FailedCreatePodSandBox 3m43s kubelet Failed to create pod sandbox: rpc error: code = Unknown desc = failed to setup network for sandbox “6b734e9c0269c454a4e93c32b5d293d6b0a2614423a9355f8a113d98327354ff”: stat /var/lib/calico/nodename: no such file or directory: check that the calico/node container is running and has mounted /var/lib/calico/
please send me a mail on sharif93@yahoo.com.
Rafael
Use this: kubectl apply -f https://docs.projectcalico.org/manifests/calico.yaml
Ari Prince
Hello there, i followed all the steps and it works like a charm. By any chance do you have the steps on how to deploy a kubernetes dash-board and how to make it accessible from out side? Ive seen many how to but all of them runs on localhost, i even want to try reverse proxy it but maybe there is an easy way.