21 Things To Do After Installing OpenSUSE
OpenSUSE is one of the oldest Linux distros. It’s a distro of choice for many developers, sysadmins, but also average Linux users. So, in this post, we’ll explore the essential 21 things to do after installing OpenSUSE!
Content
- 1. Update System
- 2. Create a System Snapshot
- 3. Install Drivers
- 4. Install Codecs
- 5. Add Community Repositories
- 6. Install Microsoft Fonts
- 7. Decrease Swapiness
- 8. Disable GRUB Delay
- 9. Disable Click to Open Files
- 10. Uninstall Discover
- 11. Open RPM with Yast
- 12. Turn on Night Color
- 13. Change Task Switcher
- 14. Install Audio Player
- 15. Firefox Settings
- 16. Install Google Chrome
- 17. Install Java
- 18. Install Build Essentials
- 19. Remove Games
- 20. Install Vanilla Kernel [OPTIONAL]
- 21. Bonus
1. Update System
After installing any distro, not just OpenSUSE, it’s advisable updating the system to take advantage of the latest and greatest features.
In OpenSUSE, the following command is used to update the system:
sudo zypper ref && sudo zypper up
Also, if you are running OpenSUSE Tumbleweed, which is a rolling distro, make sure to run the following command to make sure that your distro version is up to date:
sudo zypper dup
2. Create a System Snapshot
Linux users are known for their passion for tinkering with distros. However, before doing any modifications to the system settings, make sure to have a backup of your system. OpenSUSE is one of the best Linux distros in this regard as it allows you to create multiple system snapshots with its BTRFS file system.
We can create a system snapshot with the following:
Open Yast → Filesystem Snapshots → Create → Fill in the fields → OK
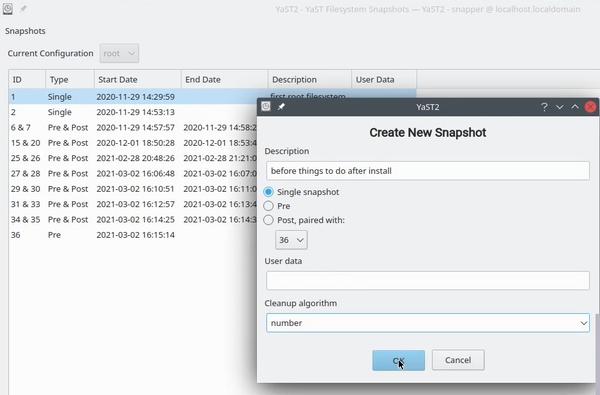
Now, if something goes wrong with your system while you are doing these things to do after installing OpenSUSE, you can always revert to the working state.
3. Install Drivers
Drivers are necessary to every system since they allow the system to take full advantage of the hardware. For example, a driver for the Nvidia graphics card can easily be installed with one-click-install at OpenSUSE Community.
If you don’t know which driver to install, make sure to get the model of your graphics card by executing the following command:
sudo hwinfo --gfxcard | grep Model
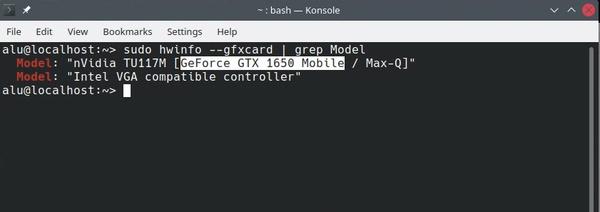
After retrieving the model of the graphics card, search for it on the Nvidia website to find what driver version you need. It should be 400+ for the newer graphics cards and 300+ for the older ones. In my case, my Nvidia GeForce GTX 1650 belongs to 600+ GeForce category and I need the driver version 400+.
You can use the links below to one-click-install the driver or visit OpenSUSE Community if these buttons do not work.
Choose to open the file with Yast to install the drivers.
NVIDIA GeForce 600+ (driver version 400+)

NVIDIA driver GeForce 400+ (driver version 300+)
NVIDIA GeForce 8xxx+ (driver version 300+)
Regarding the WiFi card, I don’t have one, so I can’t show you how to do it but I can point you to the official guide, which is very well documented.
4. Install Codecs
Codecs allow you to play various media formats on your Linux machine. They are not included by default due to some legal concerns. To be able to play all popular media files, I recommend you to install these additional codecs.
Once again, we can install them with a single-click-install using the buttons below. If some of these buttons do not work, visit OpenSUSE Community website.
KDE Codecs
GNOME Codecs
5. Add Community Repositories
By default, OpenSUSE has only official packages included in the repositories. However, the default list of packages is limited and you likely won’t find everything you need.
That’s where community repositories come in. The most important one, in my opinion, is Packman.
We can add the Pakman repository with Yast:
Open Yast → Software Repositories → Add → Select Community Repositories → Next → Select Packman Repository → OK
At the time of this writing, there’s a migration going on, so adding Packman this way may result in an error:
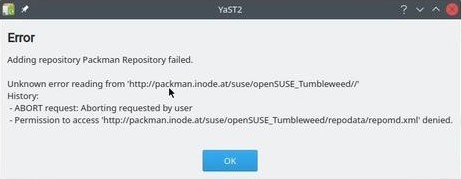
Luckily, we can fix it by adding a custom URL of one of the working community repositories mirrors:
Open Yast → Software Repositories → Add → Select Specify URL → Next → Type URL of the selected mirror → Next → OK
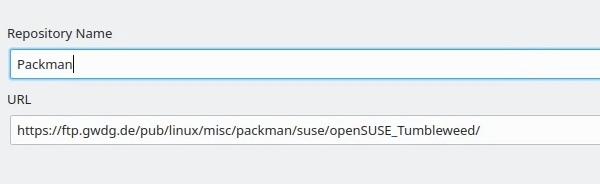
Alternatively, you can add the Pakman repository from the command line:
Tumbleweed
sudo zypper ar -cfp 90 https://ftp.gwdg.de/pub/linux/misc/packman/suse/openSUSE_Tumbleweed/ packman
Leap
sudo zypper ar -cfp 90 'https://ftp.gwdg.de/pub/linux/misc/packman/suse/openSUSE_Leap_$releasever/' packman
Lastly, to make changes take effect regardless if you used the command line or Yast, run:
sudo zypper dup --from packman --allow-vendor-change
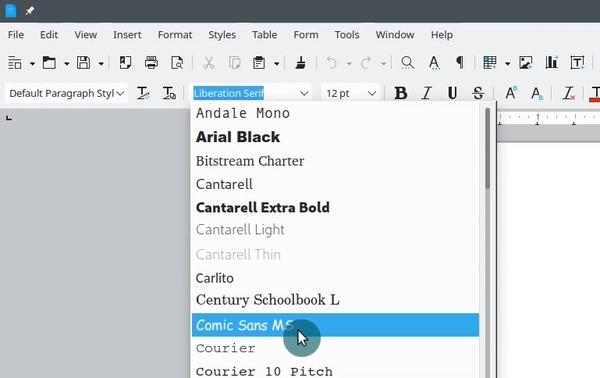
6. Install Microsoft Fonts
Similar to codecs, Microsoft fonts don’t come pre-installed either. The absence of Microsoft fonts (e.g. Arial, Times New Roman, Comic Sans) will likely cause you issues if you work with Microsoft Office files frequently.
We can install all of them from the previously added Packman repository:
Open Yast → Software Management → Search for fetchmsttfonts → Right-click →
Install → Accept
7. Decrease Swapiness
One of the ways to boost your system performance is by decreasing the swappiness value. This feature forces your Linux system to use your RAM, instead of your hard drive. If you are not familiar with Linux swap, check out our article on Swap and Swapiness.
Check the current swappiness value by executing:
cat /proc/sys/vm/swappiness # 60 (default)
Open /etc/sysctl.conf for editing:
sudo nano /etc/sysctl.conf
Add vm.swappiness=10 at the end and save the file. Then press CTRL + O to write the changes, and CTRL + X to exit nano.
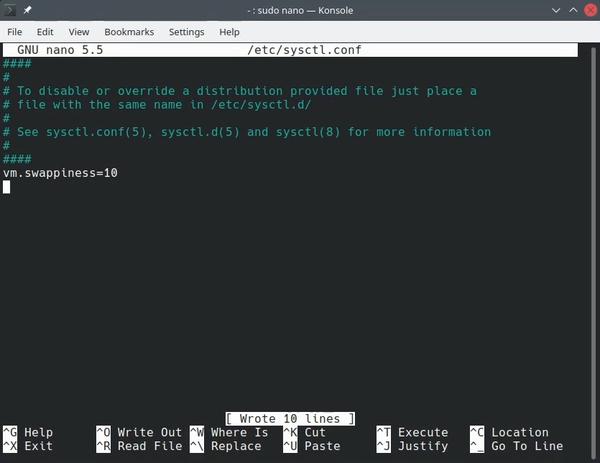
Reboot your system and check the swappiness value:
cat /proc/sys/vm/swappiness # 10
8. Disable GRUB Delay
Starting the system with OpenSUSE shows the GRUB menu each time prompting you to select the system to boot or wait 8 seconds. If OpenSUSE is the only system on your machine, it makes sense to remove the menu from showing up on boot and speed up the boot process by 8 seconds.
Open Yast → Boot Loader → Bootloader Options → Set timeout to 0 → OK
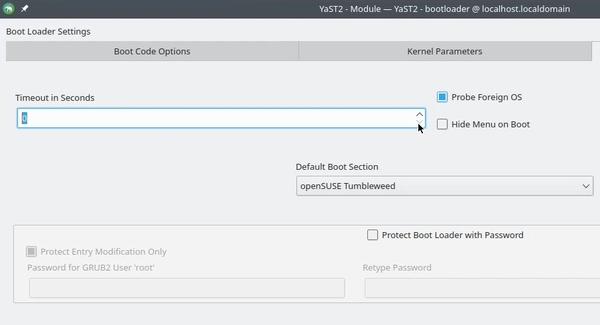
In case you have some problems with your system and you need to call the GRUB menu to boot from older kernel for example, press and hold the Shift key during boot and you will see the GRUB menu.
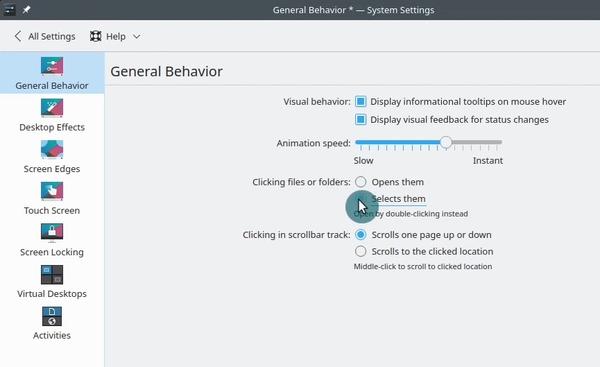
9. Disable Click to Open Files
Plasma 5 opens files/folders on single-click by default. However, most people (including me) prefer a double-click which can be enabled in Settings.
Open System Settings → Workspace Behavior → Enable “Click files or folders - Selects them”
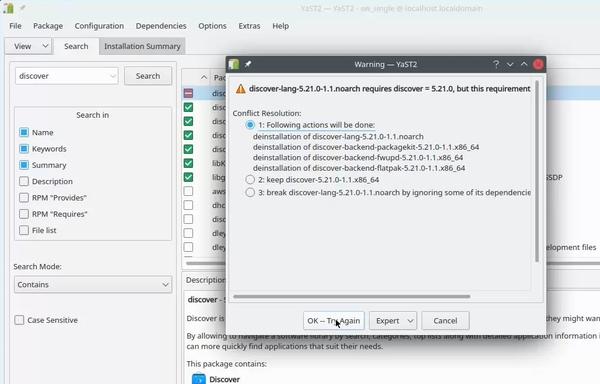
10. Uninstall Discover
Discover is the software center that is shipped with Plasma 5. Discover is infamous for its crashes, and it’s not a very good app overall. On top of that, it also adds redundancy since we already have Yast.
You can safely remove Discover:
Open Yast → Software Management → Search for discover → Right-click → Delete →
Toggle #1 (deinstallation of discover packages) → Accept
11. Open RPM with Yast
OpenSUSE opens RPM packages as an archive with Ark by default instead of Yast, which allows you to install them. Fortunately, it’s very easy to correct this behavior.
Select any RPM package → Right-click → Properties → File Type Options → Move Yast to the first place → Apply
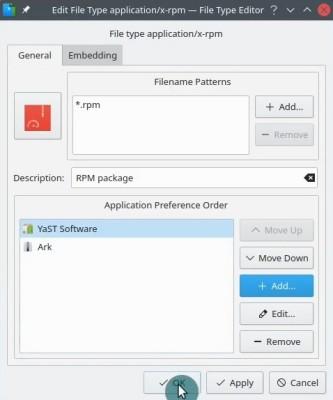
Now, you will be able to install RPM packages just by double-click on them.
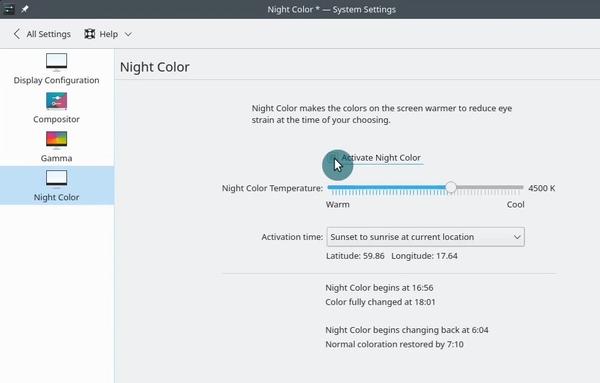
12. Turn on Night Color
Night color reduces the amount of blue light at night. This is better for your eyes and helps you to fall asleep easier. Night Color is a built-in feature of the Plasma 5 desktop and it just needs to be enabled:
Open System Settings → Display and Monitor → Night Color → Activate Night Color → Apply
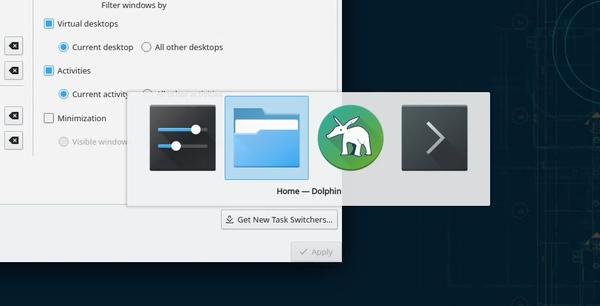
13. Change Task Switcher
The default Task Switcher (Alt + TAB) on Plasma 5 desktop is shown as the panel on the left side of the screen and it switches between focused windows. I prefer a switcher with icons and no focus on window selection. Maybe you will love it too! Just try:
Open System Settings → Window Management → Task Switcher → Select large icons (without selected window) → Apply
14. Install Audio Player
OpenSUSE includes VLC as its media player of choice. VLC is a video player that happens to support playing other media as well. Nevertheless, I prefer to have a dedicated app for playing audio files over the “one size fits all” solutions.
When it comes to audio players, there are many options to choose from, but my favorite one has always been Clementine Music Player.
Open Yast → Software Management → Search for clementine → Right-click → Install → Accept
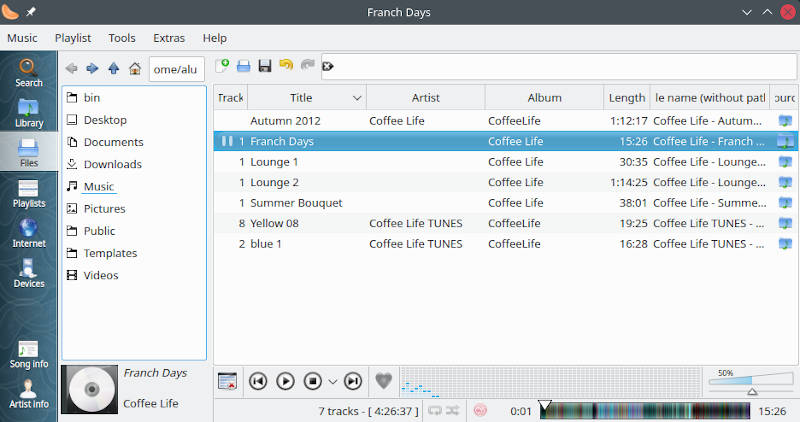
You can also try other options JuK, if you prefer a light and simple audio player, and Spotify, if you already use it. All these players and many others are available in the Yast software management app.
15. Firefox Settings
Firefox is a default browser of OpenSUSE and it happens to be my favorite browser as well. Let me show you a few tricks to make your Firefox experience so much better!
First off, I would recommend installing the Plasma Integration add-on for a more seamless experience between the browser and the desktop. It enables media control, browser notifications, Krunner browser tab search and a lot more!
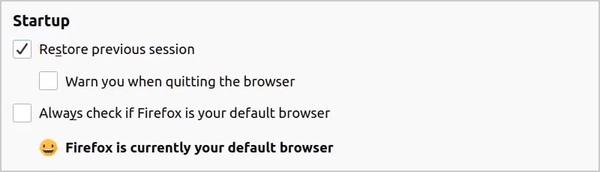
Next, Firefox has a useful feature that restores tabs from the previous session, each time you launch it. Open Firefox → Options (hamburger menu) → Preferences → Enable Restore previous session.
Another helpful feature is to enable DRM content. You may find yourself unable to play some videos (e.g. Netflix) or audio because of DRM restriction. To enable DRM content, Open Firefox → Options (hamburger menu) → Preferences → Enable Play DRM-controlled content

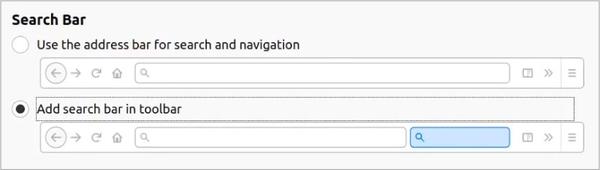
The next improvement is related to Firefox’s search bar behavior. Let’s say you search for a particular email address. Firefox will open your default email client instead of performing a web search. This functionality can certainly be annoying. You can fix this by adding a regular search bar.
Firefox Preferences (hamburger menu) → Preferences → Search tab → Select “Add search bar in toolbar”
16. Install Google Chrome
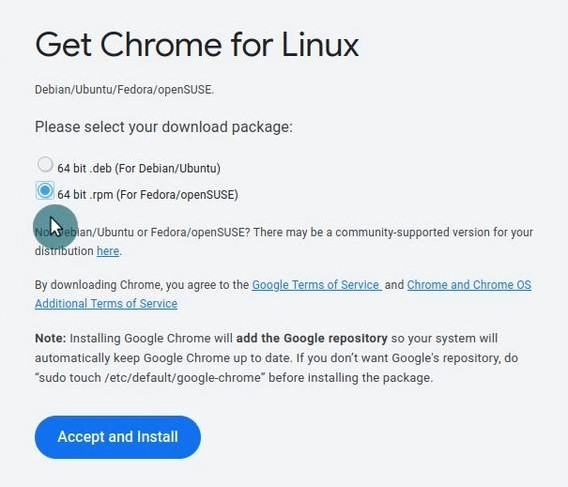
I am familiar with the fact that not everyone is a fan of Firefox. Thus, I will show you how to install the Google Chrome browser.
Go to Chrome’s website and download an RPM package. After downloading, double-click on it and install it with Yast.
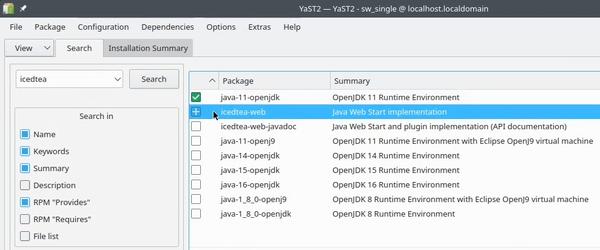
17. Install Java
Java is a very popular programming language and many programs depend on it to run. Thus, it’s critical to make sure that it’s installed.
_Open Yast → Search for java- → Make sure that you have java-
Furthermore, some web applications require a special Java plugin icedtea which can be installed by following the same steps:
Open Yast → Search for icedtea- → Select it and install
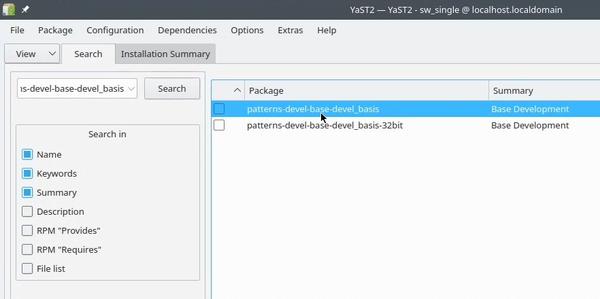
18. Install Build Essentials
Build essentials are packages for software development. But, even if you are not a developer, there’s a high probability some apps of yours will require them. So, it is better to install them now and forget:
Open Yast → Software Management → Search for patterns-devel-base-devel_basis → Right-click → Install → Accept
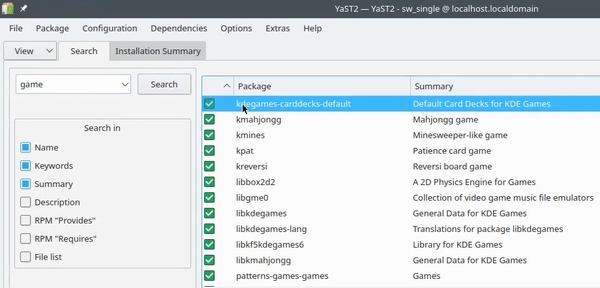
19. Remove Games
OpenSUSE includes some dummy games which I am pretty much sure no one plays and they just occupy a place in the menu and on the disk. So, let’s see how we can uninstall them.
Open Yast → Software Management → Search for game → Select to remove games related packages like
kdegames-carddecks-default, kmahjongg, ect → Accept
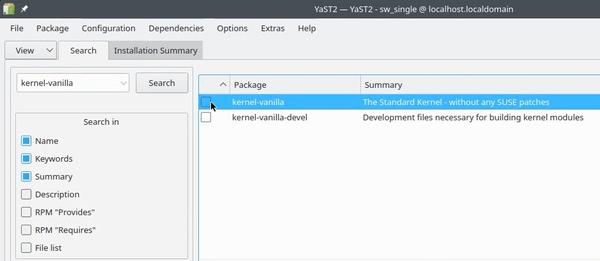
20. Install Vanilla Kernel [OPTIONAL]
This item is marked as optional since I only recommend doing this if you have problems with the default OpenSUSE’s kernel. The default OpenSUSE’s kernel has certain patches that are not implemented on the vanilla kernel and those can cause issues on some systems. If you experience some problems with your OpenSUSE, try installing the vanilla kernel and it will fix your issues:
Install:
Open Yast → Software Management → Search for kernel-vanilla → Right-click → Install → Accept
Select it as a boot option:
Open Yast → Bootloader → Bootloader Options → Default Boot Section → Select Vanilla Kernel & Reboot your system
21. Bonus
OpenSUSE’s default desktop environment is Plasma 5, which is my favorite desktop as well. Plasma 5 is known for its modern design and customization options, so if you would like to be more productive on your Plasma 5, check out:
- how to customize KDE Plasma 5
- configure Dolphin KDE’s file manager
- install Yakuake, a pull-down terminal for Plasma 5
Also, if you are looking for more software to install on your OpenSUSE, check out OpenSUSE Software webpage.
Conclusion
Alright, we’ve come to an end! These were my top 21 things to do after the installation of OpenSUSE, and I hope that you’ve found them helpful. As always, the list can be expanded so I am looking forward to your tips in the comment section below! 👇
Comments
John Davidson
Thank you!! This is great. I am a unix power user for over 20 years. I do a lot of stuff on the server side but I like my desktop to be a certain way and I don’t feel like messing around with trying different linux flavors much any more. Been using Ubuntu lately but since they broke firefox and snap I am going back to OpenSuse. Its been awhile. So thanks again.
Kevin Daniel
Being a llinux user for more than 15 years I have to say that most of this is totally unnecessary. I do recommend though that you install cinnamon over gnome, it’s fairly stable .. it crashes once a month and prompts you to restart it when it does. There is a lot to say about knowing your operating system and being familiar with it before messing about. Use the operating system first so you learn what you like rather then listen to the ramblings of some “expert” you don’t know.
Just saying, take it as you wish
Person reading thing
have to disagree with #8. Being able to modify the boot parameters can be a life saver, esp with VM’s, and for most users they wont know the workarounds with no delay.
Gatton
I agree with this one. I always set my boot loader timeout to 3 seconds. I like having the ability to quickly set boot parameters or access other options in case of problems.
Mo Renteria
Hi ALU! Thanks for all your hard work in making these web pages and videos!! I’m getting an error trying to install Google Chrome. Below in the error message in quotes.
“Internal error. Please report a bug report with logs. Run save_y2logs to get complete logs.
Caller: /usr/share/YaST2/lib/ui/ui_extension_checker.rb:93:in `exist?’
Details: no implicit conversion of nil into String”
Any ideas?
Thank you in advance!
Average Linux User
Download the rpm package and try installing it with zypper:
Rafael
To put “GRUB timeout” to 0 is a great mistake. When user have troubles with boot, easy access to GRUB options is required, to boot on previous kernels, or in safe-mode or from snapshots.
Average Linux User
You can press and hold the Shift key during boot to open the GRUB menu.
Rafael
Yes, but that’s not explicit, no messages in page, so an “average user” don’t know it. ;)
Average Linux User
Yes, you are right. I will keep this in mind for my next tutorials. I also added this explanation to this post.
Rafael
Excellent. You don’t need to know that trick till you NEED to use it .
Roberto
Hello ALU, congratulations for your precious work! Installing Clementine, Yast tells me that “libprotobuf25” is missing. Do you know how to find and install it? I’m not able to find it in Yast sofwtare… Thank you very much
Average Linux User
Do you use Tumbleweed? I installed Clementine in Tumbleweed without any problem. I also have
libprotobuf25installed. Try to installlibprotobuf25first and then install Clementine.Roberto
Yes I use Tumbleweed and also checked in live usb, but this file is not present. So I will try to install separately. I’m wondering how is possible you have it … maybe my copy is not complete? Thank you very much
Average Linux User
I cannot answer now. Maybe it was installed with another program as a dependency.
Scott
I use Tumbleweed. Please tell me about the Update System. Is it OK for me to do (sudo zypper ref && sudo zypper up) every day, or do I need to do (sudo zypper d up) as well?
Average Linux User
Tumbleweed is a rolling distro thus each update is kind if a distro upgrade. So, always use
sudo zypper ref && sudo zypper dupwhen using Tumbleweed.Scott
Thank you for your kind advice.
Hithaishi
Also, checkout tumbleweed-cli which you can install through zypper which allows you to switch to a specific snapshot of the OS. More information can be found at github.com/boombatower/tumbleweed-cli You can check which release has the least issues/bugs and switch to that Check the review of each release from review.tumbleweed.boombatower.com
derrick omurwa
and what about if it is leap?
Average Linux User
In Leap: