How to set up a Linux VPN server (Beginner's Guide)
A VPN, or Virtual Private Network, creates an encrypted tunnel between your computer and a remote server. This has two major advantages. First, you mask your real location because you will have the IP address of the VPN server. Second, all the traffic between your computer and the server is encrypted. So, if you connect to a public WiFi, your data remains safe even if it is intercepted by someone. Similarly, your Internet Service provider cannot read your data.
There are three ways to get a VPN service.
- You can get a free VPN. This is obviously the worst option because there is nothing free and most likely such VPN providers sell your data to the third party. Free VPN is also usually very slow.
- You can sign up for a VPN service for a monthly fee. This is the most popular option. It is more reliable than a free VPN but you have to trust your VPN provider.
- You can get a personal VPN on your own server. This is the most secure option because you have maximum control over your traffic.
This post is about the third option.
Requirements
To get your own personal VPN, you need two computers:
-
A client computer, most likely it is your home computer or a laptop. You use it to connect to a VPN.
-
A private server, this where you install a VPN and use it as a VPN provider. This can be your own physical server or a virtual server.
There are several programs you can use to configure a personal VPN. I will use OpenVPN. It is open-source, it is available in all Linux distro and I believe it is one of the most popular VPN programs.
Install and Configure VPN
Server computer
You need to install OpenVPN and cURL programs:
sudo apt install openvpn curl
cURL is needed to download the VPN installation script openvpn-install.sh. This script makes the installation very easy and error save. You can, of course, install everything manually, and there are good instructions on how to do that on Debian Wiki or Arch Linux Wiki. But I believe most of my readers prefer the simplest ways. This VPN installation script is a result of the work of 36 contributors, you can check what it does, and I personally trust it.
So, you need to download the script and make it executable:
curl -O https://raw.githubusercontent.com/Angristan/openvpn-install/master/openvpn-install.sh
chmod +x openvpn-install.sh
Then run this script as a superuser to install and configure OpenVPN on your server:
sudo ./openvpn-install.sh
You need to follow the assistant and answer a few questions. You can keep everything by default, just press Enter for every question. Only give a name to your VPN configuration and I also recommend encrypting the configuration with a password:
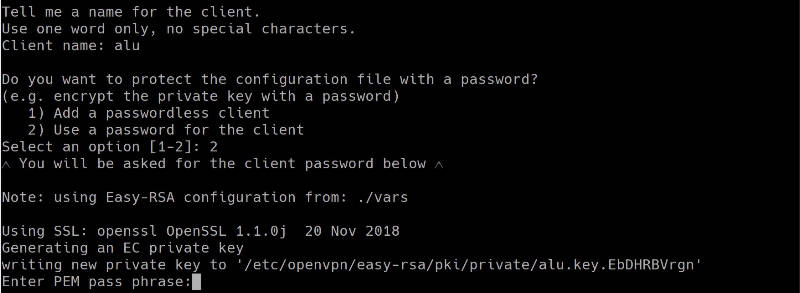
When everything is done. You should see a file that ends with .ovpn. This is a configuration file you will need to configure the client computer.

Client computer
On a client computer, also install OpenVPN and OpenVPN extension for your network manager:
sudo pacman -S openvpn networkmanager-openvpn
I install networkmanager-openvpn for Plasma 5 on Arch Linux. Search for these two packages in your distro. Their names may differ slightly. If you use Ubuntu GNOME, for example, you need to install networkmanager-openvpn-gnome:
sudo apt install openvpn networkmanager-openvpn-gnome
Next, download the VPN configuration file from your server:
scp remoteuser@remote-ip-address:/home/remoteuser/*.ovpn ~/Downloads/
The file will be downloaded to your local Downloads folder.
You can also use FileZilla if you prefer graphical programs. I explained how to use FileZilla and scp command in my previous post.
Connect to a VPN
First, I will show you the command line way to connect to a VPN. This way is more reliable and you make sure that your VPN works. Next, configure your graphical network manager.
Command line
So, copy the downloaded *.ovpn configuration file to the client folder of your OpenVPN:
sudo cp Downloads/*.ovpn /etc/openvpn/client/client.conf
Test the connection:
sudo openvpn /etc/openvpn/client/client.conf
You may need to enter the password if you set one and then you will see something like this:

If you do not see any error, your VPN works fine. To test it, open your internet browser and visit any website. You can also check your public IP address and it should be your server address.

Graphical connection in Network Manager
Although I like the command line, it is much nice to be able to connect to the VPN with just one click from your system tray:

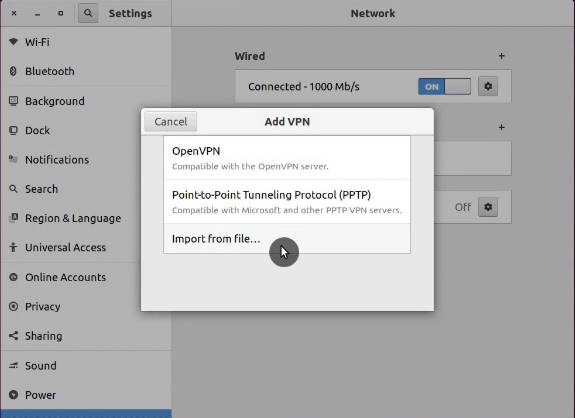
So, to add your VPN configuration to the Network Manager, open the Network Manager settings. Click on Add new connection, and import the configuration file you have downloaded from the server:
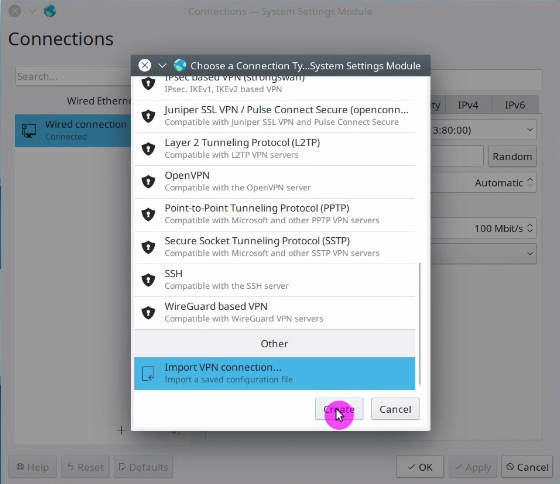
The above screenshots are from Plasma 5 Network Manager. It is almost the same in GNOME and other desktops. Just find an option to import the connection.
After that, you should see a new connection in your connection list. Try to enable it. If you see that your Network Manager icon changed, this means your VPN works. You can go to your web browser and test it.
Troubleshooting
When you start your OpenVPN connection from the command line, you will see errors right on the screen if something does not work. Try to understand what it says. If you do not how to fix it, google that error message.
However, when you configure the graphical interface of the Network Manager, you do not see detailed error information if it happens. You need to check the errors in your logs with this command:
journalctl -b -u NetworkManager
For example, I did not succeed to connect to my VPN in Plasma 5 the first time. I imported the configuration and I saw that the system tried to connect, but failed after some time:

Checking the log files revealed that the TLS certificate was missing:

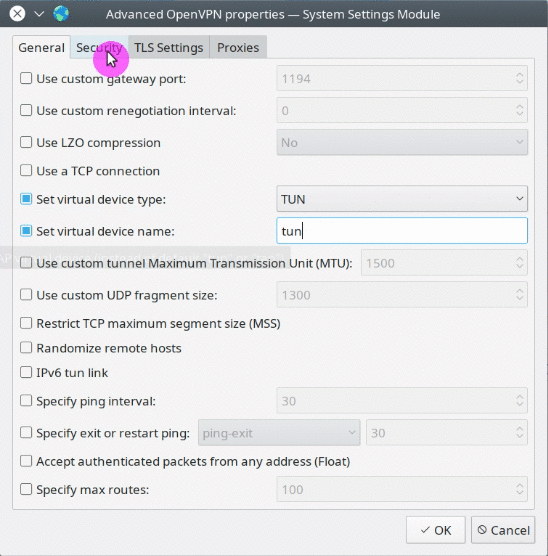
My Network Manager imported all certificated except the TLS one. From my experience, importing the connection configuration works flawlessly in the GNOME Network Manager. But other network managers may not recognize all settings during the importing. Probably, this is because the script is optimized for GNOME. So, you may need to correct some importing errors manually.
Open the configuration file *.ovpn with a text editor and make sure you have the corresponding settings in your Network Manager.
If some certificates are missing in your Network Manager, copy it from the configuration file and save as a *.crt file on your computer.
Usually, all the Network Manager certificates are stored in ~/.local/share/networkmanagement/certificates/.

You can see the screenshots of my configuration after I corrected all errors:
You may also need to change the permissions of all the certificates.
sudo chmod -R 700 ~/.local/share/networkmanagement/certificates/*/*
This is how I was able to troubleshoot my Plasma 5 VPN connection. Obviously, I cannot guess all the possible problems that can arise during your installation and configuration of a personal VPN service.
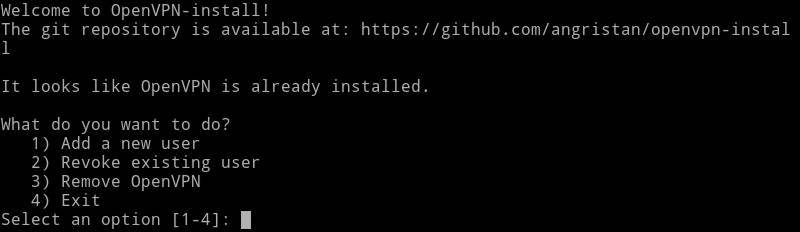
Add more VPN users
When you run the scrip openvpn-install.sh the first time, it creates a connection for one uses. However, if you run it again it, will offer you an option to add more users:
Select option 1. Add a new user and follow the instructions. The instructions are the same as above. Just provide a different Client name and you will see newuser.ovpn configuration file. Use it to connect a new user to this VPN server.
As you can see from the screenshot, running openvpn-install.sh again also gives you options to revoke a user, and remove OpenVPN from the server.
So, if you have ever thought about setting up a personal VPN, now you know how to do that. A personal VPN server is not only more secure in terms of privacy but it can also be cheaper. For example, if you connect your whole family to one VPN server, this option will be cheaper than subscribing your whole family to several VPN accounts by subscription.
Comments
Deepak
What is the IP Range and CIDR value for this VPN Script…?
Chris
Hi thanks for getting me up and running! is it possible to also install the server webUI?
Daniel Reiness
How can I connect to the VPN server using Open connect on an iphone?
Karl
Hello. I have followed the steps as described and can download the .opvpn that is created in Google Cloud Shell. The downloaded file, however, fails to connect to the internet when I call it from my OpenVPN Client for Windows on my Windows machine! I have tried the process several times with new .opvpn files created each time by the shell but the result is the same and I am at a loss (as a noob) as what causes the issue and how to resolve it. Any suggestions? Thanks in advance.
Michael
It is labeled as a guide to set up vpn but there are lots of steps to download setup scripts and no explanation of what the scripts do (normally a big red flag). I didn’t see anything about the firewall or routing rules to determine what gets routed through the vpn and what doesn’t. For an useful vpn or multiple vpns you need to make sure the traffic that needs to go through the correct vpn to reach the service is set and for a privacy/security vpn you need to make sure you never route traffic where you sign into an account through the vpn since that ties the vps-vpn to you thus no longer making your identity.
Nazmul
Hi , I have setup vpn server in aws ec2 instance.I am able to successfully connect to aws vpn server from my windows pc but unable to browse ? Could you please help me in this regard ? Your help in this regard is deeply respected and highly appreciated.
Jon
Will this work with CentOS 7.x? Would I need to make any modifications? (Noob, so please treat me like a dummy). Thanks!
Average Linux User
It should work! Let me know if you try it on CentOS.
Rob
Thank you for this guide. Could it be possible to add Windows client guide after Linux server is configured? Thanks
Average Linux User
Just install OpenVPN Client for Windows
Charly
Hi mate, could you help me please ? I did everything good but the ovpn file isn’t created. However it says it’s created… I checked with filezila and the terminal but no trace of the file and therefore I can’t go further..
Average Linux User
If you see no error, it must be created. Make sure you are looking for it in the same directory where you run the script. Also, make sure you named it, otherwise it will be hidden as
.ovpn. Check if it exists withls -la.Mr Jamie Hutber
I’m wondering if I can pause the VPN to stop traffic joining when I might not want them to? :)
Average Linux User
The easiest way is to shut down your VPN server. It is usually one click. Then you can start the server again when you need VPN.
Mr Jamie Hutber
Ahh interesting :) I guess I can user
service openvpn stoptoo? But I do not have any gui runningBruh
So why does the script try to install Monero through pacman when I follow it? I think this article tricks you to mine crypto for them.
imirosav
@Bruh Can you share the segment of the script that does this?
No bitcoinz
i read it… no mention of bitcoin mining… quite disappointing.
James Lio
I got it to work but I'm unable to see local network via SMB. Can you help me?
Thanks
Bob
You command line way of adding this is far, far more complicated.
pale2hall
THANK YOU. After struggling through setting up a VPN manually 10 different times over the past 5-7 years, your script worked like a dream. I absolutely had to setup a VPN into my work network while I'm away for Christmas, so I figured I'd give it one last shot on Christmas Eve. Your script worked flawlessly, and actually told me what ports I should forward, and I'm all set!
Average Linux User
Great! Enjoy your private VPN!