Simple Screen Recorder: the simplest way to record screen on Linux
Have you ever wondered how to record a screen tutorial on Linux? Well if you have, you are in the right place! In this post, I’ll explore the Simple Screen Recorder which, in my opinion, provides the simplest way to record screen tutorials on Linux.
Content
Record screen for YouTube
Simple Screen Recorder is an app that I’ve used for more than two years to record screen tutorials for my Youtube channel AverageLinuxUser.
As I became a more professional YouTuber, I jumped the ship, and now I use OBS. However, OBS is the more advanced screen recorder, and for simple screen tutorials, I would recommend Simple Screen Recorder. Still, if you are feeling adventurous, we have an OBS guide for beginners.
Simple Screen Recorder
Simple Screen Recorder is available in the default repo of all Linux distro. To install it in Debian/Ubuntu-based distros, run:
sudo apt install simplescreenrecorder
Configure inputs
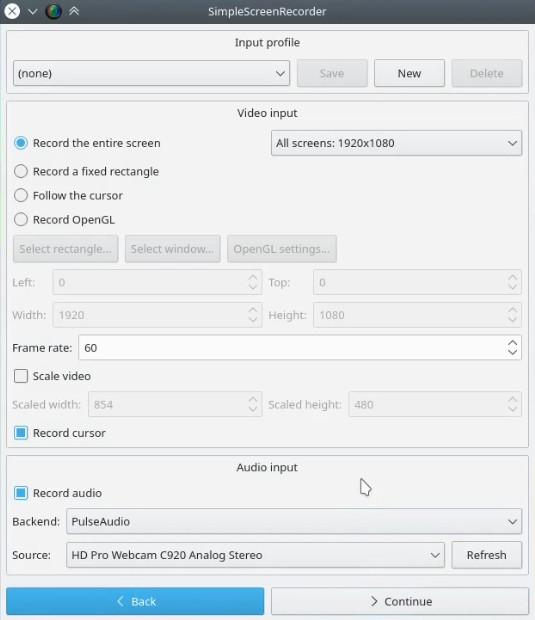
Upon opening the Simple Screen Recorder, you’ll see the main configuration window, making it very easy to configure your recording settings. The configuration window is split into three different categories:
- Input profile
- Video input
- Audio input
Input profile
The input profile section allows us to have different recording profiles. This can be useful if you need specific recording settings in other circumstances.
Video input
Video input, as the name suggests, is the section for configuring video settings. Simple Screen Recorder offers four recording options:
- Entire screen
- Fixed rectangle
- Rectangle following cursor
- OpenGL
I often found myself using the first two options. I was usually recording the entire screen and sometimes a specific part of the screen. Rectangle following the cursor and OpenGL are more advanced settings that are used in some niche cases.
Next, we can set a custom video framerate. Simple Screen Recorder will automatically adjust the frame depending on your machine, but you can always change it. I would recommend setting the frame rate to 60 to get a very smooth video. However, if your machine is not very powerful (CPU to be specific), feel free to reduce it to ~30.
Furthermore, if you have a low screen resolution, Simple Screen Recorder provides you with the scaling option to scale your video to a higher resolution.
Lastly, you can choose whether you would like Simple Screen Recorder to capture your cursor.
Audio input
Simple Screen Recorder lets you choose whether you would like to have audio in your video or not. If you choose to have an audio, select source (microphone) that you would like to use. In my YouTube setup, I use Samsung Go USB Mic (links are affiliate).
Configure outputs
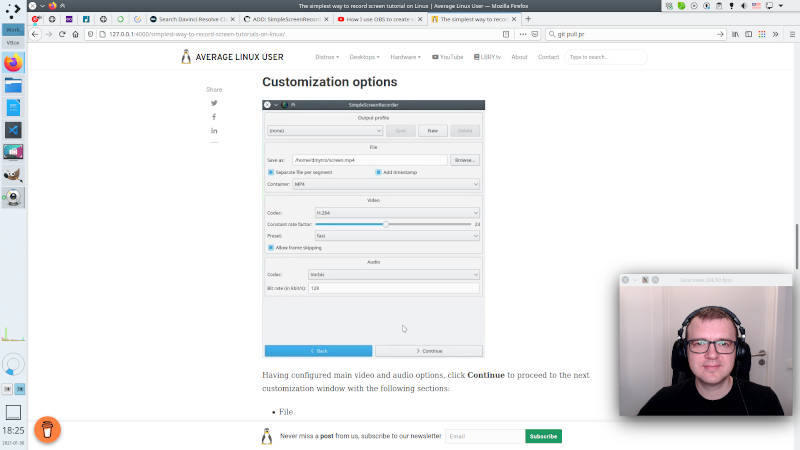
Having configured main video and audio options, click Continue to proceed to the next customization window with the following sections:
- Output File
- Video properties
- Audio properties
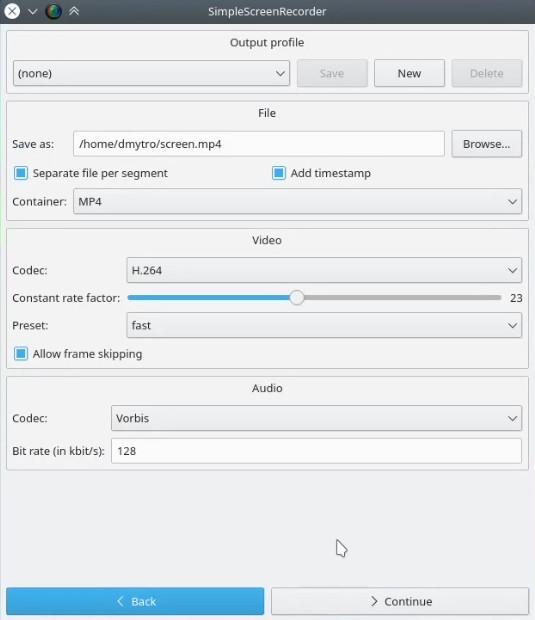
Output file
As the name implies, here we can choose where and how our videos should be stored. I would recommend enabling Separate file per segment since this will allow you to pause the recording and save each part into a separate file.
Moreover, we can select a video format and whether timestamps should be added to filenames. I recommend using the mp4 format and add timestamps to the file names.
Video properties
By default, Simple Screen Recorder uses H.264 video encoding. It works best for me, and I would recommend keeping it. I leave the constant rate factor to the default value of 23 as well.
Next, we got presets which define video encoding speed. The faster the speed, the more load is put on your CPU but smaller file size and vise versa. It doesn’t affect the video quality.
Audio properties
Similarly to video encoding, we can configure audio codec, but once again, I choose to go with the default Vorbis encoding since it works the best. Below codec is bitrate configuration input. Bitrate defines audio quality. Higher bitrate equals higher audio quality. In my experience, 128 bitrate works great.
Record
Now, we can press the record button and produce our first Linux screen tutorial.
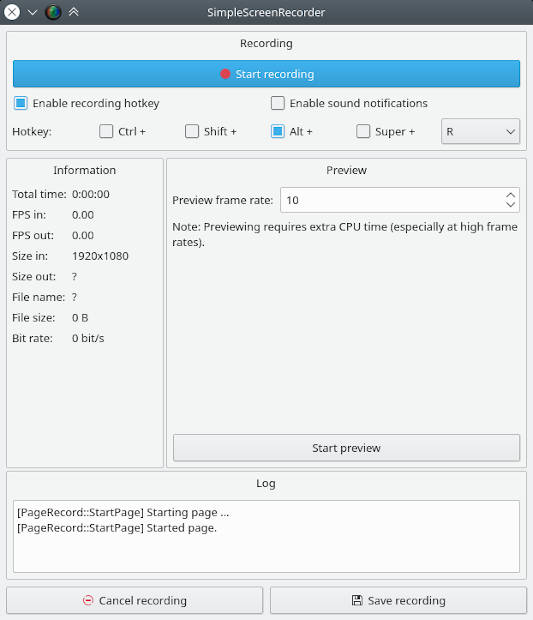
However, we can set the recording hotkey, so we don’t need to click the recording button every time to start/pause the recording. I use Alt+R as my record hotkeys.
Facecam
Additionally, we can add a webcam view to our video to make it more personal.
Unfortunately, there is no built-in option to integrate a webcam into Simple Screen Recorder. But we can add a facecam to videos with guvcview app, which is available in the repositories of all Linux distros.
When we open guvcview, it should recognize the webcam automatically. If it doesn’t, select it manually in the Preferences. My Logitech HD Pro Webcam C920(affiliate link) works perfectly:
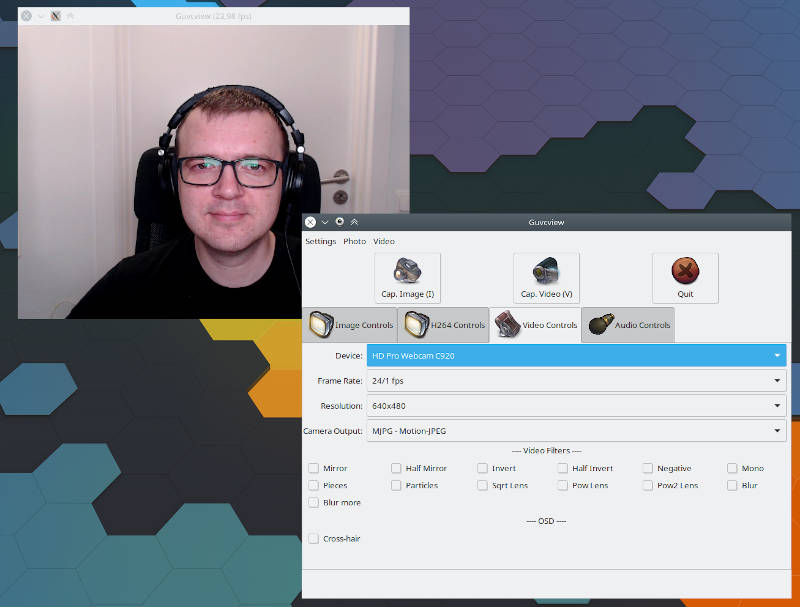
Then we minimize the settings window and place the webcam view window to the corner of our screen and enable the keep above others or always on top option by right-clicking the title of the window. So, the facecam view is always on top of all windows:
Now, we can start recording with Simple Screen Recorder and the webcam view will also be recorded as it is always visible on the screen.
Conclusion
In this post, we’ve seen how simple it is for everyone to record a screen tutorial. No special technical skills needed with Simple Screen Recorder! When you start feeling like Simple Screen Recorder is not enough for you, I recommend trying OBS.
Let me know how was your experience with the Simple Screen Recorder.
Comments
John Fraser
Hello, I have been using Simple Screen Recorder for several months. Installed on PC from Ubuntu list. Worked great until suddenly it recorded only the audio. Video sources have been camera (AVI), youtube, FsTV.org (live news). Now all theses sources record just the audio.
Just_An-End-User
Hiya ALU !!! Your tutorials have been a lifesaver for me, a newly born Linux user. The “25 Things” (Linux Mint) & “50 Things” (Ubuntu) really helped me get my feet wet & feel more at home. Not every suggestion worked perfectly though…but I learned from those failures & mistakes. Although I’ve learned now I must wipe Linux Mint & start again from scratch. This time documenting any errors! Tusen Takk!
Average Linux User
Thanks a lot for such a nice comment. Let me know if there is any way I can improve my posts. I don’t want you to have any failures & mistakes 😉
Kevin Wilcoxon
Your tuts, text and video, are so practical and useful! Many thanks. Glad to see you associating with Average Linux User.
Average Linux User
Thanks, Kevin!