Ubuntu Remote Desktop Access with ThinLinc
Ubuntu has a built-in Remote Desktop software, but it is limited in features and performance. I prefer to use ThinLinc for Ubuntu Remote Desktop Access from Linux, macOS, Windows, and a web browser. I will show you how to install and configure ThinLinc.
Content
Why ThinLinc is the best Linux Remote Desktop Software?
ThinLinc lets you access your Linux-based desktop on any device from anywhere with a seamless graphical desktop experience that is indistinguishable from a local desktop session. It is roughly 80% open-source (TigerVNC, noVNC, OpenSSH, CUPS PulseAudio) with the remaining 20% comprising proprietary code for administrating, licensing, and automation. It is free for up to 10 concurrent users!
I use ThinLinc to get access to my home Ubuntu desktop computer with a graphical interface remotely. It beats all other Linux remote desktop software by its image quality and responsiveness. Moreover, ThinLinc also redirects sound from a remote computer - a feature that is not available in any other Linux remote desktop software. Another unique feature of ThinLinc is that besides client software, it also provides a web access to a remote desktop. Thus you can access your remote desktop computer from Linux, macOS, Windows, and a web browser. It is also secure, easy to install, and simple to configure.
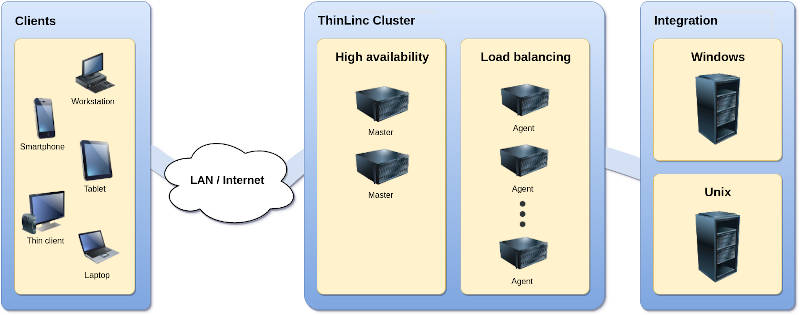
However, ThinLinc shines in providing access to Linux-based desktops in server-based computing infrastructure. It is much more powerful than I will show you in this blog post using a single machine. ThinLinc can make many remote servers work together with redundancy, load balance, and high availability for multi-user remote access.
I may make a separate blog post on such an advanced server setup. For now, let’s start with a simple scenario to establish remote access to a single Ubuntu Desktop machine and explore the features and performance of ThinLinc.
The Server/Remote computer
You need to install and configure ThinLinc Server on the computer that you want to access remotely.
Install ThinLinc Server
Download the ThinLinc Server:
Navigate to the folder with the downloaded file and extract the archive:
unzip tl-*-server.zip
Enter the extracted folder and launch the graphical installer:
cd tl-*-server
sudo ./install-server
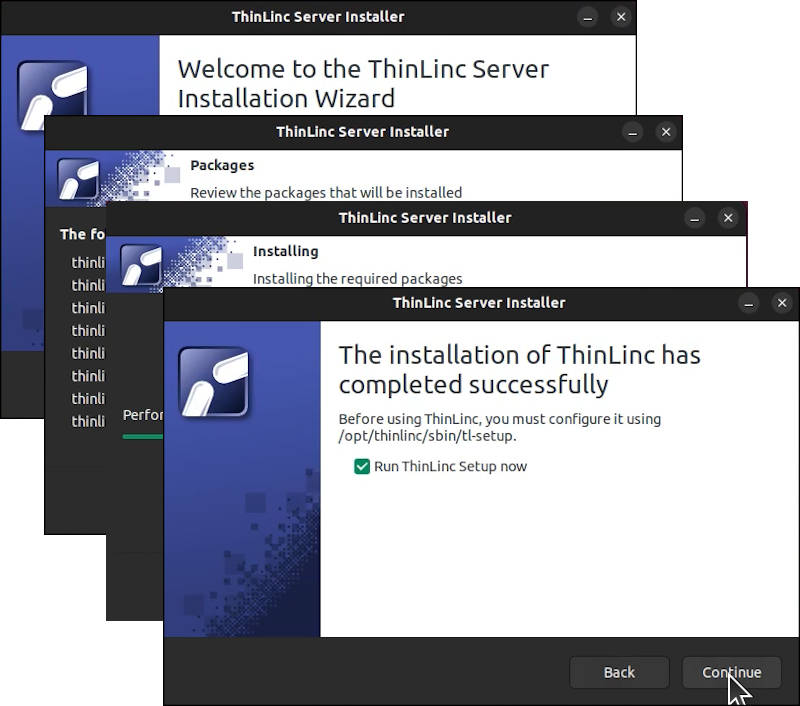
Follow the instructions and install ThinLinc. The installer is simple and fully automatic.
Configure ThinLinc
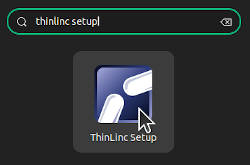
After the installation, you will be offered to launch the ThinLinc Server Setup Wizard. You can proceed with that option or launch it through the Ubuntu menu:
This Wizard will guide you through the main steps:
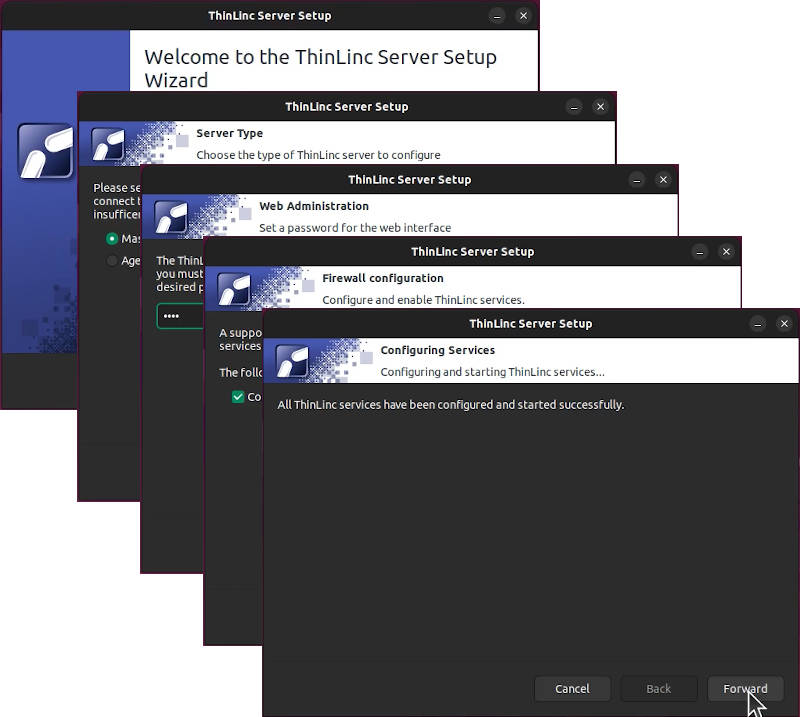
It will detect and install all the necessary dependencies, configure your firewall, install AppArmor configuration and launch the ThinLinc Server program.
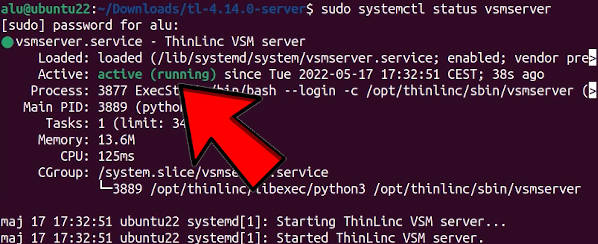
Verifying the ThinLinc installation
Check if all the ThinLinc services are active:
sudo systemctl status vsmserver
sudo systemctl status vsmagent
sudo systemctl status tlwebaccess
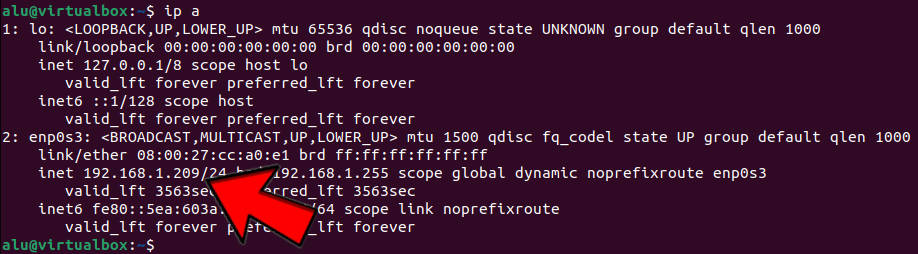
Get your IP address
To be able to connect to the computer that has ThinLinc installed, you need to know its IP address (called remote_ip below). It can be found using this command:
ip a
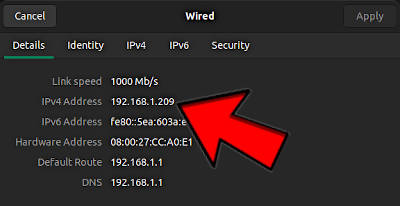
You can also find it in the graphical network settings of Ubuntu:
Note, this is your private IP address and to access this computer you need to be in the same local network e.g. connected to the same router. To establish the connection from outside of your local network, you also need to configure your router for outside access. I show you how to do it later in this post. For now, let’s test everything locally.
The Client computer
First, we will test the remote access to Ubuntu with ThinLinc Server installed within the local network. For example, I have installed ThinLinc Server on my Ubuntu Desktop and I try to connect to it from my KDE Neon laptop when both my desktop and laptop are connected to the same router.
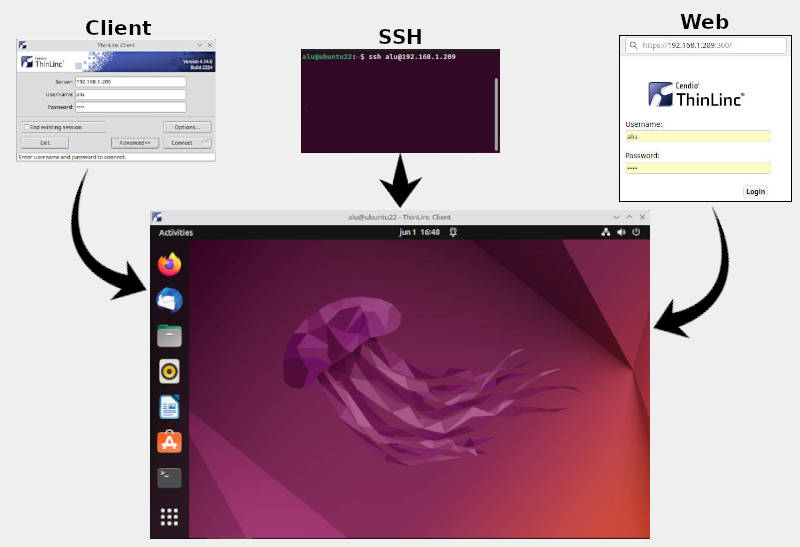
ThinLinc provides several options to establish the remote connection:
- SSH through a terminal
- Web browser access to a graphical desktop
- ThinLinc Client Software with full desktop functionality.
We will test these connections in the same order as the complexity of the connection increases.
After we know that ThinLinc works in the local network, we will configure our router for remote access from anywhere.
ThinLinc SSH connection
The SSH connection is the simplest to test because it is a command line tool. SSH is not exclusive to ThinLinc. I showed how to install OpenSSH and configure remote SSH access on Linux previously. However, it is a part of ThinLinc and it is perfect for just testing if remote access works.
To test ThinLinc with SSH, run this command on your client computer:
ssh remote_username@remote_ip
where remote_username and remote_ip are the username and IP of the computer where you installed ThinLinc Server software.
You will be prompted to enter a password of your remote machine and log in to your remote Ubuntu desktop. If SSH warns you with a message “Are you sure you want to continue connecting (yes/no)?”, type yes and proceed with entering a password.
ThinLinc Web browser access
When you know that SSH remote access works, you can test graphical Ubuntu remote desktop access with your web browser. Enter the IP address of your remote machine with the port 300 in the browser address field:
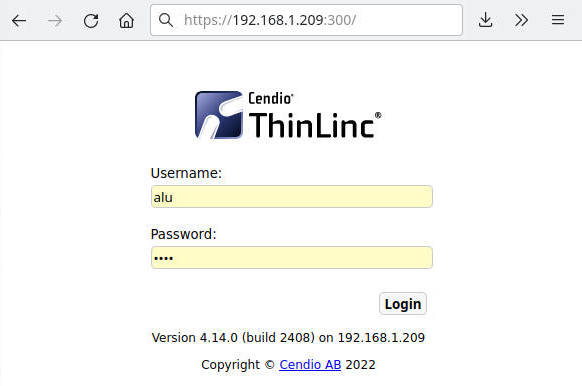
You will be welcomed with a login screen. Use your remote username and password to log in and you will see your Ubuntu Remote desktop:
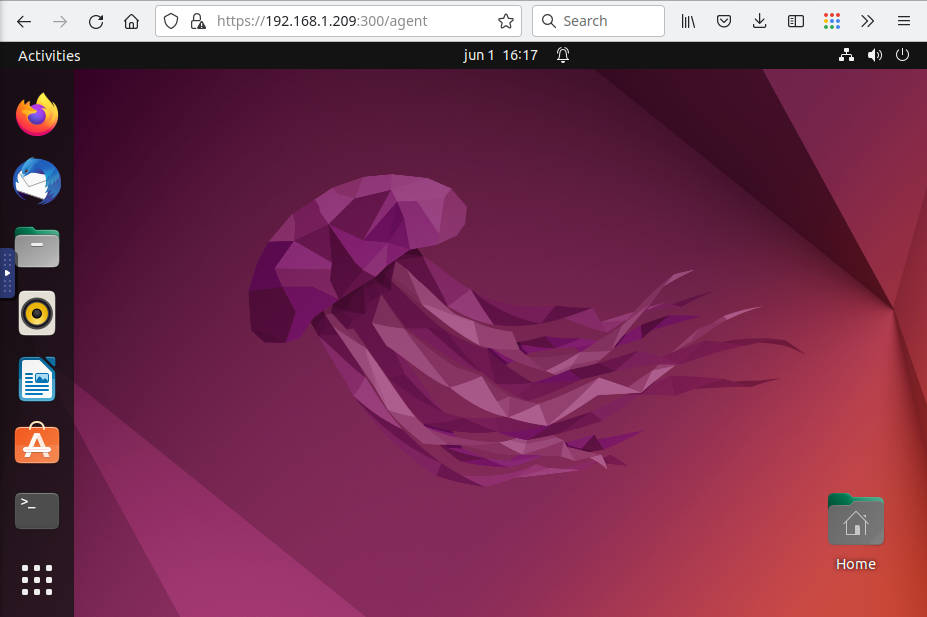
This Ubuntu Remote Desktop Access works smoothly as if you are using it sitting in front of that computer. The only limitation of the web access is no sound redirection and slower performance with a low bandwidth connection.
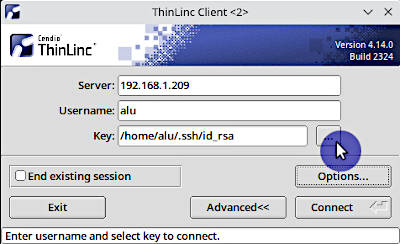
ThinLinc Client Software
To get all features of ThinLinc remote desktop access including sound-redirection and optimized performance for low-bandwidth connection, you need to use ThinLinc Client Software. It is available for Linux, macOS, and Windows.
I use KDE Neon as my client computer. It is based on Ubuntu, so I download the deb package and install it through a terminal:
sudo dpkg -i thinlinc-client_*_amd64.deb
After the installation, launch it from the menu and you will see this window:
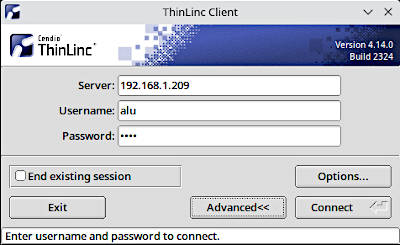
Enter your credentials and click Connect. You will see your Ubuntu remote desktop inside the ThinLinc Client window:
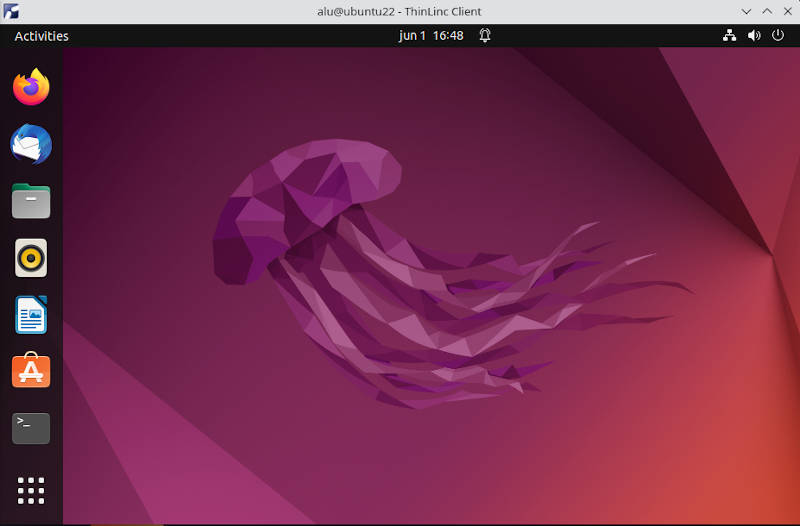
Play around inside the remote desktop and test its performance. For example, you can test that ThinLinc Client is able to provide sound.
Set static IP address in Ubuntu
Ubuntu is configured to have a dynamic IP address by default. Setting a static IP is also useful inside the local network because your remote computer may get another IP address after the reboot. It is also essential for accessing your remote desktop from outside the local network.
To set a static IP address in Ubuntu, go to:
Settings -> Network -> Settings of the active connection -> IPv4 tab
Switch the IP Methods to Manual and add the IP address that you want to use as a static (see the arrow below). Netmask, gateway, and DNS can be the same as on the screenshot below:
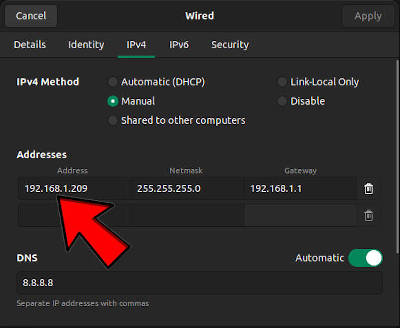
If you are not sure what IP you can enter as a static IP, just use your current IP that you can find in the Details tab of the same settings window.
After you set a static IP address, it will persist over reboots.
Configure Internet Router for Remote Desktop Access
Now, when you know that your Ubuntu remote desktop access with ThinLinc works in your local network, you can configure the access from anywhere on the Internet. Be aware that opening your computer to the outside world poses additional security risks. I provide some recommendations on security enhancements below but note that I am not an expert in network security, so everything you do is your responsibility and I do not give any guarantees.

I assume you try to configure Ubuntu remote desktop access in a typical home network with your computer connected to a router that is connected to the Internet Most Internet routers have a built-in firewall to block any connections from the outside Internet for the security reasons and you won’t be able to connect to your desktop by default. There are two ways to configure your router for remote access from the outside world:
- VPN connection
- Port forwarding
I think that setting up a VPN server in your router is a better option. It is easier to configure and it is also safer than port forwarding. A hacker would need to break through two layers of security: 1) VPN and 2) your computer.
If a VPN option is not available, you can enable port forwarding. But this would open your computer to the outside world and a hacker would only need to break through one layer of security i.e. your user login details.
VPN server
As I said above, if a VPN option is available in your Internet router, use it instead of port forwarding.
Most modern routers have an option to enable a VPN server. Go to the settings of your router and check if such an option is available. To access the router settings, most likely you need to type the 192.168.1.1 IP address in your Internet browser and log in using the admin username and password that are usually provided on the router or in its manual.
My router has an option to set up a VPN server:
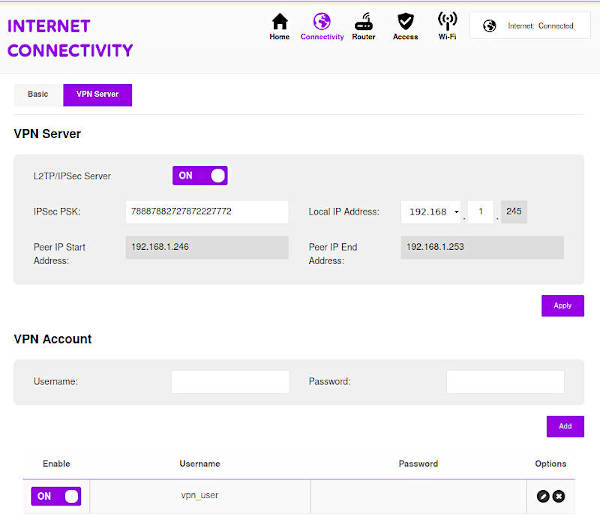
So, I can log in to my local home network using this L2TP/IPSec VPN and then connect to my Ubuntu remote desktop using the private IP address that we set above. The key security measure here is to use a strong password for a VPN user.
Port forwarding
If the VPN option is not available in your Internet router, you can enable port forwarding.
Port forwarding instructs your router to forward a connection that comes to your router’s public IP address from the outside to your remote desktop private IP address. In other words, you link a public IP to a private IP.
For ThinLinc remote desktop access, you need to open these three ports:
- 22 - SSH connection
- 300 - Web access
- 9000 - ThinLinc Client Access
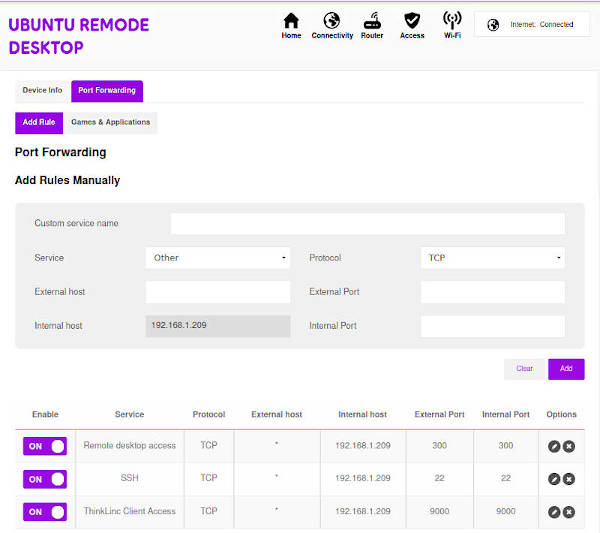
There is also port 1010 that is used to access the ThinLinc Administration Interface. I recommend you to use it only locally but if you also need remote administration access, you can open it too.
After you set the port forwarding option, you need to find out your router’s public IP address .It is usually stated in the details tab of your router admin page. You can also get it if you google my ip. Use this IP to connect remotely when you are outside of your home network.
Enhanced Security of Remote Ubuntu Access
I highly recommend using more secure authentication methods than just a user password especially if you open your remote desktop computer for outside access with port forwarding in your router.
Thinlinc supports several authentication methods:
- Pluggable Authentication Modules
- Public Key Authentication
- Smart Card Public Key Authentication
- One Time Passwords
I use Public Key and One Time Passwords. If you are not experienced with the public key authentication, I recommend setting up the one time passwords authentication. I also think the One Time Passwords authentication is more secure and it is supported in all login methods (SSH, Thinlinc Client, Web), while Public Key is supported only in SSH and Thinlinc Client, but not in the Web access.
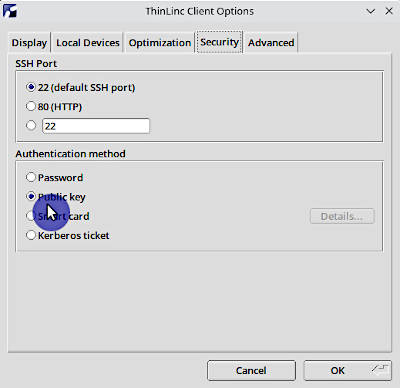
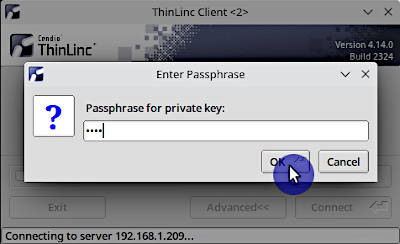
Public Key Authentication
Public Key Authentication is the most suitable if you always access your remote desktop from the same client computer because you need a private key stored in your client computer. In case of Thinlinc, it is also only useful if you want to use a passwordless public key for login without a password because the web access doesn’t support the public key authentication yet and one can still log in using the user’s password in the web browser.
I have a detailed guide on how to configure a public key authentication on Linux, so I won’t repeat everything here. I just want to point out the Thinlinc Client settings for a public key authentication.
To enable a public key authentication in the Thinlinc Client, go to Options -> Security tab -> Authentication method -> Public key:
You will then be able to add a public key:
After that, you would log in without a password if you use a passwordless public key or you would need to enter the public key password:
One Time Passwords
The One Time Passwords (OTP) is a highly secure and more universal authentication method. You only need a mobile phone with an OTP client to get a one time passwords and you would be able to log in to your remote Ubuntu desktop from any device.
To enable the OTP authentication, you need to do these steps.
1. Install Google Authenticator on your remote Ubuntu:
sudo apt install libpam-google-authenticator
2. Configure SSH to allow the OTP authentication by editing the file /etc/ssh/sshd_config on your remote Ubuntu:
sudo nano /etc/ssh/sshd_config
Find KbdInteractiveAuthentication and set it to yes. Press the keys Ctrl+O to write the changes, and Ctrl+X to exit nano.
To apply these settings, restart the SSH daemon:
sudo systemctl restart ssh
3. Configure ThinLinc to use the google-authenticator module. Open the ThinLinc PAM config on your remote Ubuntu:
sudo nano /etc/pam.d/thinlinc
And add this code at the end of the file:
# enable One Time Password with the google-authenticator module
auth  required  pam_google_authenticator.so secret=/home/${USER}/.ssh/.google_authenticator
4. Install OTP mobile app on your phone. You can use the Google-Authenticator if you have iOS. For Android, I recommend installing andOTP because it is free and open-source. I also like it for its multiple backup options.
5. Activate google-authenticator by running this command in the terminal of your remote Ubuntu:
google-authenticator
During the configuration, you would need to scan the QR code with your mobile OTP app:
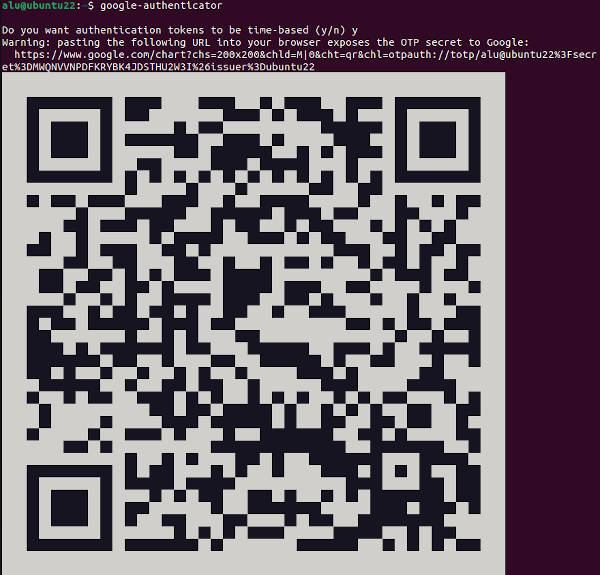
Enter the code from the mobile OTP app and you will see emergency codes on the screen. Write them down, you would need them in case you lose access to your mobile OTP app.
Then you will get a few questions to configure google-authenticator. ThinLinc recommends answering them this way:
Do you want me to update your "/home/<username>/.google_authenticator" file (y/n) **y**

Do you want to disallow multiple uses ... man-in-the-middle attacks (y/n) **n**

By default, a new token is generated every 30 seconds ...
Do you want to do so? (y/n) **y**

If the computer that you are logging ...
Do you want to enable rate-limiting? (y/n) **y**
6. After you have configured google-authenticator, move its configuration file to the .ssh folder:
mv /home/<username>/.google_authenticator /home/<username>/.ssh/.google_authenticator
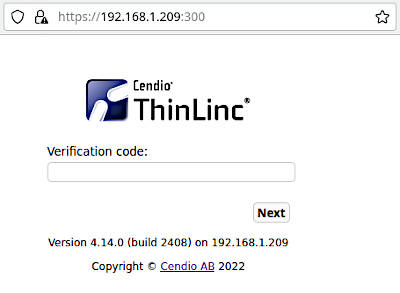
7. Test the OTP login. First, try to connect with the SSH. You should get an OTP prompt after you enter your user password:

If you try the web access, you would also be presented with the OTP verification code request:
ThinLinc Client also pop-ups an OTP verification code window:
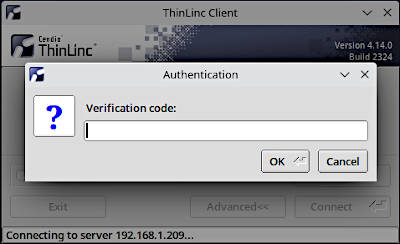
If something goes wrong and you cannot use the OTP method to log in remotely, you can disable it. But you would need to log in to your Ubuntu on the physical machine and remove all the settings listed above and uninstall google-authenticator.
Troubleshooting
Don’t forget to LOG OUT on the remote computer
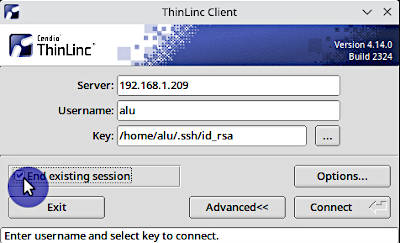
During my usage, I only encountered a situation when I forget to log out from the graphical interface of my remote user and then ThinLinc fails to establish a graphical connection with the remote desktop. Obviously, you cannot have two graphical desktop sessions open at the same time.
If you forget to log out, activate the option End existing session in the Thinlinc Client before you connect:
If you do not use Thinlinc Client, you can log in with the SSH and kill your open desktop session with:
kill -9 -1
After that, you would be able to connect remotely with the web browser.
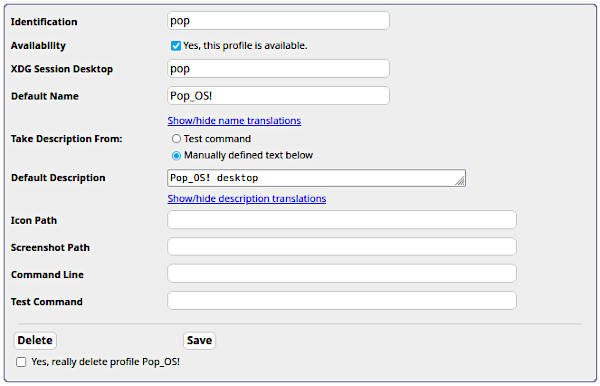
Error: No executable profiles could be found
After Ubuntu, I tried TninLinc in Pop_OS! and I got the error Error: No executable profiles could be found when I tried to connect.
This error may appear for less common desktop environments that are not added to ThinLinc by default. Pop_OS! uses modified GNOME desktop and it is called pop in /usr/share/xsessions. You can check the name of your desktop with this command in your server/remote computer:
ls /usr/share/xsessions
You need to add that session name manually to ThinLinc:
-
Log in to the admin panel by entering the IP address of your computer and port 1010 (for example:
192.168.1.209:1010) and using the usernameadminand the admin password your set up during the installation. -
Go to Profile -> Profiles lists -> Add new profile
-
Add your profile with the name you get from the
ls /usr/share/xsessionscommand in XDG Session Desktop. For example, a Pop_OS! profile looks like this:
More problems?
If you encounter any other problems while using ThinLinc, please share them in the comments below and we will try to help you.
Comments
Art
How to change the default SSH TCP port from 22 to something else on the ThinLinc SERVER? It seems straightforward how to do this on the client (see your own screenshots above), but I found no description for the server. I already searched through the /opt/thinlinc/etc/conf.d/*.hconf files, but nothing that I could spot said TCP or 22. Thanks!
Andre
Hi Art
I guess that the ThinLinc server is listening to the same SSH port that OpenSSH Server is set to. So, if you want to use a different SSH port (or add a new one), just change your OpenSSH Server port configuration. Usually it is set in /etc/ssh/sshd_config or some other distros on /usr/etc/ssh/sshd_config - There should be a line reading “#Port 22”, uncomment it and change the number to a valid one.
If you use firewalls and AppArmor, don’t forget to allow the traffic to this port. After changing it, restart your ssh server daemon.
Then don’t forget to set your ThinLinc Client to use the new port.
Paolo
Hey, I’ve installed and I’m facing an issue that the client can only see a blue screen instead of the proper desktop.
My server is running on Ubuntu 22 with proprietary NVIDIA drivers, have you seen this problem before? Any clues?
Thanks
Andre
Please, make sure that your user is not logged in locally. I had this issue once and it was because my user was logged in locally and I tried to start a new remote session.
If you are remotely connecting to the server, you can SSH to it and run “killall -9 -u username” to make sure that you’re not running a local session.
gszlag
Excellent tutorial!
I have played around with thinlinc on my KDE Neon testbed but now wish to uninstall it. Unless, I missed it somewhere on the cendio website, I could not find the uninstall instructions.
How do I uninstall ThinLinc?
Andre
To uninstall ThinLinc is very easy! Use the package manager of your distro to uninstall it!
When you install ThinLinc Server, its installer uses your package manager to install the following packages:
thinlinc-tladm thinlinc-tlmisc thinlinc-tlmisc-libs thinlinc-tlmisc-libs32 thinlinc-tlprinter thinlinc-vnc-server thinlinc-vsm thinlinc-webaccess
If your system uses APT, a simple **apt remove thinlinc ** should do the trick and remove all ThinLinc packages. On openSUSE for example, **zypper re thinlinc ***
To uninstall the client, the package name is thinlinc-client
zirant
I have saved your page to learn linux, but I have a doubt. can you teach me how to do reverse proxy. I would like to hide ip 1 and show IP 2 first. I would like IP 2 to be the protection of IP 1.
Andre
Hi
I’m not sure if I understood what you need.
A reverse proxy is very similar to a SSH tunnel. Imagine that you have machines A, B and C, being:
“A” is your machine and you cannot reach machine “C”. “A” has a private ip 10.0.0.10 “B” is a machine that can talk to both machines A and C; “B” has 2 IPs: Public IP 13.13.13.2 and private IP 192.168.0.2 and “C” is the machine that you want to connect to from “A”, but it is not directly accessible. C has private ip 192.168.0.3
The difference is that for the SSH Tunnel, from machine A you create a tunnel that tells machine B that an especific port from machine A should point to machine C on an specific port (passing through machine B. example of a SSH Tunnel command (run on machine A)
The command above will create a tunnel from machine A’s local port 22222 that goes to machine C’s port 22 and it is done through machine B. The above comand will access machine B and the Tunnel will be open as long as this connection is alive (you’re not in machine C, you’re in machine B and the tunnel is up)
Using another terminal on machine A, use a command to access machine C through the tunnel:
This ssh command above will try to connect the machine A to itself on port 22222… But if the tunnel is up, it will redirect you to machine B and forward you straight to machine C on port 22.
So, for the SSH Tunnel you need:
NOW THE REVERSE TUNNEL:
The reverse tunnel is pretty similar, except that you need someone on the remote machine to start the reverse tunnel for you and you don’t need that our machine B can directly connect to machine C (but C has to be able to connect to B). Let’s rearrange our scenario:
“A” is your machine and you cannot reach machine “C”. “A” has a private ip 10.0.0.10 “B” is a machine that has a public IP and is accessible from both machines A and C; “B” has Public IP 13.13.13.2 and you cannot contact machine A neither machine C because they’re on different unreachable networks under NAT; and “C” is the machine that cannot connect to “A”, but can connect to “B”. You want to connect to from “A” and have someone remotely that can connect to B. C has private ip 192.168.0.3
So, you have to ask someone remotely on C that can start the reverse tunnel. That person should run on C’s terminal:
the command above will connect machine C to machine B and will start a reverse tunnel… It means that anyone logged in machine B should be able to SSH on localhost port 22222 and it will point back to machine C, as long as machine C keeps the tunnel connection open.
Then, from machine A, you may connect to machine B and then from machine B you may use the reverse tunnel and connect to C. From Machine A
AND then you are on machine B, you can
It’s two steps but you may resume it to one line command from machine A:
(when you use SSH, you may commands and it will start the ssh, run the command and once it is finished, it’ll end the ssh connection)
So, for the SSH Reverse Tunnel, you need:
You may also combine both Reverse SSH and SSH Tunnel to reach a machine… I did that once with ThinLinc to access my machine at home from my machine at work… Usually I create a SSH Tunnel from home to work, but to access from work to home, I had to ask my wife to start a script that I had ready to create a reverse tunnel for me and then I used a Tunnel that pointed my work machine to my “B machine’s” reverse SSH port back to home. Hard to explain in details but it is very simple: machine at home started a reverse SSH to a “jump host” machine here at work; my work machine created a tunnel that pointed a local port to the jump host’s port assigned to the reverse tunnel. As a result, accessing localhost:tunnelport would send to my home computer.
Andre
Hi there :)
ThinLinc user here and indeed, ThinLinc is superb: its very fast responsiveness and image quality even on higher latency/low bandwidth connections allows you to work remotely as if you were sitting right in front of the remote computer itself. I’ve been using ThinLinc on my computer at work and at home and sometimes accessing them using a Raspberry Pi 2 and everything works surprisingly well.
Your tutorial is very well detailed and pretty well structured, but I have just one detail that I’d like to comment. Maybe I already know the answer from my previous experience (I use SSH Tunnel to reach my machines), but I didn’t had time to test VPN and PortForwarding scenarios yet.
Regarding the VPN setup (and PortForwarding) for “over-the-internet” access, the connection to the “ThinLinc Master” role is going to forward to a “ThinLinc Agent” role (that for simple uses is the same computer running both roles). I’m almost sure that the Agent is going to reply to the Master (and then to the client) its LAN IP instead of its VPN IP (or the Router’s IP that is forwarded). If that’s true, the client won’t be able to connect because it is not on the same network. I know that because when using an SSH Tunnel, even tunelling the right port to my machine, the Agent’s IP reply was its LAN IP and I couldn’t finish the connection.
To fix this behavior, there is two simple solutions: First one is setting the “HOST_ALIASES” parameter on the client (and each client machine should set this individually). For Linux clients, it is located inside file /opt/thinlinc/etc/tlclient.conf (global) or ~/.thinlinc/tlclient.conf (for each user, overrides global). For Windows clients it is on the registry, on “Software\Cendio\ThinLinc\tlclient” under both HKLM (global) and HKCU (for each user, overrides global). For Mac OSX, it is on file /Library/Application Support/ThinLinc Client/tlclient.conf (global) or ~/.thinlinc/tlclient.conf (for each user, overrides global). Basically. the HOST_ALIASES parameter will tell the client to understand an IP:Port as another IP:Port, fixing this kind of issue of an Agent replying a LAN IP:Port instead of a VPN IP:Port or the router’s IP:ForwardedPort. For example: My “HOST_ALIASES” is literally “HOST_ALIASES=192.168.0.5:22=localhost:63000” where 192.168.0.5:22 is the LAN IP:Port Address of my ThinLinc Server (Agent) and localhost:63000 is my local SSHTunnel port.
Another solution would be to set the ThinLinc Server Agent to reply the right IP Address or an URL that would point to it for both users on the same LAN, VPN or over the Router’s forwarded port. This solution is described on the official deployment guide here as “split DNS”: https://www.cendio.com/resources/docs/tag/network.html#thinlinc-in-a-nat-split-dns-environment . It is not my preferred solution because it will need that you to either configure a DNS server or configure the “/etc/hosts” file for your clients and not everyone have a DNS server deployed.
So, again, I did not try the VPN/PortForwarding methods yet because I’m using the SSH Tunnel way (I connect to a “jumphost” that is acessible from outside and has access to my ThinLinc Server), but I think that if the same problem occurs, people should try the HOST_ALIASES or the “split-DNS” methods. If you need more details, please let me know