20 Things to do After Installing MX Linux (2021)
MX Linux, as one of the most popular Linux distributions, has a whole lot to offer. In this post, I’ve picked top 20 things most users should do after installing MX Linux in 2021.
Content
- Enable Double-click
- Speed up Boot
- Fix Screen Tearing
- Install Nvidia Drivers
- Install Codecs
- Configure HiDPI Screen
- Set User Password for Admin tasks
- Configure Panel
- Configure Task Icons
- Increase Clock Font
- Configure Whisker Menu
- Configure Theme
- Install DockBarX
- Configure Conky
- Configure Terminal
- Install Popular Apps
- Install Redshift
- Enable AdBlocker
- Enable Firewall
- Uninstall Games
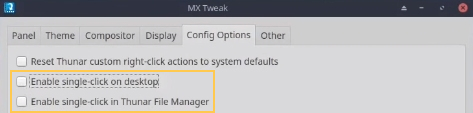
1. Enable Double-click
This feature comes down to personal preference. By default, MX Linux requires single-click to open files and folders, but I prefer double-click.
Open MX Tools → Tweak → Config Options → Disable Enable single-click on desktop & Enable single-click in Thunar File Manager → Apply.
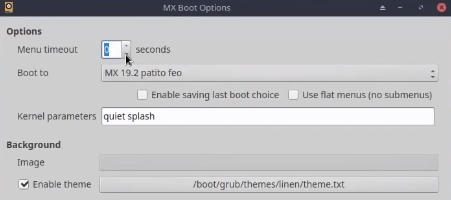
2. Speed up Boot
After installing MX Linux, you likely see a boot menu on each system startup. If MX Linux is only OS on your machine, then this behavior is redundant. Fortunately, MX Linux has an easy way to disable it.
Open MX Tools → Boot Options → Set Menu timeout to 0 → Apply.
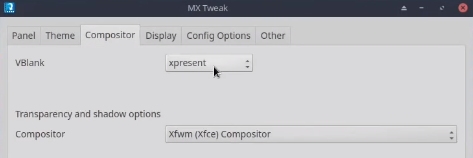
3. Fix Screen Tearing
Many users have encountered screen tearing on MX Linux. Screen tearing happens due to unsynchronised GPU & monitor frame rates.
Open MX Tools → Tweak → Compositor → Set VBlank xpresent & Compositor Xfwm (Xfce) Compositor → Apply.
Please note, these are the settings that work for me. They might not work for you. I would encourage you to experiment with different options until you get the right one for your system.
4. Install Nvidia Drivers
If your system uses Nvidia graphics card, then I would recommend you to install Nvidia drivers for a more seamless desktop experience.
Open MX Tools → Nvidia driver installer.
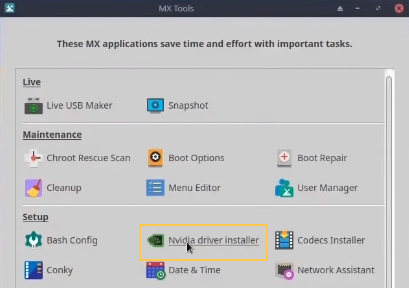
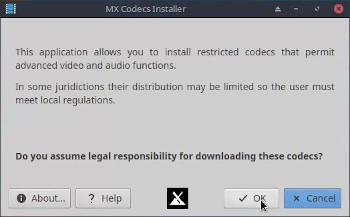
5. Install Codecs
Similarly to Nvidia drivers, I would recommend you to install codecs as well. Codecs allow you to play various media formats on your Linux machine. They are not included by default because of legal concerns.
Open MX Tools → Codecs Installer → OK.
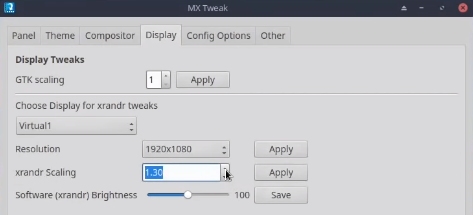
6. Configure HiDPI Screen
In case you have a HiDPI screen, you’ll need to configure MX Linux to work nicely with it. MX Tools has our back again.
Open MX Tools → Tweak → Display → Adjust xrandr scaling → Apply.
7. Set User Password for Admin tasks
When you were installing MX Linux, installer prompted you to enter user and admin password. For an average user, it’s more convenient to have a single password for both user and admin tasks.
Open MX Tools → Other → Set Password for administrative tasks to User → Apply.

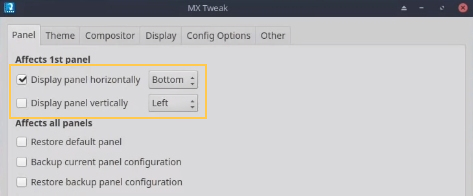
8. Configure Panel
By default, MX Linux has its panel on the left. However, many of you would probably prefer to have it at the bottom of the screen. You can easily change its position if you would like to do so.
Open MX Tools → Tweak → Panel → Set panel position to your liking → Apply.
I also increase the vertical size of the bottom panel since by default it’s pretty small.
Right-click on panel → Panel → Panel Preferences → Set row size to 40 - 50px.
9. Configure Task Icons
Another panel customization feature that I like is the ability to group multiple instances of the same app in the panel. For me, this results in better productivity when I have more apps opened.
Open MX Tools → Tweak → Panel → Options → Set Window grouping to Always → Close → Apply.
![]()
10. Increase Clock Font
Clock’s text, depending on the position of your panel, can get very small. I increase its size to be consistent with other icons in the panel.
Right-click on panel → Properties → Font button → Set font size to your liking → OK.

11. Configure Whisker Menu
Whisker menu is MX Linux’s default menu for launching apps. It’s well configured out of the box. The only exception for me is that I place categories on the left-hand side.
Right-click on Whisker menu → Properties → Enable Position categories next to panel button.

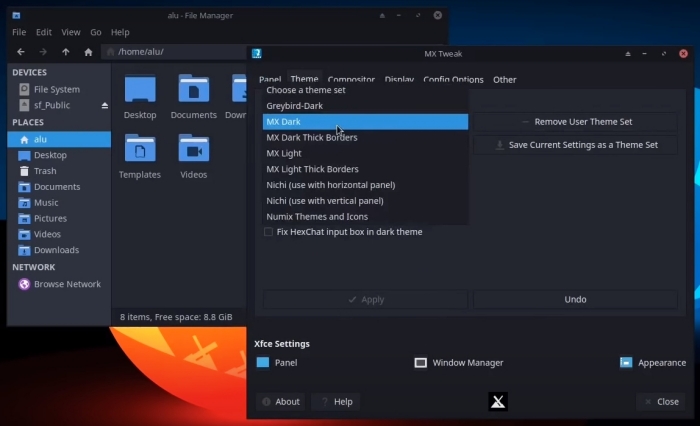
12. Configure Theme
MX Linux’s default theme may not be everyone’s cup of tea. Luckily, MX Linux uses XFCE desktop that is highly configurable.
MX Linux comes with a set of pre-installed themes which you can find in MX Tools:
Open MX Tools → Tweak → Theme → Options → Choose a theme from the set of pre-installed themes → Apply.
However, you can go beyond these preinstalled themes and install more themes and enable them in the XFCE Settings:
Open Settings → Appearance → Choose style and icons.
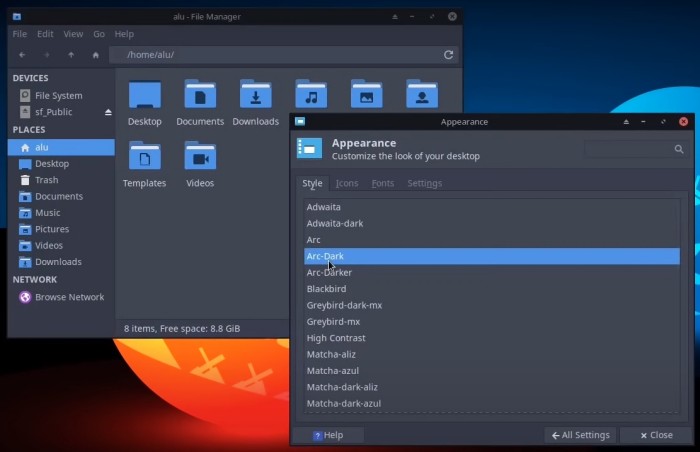
Check out our article if you would like to learn more about XFCE desktop customisation.
13. Install DockBarX
DockBarX describes itself as a lightweight taskbar/panel replacement for Linux. DockBarX is my go-to panel on MX Linux for many reasons:
- App window preview
- Pin application
- Nice-looking
- and many more!
Open MX Package Installer → Stable Repo tab → Search for dockbarx → Select dockbarx & xfce-dockbarx-plugin packages → Install.
Now, let’s replace the default panel with DockBarX.
Right-click on panel → Panel → Panel Preferences → Items tab → Remove launchers and window buttons → Click on + button → Search for dockbarx → Add → Move it with up and down arrow to your desired position (it’s bellow Workspace Manager for me).
DockBarX is customizable, so feel free to launch DockBarX Preferences.
In the Appearance tab, you can choose your preferred theme, window list style and much more.
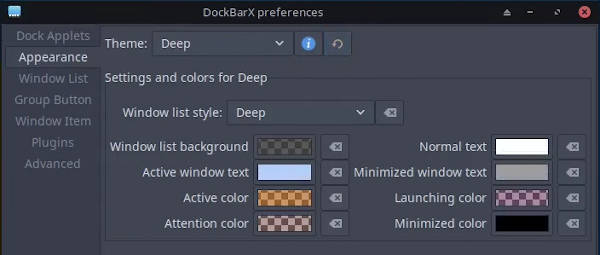
After you’ve finished tweaking DockBarX, don’t forget to hit the Refresh button which you can find next to the theme entry. If the changes are not visible, log in/out to force DockBarX to apply them.
14. Configure Conky
If you are a new Linux user, you may not be aware of Conky. Conky is a lightweight system monitor which displays information on your desktop as widgets (conkies). It’s available by default on MX Linux.
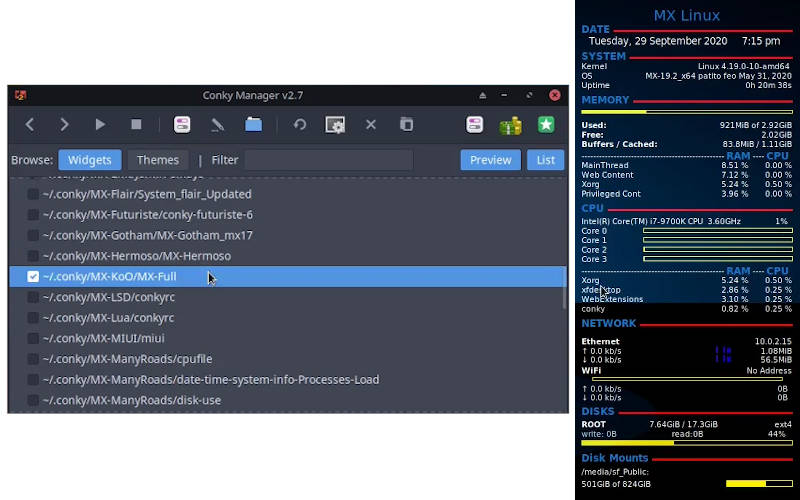
You can manage conkies with Conky Manager, of course. We have many conkies pre-installed. Once you’ve opened Conky Manager, click on a conky to preview what it is for and optionally, enable it!
I use MX-Full which provides detailed information about my system.
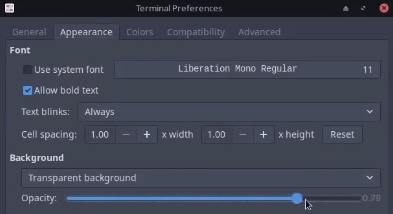
15. Configure Terminal
MX Linux’s default terminal comes with a too transparent background which can be distractive. I prefer lower transparency.
Open Terminal → Right-click inside terminal window → Preferences → Appearance → Adjust opacity to your liking.
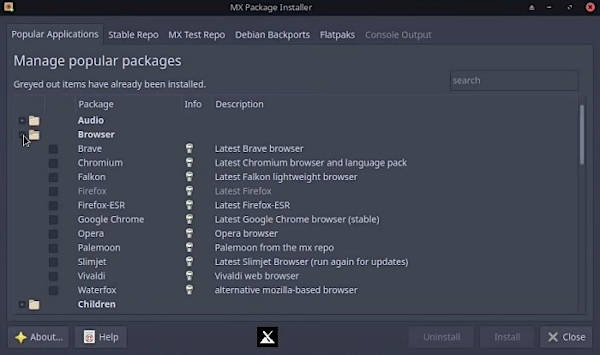
16. Install Popular Apps
MX Linux comes with a slew of pre-installed apps. Still, it doesn’t include some popular apps that most of the users use daily. We can install them with MX Package Installer.
Popular Applications tab helps a lot in installing the most common apps. It groups apps in categories, and it includes the best of the best apps out there:
- Spotify
- Zoom/Skype
- Google Chrome
- Microsoft Teams (many of us are forced to use it for work)
- and many more!
17. Install Redshift
Redshift is a Linux application that protects your eyes by reducing the amount of blue light at night. A very crucial app for all of you working at night. To my surprise, contrary to many popular distros, MX Linux does not include Redshift by default. Fortunately, we can easily install it ourselves.
Open MX Package Installer → Stable Repo tab → Search for redshift → Select redshift-gtk → Install.
Once installed, open it from the menu, and it will appear in your system tray. Make sure that Enabled and Autostart options are checked by right-clicking on the icon in the system tray.
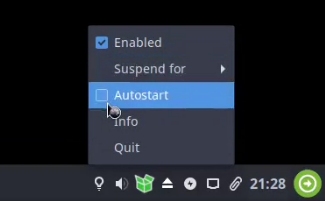
No further customization is required.
18. Enable AdBlocker
Adblock is pre-installed adblocker on MX Linux, but we need to enable it. Adblock blocks ads while you browser the web, thus providing you with fast and clean browsing experience.
Open Adblock → OK → Select all pre-configured lists → OK.
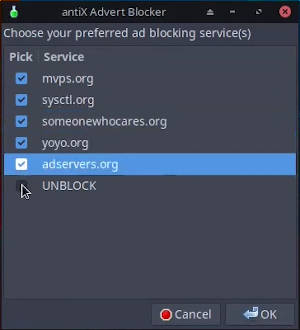
You can test Adblock app by going to ads-blocker.com.
19. Enable Firewall
I would recommend leveraging Firewall app, which is installed by default to improve the security of your system. A firewall, in general, protects against network intrusions.
Open Firewall Configuration → Enable it.
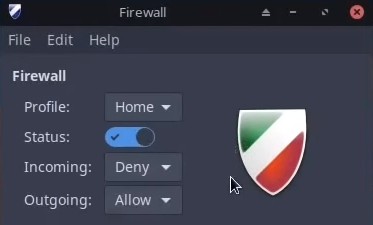
The default settings are fine, but if you would like to learn more about firewall, check out our article on the Linux Firewall.
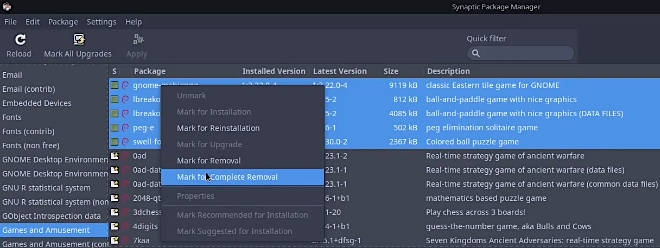
20. Uninstall Games
MX Linux comes with some basic games. If you are like me and don’t play them, I would recommend removing them.
Open Synaptic Package Manager → Select Sections → Scroll down to Games and Amusement category → Click on $ button to sort applications by installed, uninstalled → Select all games → Mark for removal → Apply.
Conclusion
In this post, I’ve outlined my top 20 things to do after installing MX Linux in 2021. Nevertheless, your journey doesn’t stop here. I’ll leave it to you to explore more awesome stuff that MX Linux offers. 🚀
Comments
James
When you install “redshift”…. you also need another program called: “geoclue”. On Redshift once opened, the icon displays on the sidebar, rightclick and you have options like Enable, Autostart, Suspend For, Info and Quit. Selecting “Info” will display “status”, “location”, “Color Temp.”, “Period- Daytime. Geoclue, provides your location so that Redshift can adjust the huge of your screen color as Daylight gradually decreases. Redshift installed w/MX Package Installer, w/Stable Repo open/loaded, in the search box.. enter geoclue, hit enter/search… 4 opts appear, select geoclue-2.0, version: 2.5.7-3, hit Install. After the Install is done, you have to Log out, then log back in again, this allows geoclue to search your location. Righclicking on redshift Icon again, under “Info” you’ll now see your GPS Longitude and Latitude…. and Redshift will now adjust your Screen as the Sun goes down……!
nosystemissafe
you can also determine which command is used for uninstalling some programs which you may not use go to mx tools then mx menu editor there is a list of all the programs and commands to run then so you can uninstall them from the command sudo apt remove command/or command used to run that program
Morty
Good ole’ proven reliable stable MX Linux.Discovered it with MX Linux 19.4 on another machine.An old hp Pavillion from 2008 dirt cheap from pawn shop in 2017.First computer i ever owned,actually.Got this other old laptop for free.That’s happening quite often,now.Have 3 old laptops,here,given to me.Hardware upgrades do wonders for them.SSD’s rock! MX Linux 21.1 on this old Dell Latitude E5400 from 2009.The hp Pavillion put away,for know.I think it’s going to break down.Makes awful noise,sometimes.I’ll take it appart and take a look,someday.All is well with MX Linux 21.1 Wildflower.Another excellent Linux distro.There are so many.
Larsen
Enjoyed your article. I used MX Linux in the past but somehow got away from it; probably because my wife wants Linux Mint which I have to handle for her. Anyway, I’ve reloaded it on my system (multi-boot) and find that it comes up with a VERY dim screen. It is beyond me why the developers would have that happen! I’ve tried to find a way to have it come up with a bright screen but to no avail. I have brightness key on my Asus laptop that are functional but there is no way that I will live with this problem. Even though I like MX, if there is no way to rectify this problem I’ll just zap it off my computer and use one of the other distros as they all know how to function realistically!!!!
Any ideas on a solution?
Devlin
Im with you on this as well…. If i cant resolve it, i will switch to either Mint or Manjaro… Ive spent 20 minutes searching, and havent found anything that worked.. I have Asus Vivobook Laptop, and whenever i boot up, the screen brightness is about 10%
Mike
I’m also using Asus laptop / MX21 and not good with linux but:
I don’t remember how I got to these fixes, but spent tons of time researching on line. But now have reliable daily driver.
Mike
[My System Info] System: Kernel: 5.15.0-3.1-liquorix-amd64 x86_64 bits: 64 compiler: gcc v: 10.2.1 parameters: audit=0 intel_pstate=disable acpi_enforce_resources=lax BOOT_IMAGE=/boot/vmlinuz-5.15.0-3.1-liquorix-amd64 root=UUID= ro splash quiet Desktop: Xfce 4.16.0 tk: Gtk 3.24.24 info: xfce4-panel wm: xfwm 4.16.1 vt: 7 dm: LightDM 1.26.0 Distro: MX-21.1_ahs_x64 Wildflower October 10 2021 base: Debian GNU/Linux 11 (bullseye) Machine: Type: Laptop System: ASUSTeK product: VivoBook_ASUSLaptop X712UA_M712UA v: 1.0 serial:
Mobo: ASUSTeK model: X712UA v: 1.0 serial: UEFI: American Megatrends LLC. v: X712UA.307 date: 10/26/2021 Battery: ID-1: BAT0 charge: 44.3 Wh (100.0%) condition: 44.3/47.0 Wh (94.1%) volts: 11.8 min: 11.8 model: ASUSTeK ASUS Battery type: Li-ion serial: N/A status: Not charging cycles: 7 Device-1: hidpp_battery_0 model: Logitech Marathon Mouse/Performance Plus M705 serial: charge: 50% (should be ignored) rechargeable: yes status: Discharging CPU: Info: 8-Core model: AMD Ryzen 7 5700U with Radeon Graphics bits: 64 type: MT MCP arch: Zen 2 family: 17 (23) model-id: 68 (104) stepping: 1 microcode: 8608103 cache: L2: 4 MiB flags: avx avx2 lm nx pae sse sse2 sse3 sse4_1 sse4_2 sse4a ssse3 svm bogomips: 57497 Speed: 2221 MHz min/max: 1400/1800 MHz boost: enabled Core speeds (MHz): 1: 2221 2: 1674 3: 1756 4: 1394 5: 1397 6: 1397 7: 1623 8: 1554 9: 1840 10: 1395 11: 1396 12: 1323 13: 1295 14: 1397 15: 1397 16: 1397 Vulnerabilities: Type: itlb_multihit status: Not affected Type: l1tf status: Not affected Type: mds status: Not affected Type: meltdown status: Not affected Type: spec_store_bypass mitigation: Speculative Store Bypass disabled via prctl Type: spectre_v1 mitigation: usercopy/swapgs barriers and __user pointer sanitization Type: spectre_v2 mitigation: Full AMD retpoline, IBPB: conditional, IBRS_FW, STIBP: conditional, RSB filling Type: srbds status: Not affected Type: tsx_async_abort status: Not affected Graphics: Device-1: AMD Lucienne vendor: ASUSTeK driver: amdgpu v: kernel bus-ID: 03:00.0 chip-ID: 1002:164c class-ID: 0300 Device-2: IMC Networks USB2.0 HD UVC WebCam type: USB driver: uvcvideo bus-ID: 3-3:3 chip-ID: 13d3:56ea class-ID: fe01 serial:
Display: x11 server: X.Org 1.20.13 compositor: xfwm4 v: 4.16.1 driver: loaded: amdgpu,ati unloaded: fbdev,modesetting,vesa display-ID: :0.0 screens: 1 Screen-1: 0 s-res: 1920x1080 s-dpi: 96 s-size: 508x285mm (20.0x11.2”) s-diag: 582mm (22.9”) Monitor-1: eDP res: 1920x1080 hz: 60 dpi: 128 size: 382x215mm (15.0x8.5”) diag: 438mm (17.3”) OpenGL: renderer: AMD RENOIR (DRM 3.42.0 5.15.0-3.1-liquorix-amd64 LLVM 12.0.1) v: 4.6 Mesa 21.2.5 direct render: Yes Audio: Device-1: AMD Renoir Radeon High Definition Audio driver: snd_hda_intel v: kernel bus-ID: 03:00.1 chip-ID: 1002:1637 class-ID: 0403 Device-2: AMD ACP/ACP3X/ACP6x Audio Coprocessor vendor: ASUSTeK Raven/Raven2/FireFlight/Renoir Processor driver: N/A alternate: snd_pci_acp3x, snd_rn_pci_acp3x, snd_pci_acp5x bus-ID: 03:00.5 chip-ID: 1022:15e2 class-ID: 0480 Device-3: AMD Family 17h/19h HD Audio vendor: ASUSTeK driver: snd_hda_intel v: kernel bus-ID: 03:00.6 chip-ID: 1022:15e3 class-ID: 0403 Sound Server-1: ALSA v: k5.15.0-3.1-liquorix-amd64 running: yes Sound Server-2: PulseAudio v: 14.2 running: yes Sound Server-3: PipeWire v: 0.3.19 running: no Network: Device-1: Intel Wi-Fi 6 AX200 driver: iwlwifi v: kernel modules: wl bus-ID: 01:00.0 chip-ID: 8086:2723 class-ID: 0280 IF: wlan0 state: up mac:
Bluetooth: Device-1: Intel AX200 Bluetooth type: USB driver: btusb v: 0.8 bus-ID: 3-2:2 chip-ID: 8087:0029 class-ID: e001 Report: hciconfig ID: hci0 rfk-id: 3 state: up address: bt-v: 3.0 lmp-v: 5.2 sub-v: 24bf hci-v: 5.2 rev: 24bf Info: acl-mtu: 1021:4 sco-mtu: 96:6 link-policy: rswitch sniff link-mode: slave accept service-classes: rendering, capturing, audio Drives: Local Storage: total: 968.19 GiB used: 105 GiB (10.8%) SMART Message: Unable to run smartctl. Root privileges required. ID-1: /dev/nvme0n1 maj-min: 259:0 vendor: Western Digital model: PC SN530 SDBPNPZ-1T00-1002 size: 953.87 GiB block-size: physical: 512 B logical: 512 B speed: 31.6 Gb/s lanes: 4 type: SSD serial: rev: 21106000 temp: 36.9 C scheme: GPT ID-2: /dev/sda maj-min: 8:0 type: USB vendor: SanDisk model: Ultra USB 3.0 size: 14.32 GiB block-size: physical: 512 B logical: 512 B type: N/A serial:
rev: 1.00 scheme: MBR SMART Message: Unknown USB bridge. Flash drive/Unsupported enclosure? Partition: ID-1: / raw-size: 48.83 GiB size: 47.76 GiB (97.81%) used: 17.79 GiB (37.2%) fs: ext4 dev: /dev/nvme0n1p9 maj-min: 259:9 ID-2: /boot/efi raw-size: 260 MiB size: 256 MiB (98.46%) used: 41.6 MiB (16.2%) fs: vfat dev: /dev/nvme0n1p1 maj-min: 259:1 ID-3: /home raw-size: 345.95 GiB size: 339.46 GiB (98.12%) used: 87.17 GiB (25.7%) fs: ext4 dev: /dev/nvme0n1p10 maj-min: 259:10 Swap: Kernel: swappiness: 15 (default 60) cache-pressure: 100 (default) ID-1: swap-1 type: partition size: 18.17 GiB used: 0 KiB (0.0%) priority: -2 dev: /dev/nvme0n1p8 maj-min: 259:8 Sensors: System Temperatures: cpu: 56.0 C mobo: N/A gpu: amdgpu temp: 46.0 C Fan Speeds (RPM): cpu: 2200 Repos: Packages: note: see –pkg apt: 2907 lib: 1666 flatpak: 0 No active apt repos in: /etc/apt/sources.list Active apt repos in: /etc/apt/sources.list.d/brave-browser-release.list 1: deb [signed-by=/usr/share/keyrings/brave-browser-archive-keyring.gpg arch=amd64] https://brave-browser-apt-release.s3.brave.com/ stable main Active apt repos in: /etc/apt/sources.list.d/debian-stable-updates.list 1: deb http://deb.debian.org/debian/ bullseye-updates main contrib non-free Active apt repos in: /etc/apt/sources.list.d/debian.list 1: deb http://deb.debian.org/debian/ bullseye main contrib non-free 2: deb http://security.debian.org/debian-security/ bullseye-security main contrib non-free 3: deb-src http://deb.debian.org/debian/ bullseye main contrib non-free 4: deb http://deb.debian.org/debian/ bullseye-backports main contrib non-free Active apt repos in: /etc/apt/sources.list.d/mx.list 1: deb http://ftp.osuosl.org/pub/mxlinux/mx/repo/ bullseye main non-free 2: deb http://ftp.osuosl.org/pub/mxlinux/mx/repo/ bullseye ahs Active apt repos in: /etc/apt/sources.list.d/protonvpn-stable.list 1: deb [signed-by=/usr/share/keyrings/protonvpn-stable-archive-keyring.gpg] https://repo.protonvpn.com/debian stable main Active apt repos in: /etc/apt/sources.list.d/skype-stable.list 1: deb [arch=amd64] https://repo.skype.com/deb stable main Active apt repos in: /etc/apt/sources.list.d/vivaldi.list 1: deb [arch=amd64] http://repo.vivaldi.com/stable/deb/ stable main Info: Processes: 408 Uptime: 47m wakeups: 5 Memory: 15.09 GiB used: 3.01 GiB (20.0%) Init: SysVinit v: 2.96 runlevel: 5 default: 5 tool: systemctl Compilers: gcc: 10.2.1 alt: 10 Shell: Bash v: 5.1.4 running-in: quick-system-info-mx inxi: 3.3.06 Boot Mode: UEFI [/code]
thunk
left click the battery icon. brightness slider appears
Rob
Apparently, I’m a monster for actually preferring single click.
Efff yuuuuuu
you literally broke my mx iinstall cant lloginloginlogin as the useruser.
iys as broken as your comment box.
xpresemt should pnly be used by amd users , it breaks logon for nbidia users, stop making suggestions out of rear putput to make money with a page literred with ads.
Tam Davage
You have instructions for “group multiple instances”. I can’t find this setting in MX-21. I actually want to ungroup these on the panel. Any idea how to do this?
verdulleme
If it is not solved yet: Ctrl+right click on any icon in the windows button area on the panel. (Or goto panel preferences, items and choose window buttons item, click on the edit button). Next set window grouping to ‘never’. If you have the docklike taskbar instead of the window buttons, I haven’t found a way to disable window grouping. You can always change back to the window buttons by adding it to the panel items and removing the docklike taskbar….
Sebastian
I am switching from windows to linux and found this very helpful, so thank you. One this that I struggled with was that I have two hard drives (OS and data, I think this is very common) and had to figure out how to automatically mount my second drive. I finally edited the fstab file but then had to figure out by my self that the new drive is now in /mnt and not in /media (as I said quite new to linux). I do not know if this is the only or best way but I think that instruction for this would be helpful to others. I found this feature frustrating, at installation linux should ask you what do you want to do to with your installed drives.
Curt Dawe
Hi Sebastian,
Many Linux distributions provide a utility such as disk-manager in MX-Linux to select, with a single click, which drives to auto mount at boot. These modify the /etc/fstab file. Essentially, it does for you automatically what you did on your own, manually. Additional drives (other than your OS boot drive) across many Linux distributions mount to /media.
IIRC, when you mount them to another location, such as /mnt. some distributions give issues with accessibility of drives/permissions?
I’d say stick with the /media option. Just my $0.02. Enjoy Linux, there is much to enjoy!
John
Hello, I also switched to Linux from Windows, the disk was ntfs, in Linux ext 4. The ntfs-3g is fixed, the disk is added to the fstab file with the rw parameter. Also using disk manager with defaults parameters.
Average Linux User
Congratulation for making through your first challenge in Linux! Not many new Linux users can edit fstab file correctly. I wish I had time to cover all the topics of Linux. I will try to make a tutorial you requested, but I believe there is plenty of info about this online.
Mike
Very good list of improvements. But I miss the option to invert the mouse wheel (human scrolling) The “Reveese scroll direction” option in “Mouse and touchpad” do not work for me.
John
Explain how to delete games, paragraph 19, does not
Average Linux User
See the screenshot and the video tutorial. Select the Games section in Synaptic -> Sort the programs by their installation status -> Mark all installed games for removal.
milahu
enable the ntp service, to auto-sync the system time
on old laptops, the RTC battery can be empty, and the null date 1980-01-01 breaks all SSL/HTTPS downloads
ln -s K01ntp /etc/rc5.d/S01ntp /etc/init.d/ntp start /etc/init.d/ntp status
milahu
edit: the correct command to enable a service (in this case ntp)
ln -s ../init.d/ntp /etc/rc5.d/S01ntp
Average Linux User
Thanks for sharing the tip.
Morty
Fresh install of MX Linux 19.4 on this old machine. All is well,so far. I like it. Firewall installed already and was giving me a hard time for about 6-7 tries. Enabled it but it kept disabling on its own after about 5 seconds,or so. I kept on it and it finally stayed activated. I will be checking it often over next little while. I was going to report it until it started working properly.
Average Linux User
You can also check Firewall with command line as explained in this article.
Python
Thanks for writing this up; however it is too outdated now. Most selections are no longer available.
Average Linux User
Could you please be more specific what selections are not available?
The article is only a few months old.
Green Branch
Hello, average Linux user. Congratulations and thanks for yet another excellent tutorial!
I couldn’t find dockbarx in the MX Linux 21.1 stable repository. Could you help me to solve this?
tato
It all worked for me. Are you sure you got MX Linux?
oldManNearTheSea
10 Things everyone MUST do …. Lists 10 personal preferences ….
Average Linux User
🤫 I have corrected the text to “… top 20 things most users should do after installing MX Linux in 2021.”
Regiz
Which linux distro do you for your daily regular work?
bax
Hannah Montana Linux
Average Linux User
I use KDE Neon