Staticman: Add Comments to your Static Website for FREE
Learn how to add Staticman comments to your static website to get a FREE commenting system that looks like this one: 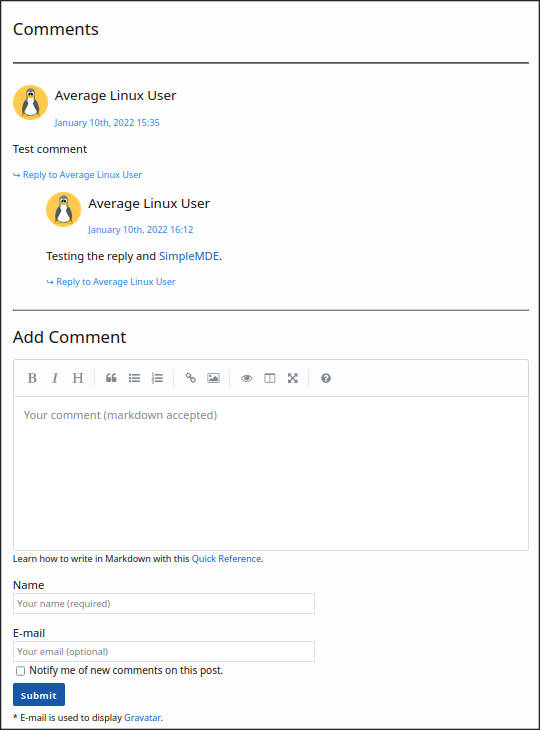
Content
Why Staticman
I reviewed the best commenting systems for a static website some time ago. Out of several decent options, I have decided to use Staticman as the commenting system of this website. Staticman has several advantages that influenced my choice:
- free
- you own the comments
- customizable
- spam filter
- moderation
- email notification
- anonymous comments option
- website and comments are in the same repository
The only disadvantage is that you need to know how to code to implement Staticman. However, you do not need to be an expert and this blog post will help you to add the Staticman comments system to your static website hassle-free.
We will add the Staticman comments to a Jekyll website that is hosted on GitHub but the principle is the same for other static site generators and hostings. Staticman will bring dynamic content to our static website with a help of the Heroku app and Mailgun email notifications. Spam filtering will be done with the help of reCAPTCHA & Akismet. We will also customize the comments display to load Gravatars and fit the website style. I picked up these tools because they all have a free tier and they are the most frequently used with Staticman.
You can test how the Staticman commenting system works on the ALU test website. Please, do not use the comment form below this blog post to test the commenting system. It is meant only for meaningful comments that are related to this blog post. All the test comments under this blog post will be removed.
How Staticman works
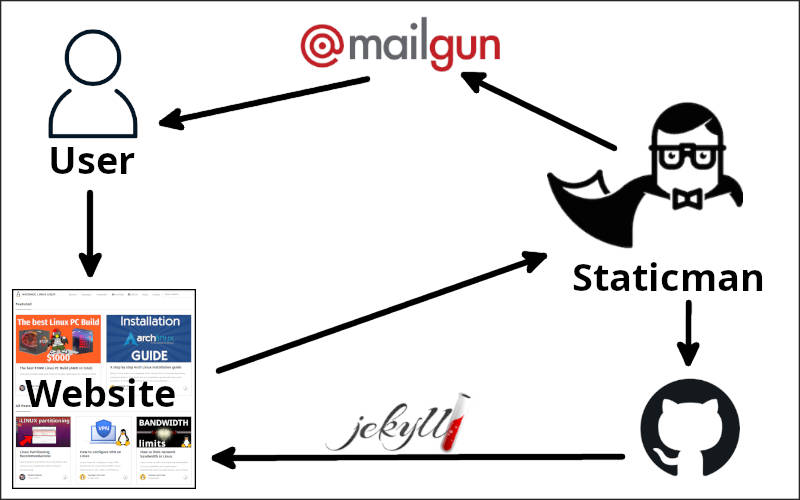
The Staticman comments work as follows:
- A visitor submits a comment in the comment form.
- The Staticman app processes the comment and submits it as a commit (a pull request if you have moderation enabled) to the GitHub blog repository.
- New content in the blog repository triggers a rebuild of the website, so the comment appears on the website.
- Staticman uses Mailgun to send an email notification about a new comment.
It looks like many steps but in fact everything is almost instant if you do set manual comments moderation. On this website, it takes a few seconds for a new comment to appear and the bottleneck is actually the Jekyll build time that is considerable given the size of this blog.
Add Staticman to website (Jekyll)
This guide is based on the official documentation of Staticman and these blogs-posts:
- Spinning Numbers
- Performance Matters
- Minimal Mistakes
- Made Mistakes
- Gabe’s Code
- Michael Rumpler’s blog
I also introduce some modifications which I believe make Staticman comments much better and more suited for this website. I hope you will also like my version of the Staticman comments 😊.
We will use the Staticman v2 because I think it is more tested and this is what I use on this website. If I ever switch to the v3, I will update this blog post accordingly.
If it ain’t broke, don’t fix it
To add Staticman to a website, we need to create a Github bot account and Heroku Staticman app. Then we link the two together and connect them to the website repository.
Create Staticman Bot Account (GitHub)
First, we need to create a Staticman Bot Account that will be used to submit pull requests with a comment to the blog repository. This is more secure than using your own account and it also makes it easier to separate the commits by you and commits by Staticman.
So, open a new private window in your browser, go to GitHub, and create a new account. Give it a name that will clearly indicate that it is a bot account, for example, my bot account is called alu-bot. Hereafter, I will refer to this account as <github-bot>.
Next, you need to create a personal access token for your bot account. This token is required to be able to use the bot account without a password with the Staticman API:
Account Settings -> Developer settings -> Personal access tokens -> Generate new token -> Name it “staticman” -> Set No expiration -> Select all repo and user scopes -> Generate token:

Copy and save the token into a safe place as you will need it later in this tutorial. I will refer to it as <github_token>.
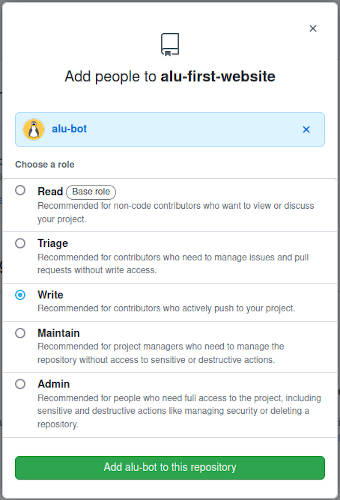
Now, go to your regular GitHub account and add the bot account to your website repository as a contributor with the write access:
GitHub website repository -> Settings -> Manage access -> Add people -> Add <github-bot> -> Choose role “Write”
Deploy Staticman app (Heroku)
Go to Heroku.com and sign up for a free account. You will get 550 free dyno hours per month, which is more than enough for a small blog. You can also get additional 450 free dyno hours if you add your credit card.
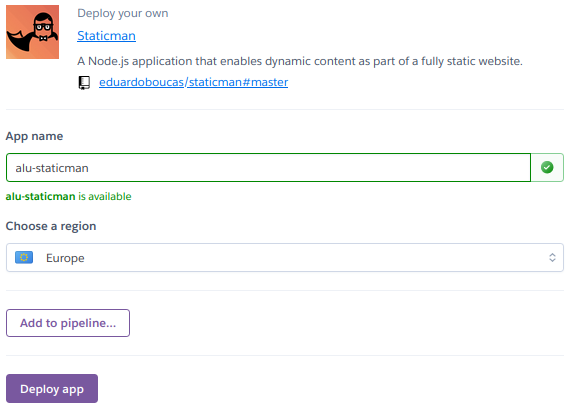
After you have activated your Heroku account, go to the Staticman repository and click the Deploy to Heroku button:
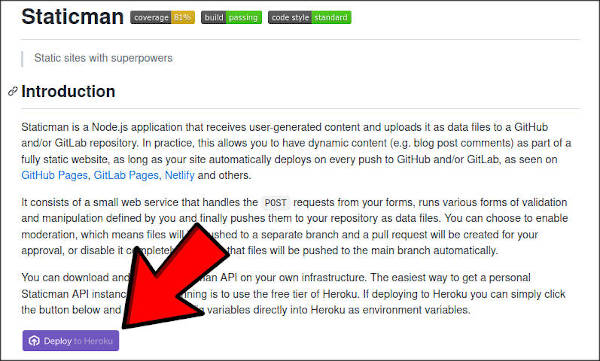
It will automatically deploy the Staticman app to Heroku, you will only need to name the app (I will refer to this name as <heroku_staticman_app>) and click Deploy app:
It will take some time to download, build and deploy the app. So, you can go get a cup of coffee for yourself or buy me a coffee 😉.
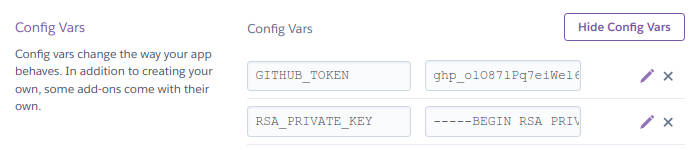
When the deployment is complete, you will find the staticman app among your applications in the Heroku Dashboard. Click it and go to its Settings. We need to add our GitHub personal access token and a private key here. In the Config Vars, click Reveal Config Vars and add the GitHub personal access token (<github_token>) as GITHUB_TOKEN.
Next, we need to generate an RSA keypair that will be used to encrypt all sensitive information that is exposed to the public (emails, reCAPTCHA site secret, etc.). To do that, run the following command in the terminal of your Linux computer:
ssh-keygen -m PEM -t rsa -b 4096 -C "staticman key" -f ~/.ssh/staticman_key
Leave the passphrase empty and just press Enter two times.
When the key pair is generated, open the Private key with:
cat ~/.ssh/staticman_key | tr -d '\n'
You should see a set of random characters. Copy everything including -----BEGIN RSA PRIVATE KEY and END RSA PRIVATE KEY-----, and add it to the Heroku Staticman app:
Note, there is also the Heroku CLI, which you can use to do the same with these two commands:
heroku config:add --app <heroku_staticman_app> "RSA_PRIVATE_KEY=$(cat ~/.ssh/staticman_key | tr -d '\n')"
heroku config:add --app <heroku_staticman_app> "GITHUB_TOKEN=<github_token>"
Add Staticman to website repository
To add Staticman to your website, you first need to provide the main Staticman configuration file staticman.yml.
Download it, edit and place it into the root folder of your website repository. It is based on the official template. You can follow the official documentation to modify it.
The second part of the Staticman configuration goes to your _config.yml and includes these lines:
# staticman comments configuration
staticman_url: https://<heroku_staticman_app>.herokuapp.com/v2/entry/<user-name>/<blog-repo-name>/<branch-name>/comments
You need to edit all parts that are marked with < >. You can also check these files in my ALU test repository.
Comment form and Comments
When Staticman is added and configured, we need to add the comment form and configure how the comments will be displayed. We will use this type of the comment form and comments:
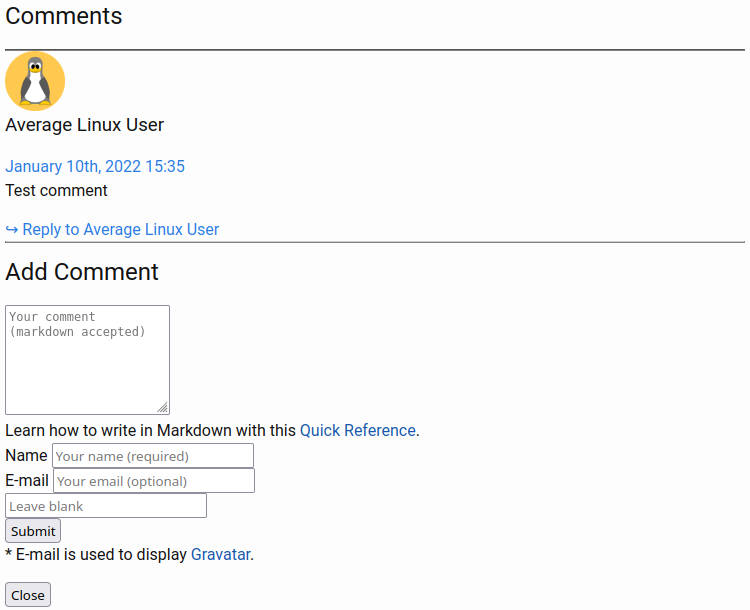
It doesn’t look nice by default, but we will improve it with the CSS later. I just want you to see how we add things step by step.
In fact, this comments section consists of three parts:
_includes/comment_form.html- the Comment Form._includes/comment.html- defines how a comment looks._includes/comments.html- displays comments ordered by the submission date.
Download these files and place them in the _includes folder of your website.
To display the Staticman comments on your website, add this code right after the post content in your _layouts/post.html template:
<!-- Begin Comments -->
{% if page.comments != false %}
  <div id="comments">
    {% include comments.html %}
    </div>
{% endif %}
<!-- End Comments -->
You can also check how this code is included in my test website.
JavaScript
We will also add some JavaScript to implement nested replies and to display the Comment submitted message. Download staticman.js and place it in assets/js/.
If you open that file, you will see that it is quite extensive code built from different pieces. If you want to keep your website simpler, you may want to reduce this code or remove it completely.
Test Staticman comments
Before we add any CSS, reCAPTCHA, spam filter, and email notification to our comments, we need to test it and make sure everything works fine.
Write any comment, fill in your name and e-mail address, and click submit.
If your comment is submitted successfully, you will see this message below the comment form:

You can also test the dummy spam filter by filling in the Leave blank field and submitting a comment. You should fail to submit the comment with an error message.
Customize Staticman comments (CSS)
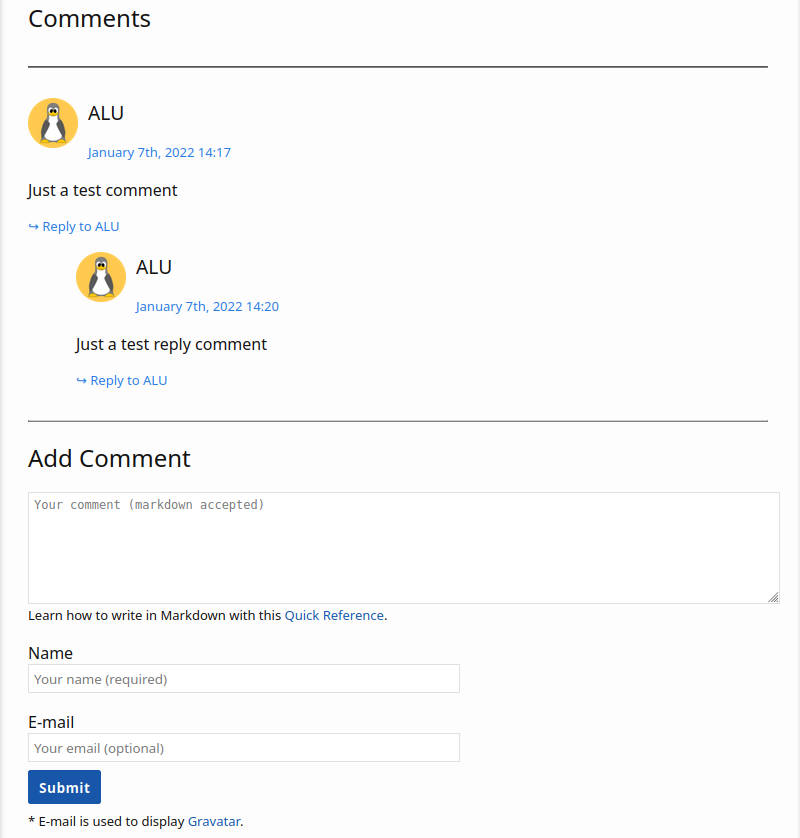
After you have tested your Staticman comments and everything works fine, you can start playing with the CSS style of the comment form and comments. We will make it look like this:
It is better to keep the comments’ CSS in a separate file and import it with the main CSS file. Most likely, the main CSS is assets/main.scss, so you need to open/create it and add "comment-styles" to import:
@import "comment-styles";
Then download _comment-styles.scss and place it to _sass/. This is the CSS I applied to the comments on this website but you are of course free to edit it to fit your website style.
Gravatar support
The Gravatar (Globally Recognized Avatars) support is added in _includes/comment.html with this code:
<div class="comment__avatar-wrapper">
  <img class="comment__avatar" src="https://www.gravatar.com/avatar/{{ include.email | downcase | md5 }}?s=60&d=identicon&r=g" alt="{{ include.name }}">
</div>
You do not need to copy/paste as it is already included in the _includes/comment.html you downloaded. But I would like to provide some explanation on how it works.
By default each email is transformed with MD5. So, my email AVGLinuxUser@gmail.com is actually saved as the hash 5c55afc9187d4a988df4524967c03f26 in a comment file:
_id: f555da40-722a-11ec-9769-03331206fd79
_parent: /staticman_comments/
replying_to_uid: ''
message: Test comment
name: Average Linux User
email: 5c55afc9187d4a988df4524967c03f26
hp: ''
date: '2022-01-10T15:35:37.527Z'
This MD5 hash is used by Gravatar to store images associated with emails that have Gravatars. To see my Gravatar, click this link that has the MD5 hash of my email: https://www.gravatar.com/avatar/5c55afc9187d4a988df4524967c03f26?s=60&d=identicon&r=g.
You can also set what type of icons will be displayed for uses that do not have Gravatars. For example, I use identicon - a geometric pattern based on an email hash. You can find more details on the Gravatar image request page.
Also, if your email still doesn’t have a Gravatar, you can upload it at Gravatar.com.
I recommend keeping this MD5 encryption of emails for your commenting system, so you would expose the personal information of users leaving comments on your website. However, there may be cases when you want to store emails unencrypted. To achieve that, you first need to disable MD5 encryption in staticman.yml by commenting out these two lines:
# transforms:
#    email: md5
Now, you need to add MD5 encryption to display Gravatars. You can do that with the liquid-md5 plugin. Add it to your _config.yml and Gemfile, and include the MD5 encryption step by adding | downcase | md5 after include.email in _includes/comment.html:
<img class="comment__avatar" src="https://www.gravatar.com/avatar/{{ include.email | downcase | md5 }}?s=60&d=identicon&r=g" alt="{{ include.name }}">
Now, you store the emails as plain text but encrypt them to get their Gravatar if such is available. Note, if you do so, make sure emails are not exposed to the public. For example, use this option only with private GitHub repositories.
SimpleMDE
We can make our commenting form more functional and also fancy-looking by adding SimpleMDE, a markdown editor panel:

To add SimpleMDE to the Staticman commenting form, add this code at the end of _includes/comment_form.html:
<!-- Simple Markdown Editor -->
<link rel="stylesheet" href="https://cdn.jsdelivr.net/simplemde/latest/simplemde.min.css"/>
<script src="https://cdn.jsdelivr.net/simplemde/latest/simplemde.min.js"></script>
<script>
  var simplemde = new SimpleMDE({
    element: document.getElementById("comment-form-message"),
    forceSync: true,
    spellChecker: false,
    status: false,
    placeholder: "Your comment (markdown accepted)",
  });
</script>
Now, it is a good time to test how our CSS, Gravatars, and SimpleMDE work.
Enable reCAPTCHA
You will get much better spam prevention with reCAPTCHA in addition to the hidden Leave blank field we added initially. However, configuring reCAPTCHA may be tricky and that’s why we had it disabled until we have fully configured our Staticman comments and verified that everything works fine.
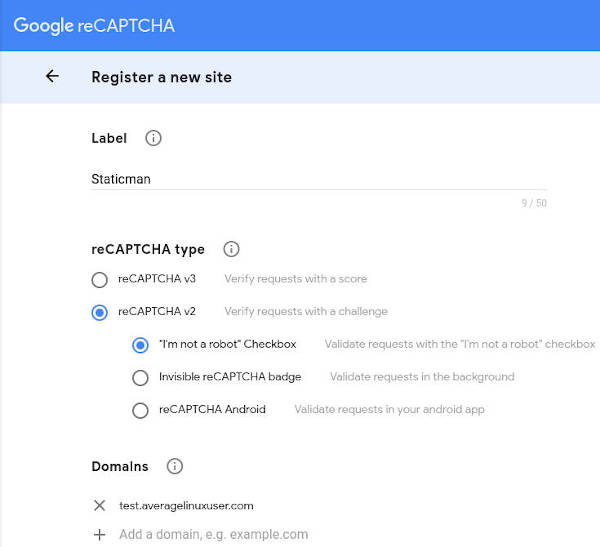
First, you need to sign up for reCAPTCHA and create a reCAPTCHA for your domain. I have only tested reCAPTCHA v2 with checkbox, so I recommend you use the same:
Second, we need to encrypt the secret key with the RSA key we added to our Heroku app because this secret key will be exposed to the public. To that end, enter the following URL in your browser with your corresponding Heroku app name (<heroku_staticman_app>) and secret key (<secret_key>) :
https://<heroku_staticman_app>.herokuapp.com/v2/encrypt/<secret_key>
You will get an encrypted secret key displayed in your browser. Copy and add it to _config.yml and staticman.yml together with the site key.
staticman.yml:
reCaptcha:
    enabled: true
    siteKey: <site key>
    secret: <encrypted secret key>
_config.yml:
reCaptcha:
    siteKey: <site key>
    secret: <encrypted secret key>
Uncomment this line in _includes/comment_form.html:
<div id="reCaptcha" class="g-recaptcha" data-sitekey="{{ site.reCaptcha.siteKey }}"></div>
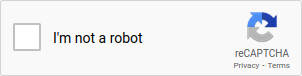
Commit and push the reCaptcha update to your website. You should see this checkbox reCAPTCHA above the submit button:
Note, if you decide to disable reCAPTCHA, change its settings in staticman.yml to enabled: false. One would be able to submit a comment without passing the reCAPTCHA, however the reCAPTCHA will still be displayed. To hide it, comment out the reCAPTCHA line mentioned above in _includes/comment_form.html.
Add Spam filter (Akismet)
To enhance the spam filtering even further, one can also add the Akismet spam filter to the Staticman comments. I have been using it for over a year now. It indeed stops 99% of the spam but it also falsely marks some messages that include links even if they are written by me when I reply to comments. So, it may also be annoying. Test it and see if you are willing to live with it.
First, sign up for an Akismet personal plan. You can define how much you are willing to pay for the Akismet service including $0. Add your site’s URL to Akismet and copy the Akismet API key that you will get by email.
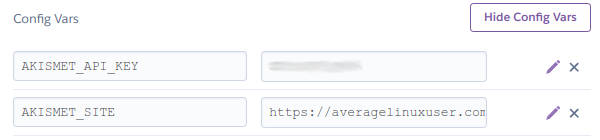
Second, add the Akismet API key and your website URL to the Staticman Heroku app as we did with the RSA key pair above:
Third, enable Akismet and define what you want to be checked for spam in the staticman.yml config:
akismet:
    enabled: enable
    author: "name"
    authorEmail: "email"
    content: "message"
    type: "comment"
Finally, test the Akismet spam filter by entering the Akismet guaranteed spam information:
- Name:
viagra-test-123 - Email:
akismet-guaranteed-spam@example.com - Comment Body:
akismet-guaranteed-spam
You should see a message stating:
An error occurred. [IS_SPAM].
Add Staticman Email Notification (Mailgun)
Getting Mailgun work with my Staticman was the most difficult step of the whole configuration process. So, please read the instructions carefully and make sure you do everything as I describe.
Sign up for a Mailgun account. Unfortunately, it is not free anymore. With the Flex plan, you get 5,000 free emails per month for 3 months, then you pay $0.80 per 1000 emails, which is pretty cheap.
Register your domain at Mailgun. Go to the Mailgun Dashboard -> Sending -> Domains -> Add New Domain and add your website domain name with mg. in the front. For example, my domain is mg.averagelinuxuser.com. Register your domain in the US, because Staticman default settings may not work with the EU option.
Next, find the Mailgun DNS records of your newly added domain: Mailgun Dashboard -> Domain settings -> DNS records and enter the TXT, MX, and CNAME records in the DNS settings of your domain provider or where you host your domain. Then press the “Verify DNS settings” in the top right corner of the Mailgun DNS records window. You may need to wait up to 24-48hrs for the DNS to propagate.
After you have successfully verified the Mailgun DNS records, get the Mailgun API keys: Mailgun Dashboard -> Settings -> API Keys:
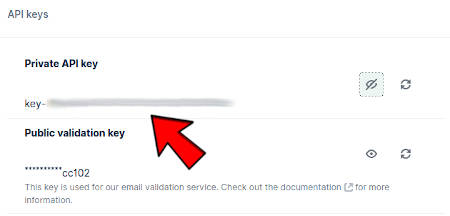
Encrypt the API private key (starts with key-) with the Heroku app:
https://<heroku_staticman_app>.herokuapp.com/v2/encrypt/<key>
Similarly, encrypt your Mailgun domain (starts with mg.):
https://<heroku_staticman_app>.herokuapp.com/v2/encrypt/<domain>
Add the encrypted Mailgun API key and domain to staticman.yml:
# Notification settings. When enabled, users can choose to receive notifications
# via email when someone adds a reply or a new comment. This requires an account
# with Mailgun, which you can get for free at http://mailgun.com.
notifications:
  # Enable notifications
  enabled: true

  # (!) ENCRYPTED
  #
  # Mailgun API key
  apiKey: <encrypted Mailgun API key>

  # (!) ENCRYPTED
  #
  # Mailgun domain (encrypted)
  domain: <encrypted Mailgun domain>
You can also provide an email address that will be used as a sender email. To add it, go to Heroku Dashboard -> Config Vars -> Reveal Config Vars and add your email as an EMAIL_FROM field:

The last thing, you need to do is to offer an option to subscribe for new comments notifications. To do that, uncomment these lines in _includes/comment_form.html:
<div class="checkbox-email-notification">
  <input type="checkbox" name="options[subscribe]" value="email">
    Notify me of new comments on this post.
</div>
To test if it works, comment with the subscription for new comments notifications and then reply to that comment. You should receive a message from noreply@staticman.net in this form:
Dear human,
Someone replied to a comment you subscribed to on Site Name.
Click here to see it. If you do not wish to receive any further notifications for this thread, click here.
Staticman
If you have not received an email notification. Check your spam folder or wait a little longer. Mailgun has a queue system, so you may get the notification email with some delay. But if you have not received an email within an hour, you probably have some problem and need to troubleshoot.
To make sure that it is a problem of Staticman and not Mailgun, test that Mailgun actually works, buy running this code in your terminal:
curl -s --user 'api:YOUR_API_KEY' \
    https://api.mailgun.net/v3/YOUR_DOMAIN_NAME/messages \
    -F from='Excited User <mailgun@YOUR_DOMAIN_NAME>' \
    -F to=YOU@YOUR_DOMAIN_NAME \
    -F to=bar@example.com \
    -F subject='Hello' \
    -F text='Testing some Mailgun awesomeness!'
YOUR_API_KEY- your unencrypted key starting withkey-.YOUR_DOMAIN_NAME- your domain starting withmg..bar@example.com- your email address to receive a test email.
If you receive a test email from Mailgun, it means that Mailgun works and you need to check your Staticman configuration. See the Troubleshooting section below.
Edit Staticman notification message
To edit the default Dear human, ... message, you need to install the Heroku CLI and clone your Heroku app to your computer:
heroku login
heroku git:clone -a <Staticman Heroku app name>
Clone the Staticman code and place it to the <Staticman Heroku app name> folder:
git clone https://github.com/eduardoboucas/staticman.git
cp -r staticman/* <Staticman Heroku app name>
cd <Staticman Heroku app name>
Edit the message in lib/Notification.js and add these changes to Heroku:
git add lib/Notification.js
git commit -am "edit Staticman email text"
git push heroku master
You can see how I edited the notification message for my website.
Enable moderation
I do not use moderation. First, manual moderation takes too much work to manually merge each pull request. Second, it makes users wait quite sometime before they see their comments appear on the website. Third, the spam filters work pretty well and I barely see any spam passing the filters. Finally, it requires setting up a webhook to delete a comment branch and send an email notification on the pull request merge event.
If you are willing to moderate comments manually, enable the moderation in staticman.yml:
moderation: true
To set up a webhook on GitHub to delete a comment branch and send email notification on the pull request merge, go to Settings -> Webhooks -> Add Webhook -> Create a Webhook:
- Payload URL:
https://<heroku_staticman_app>.herokuapp.com/v2/webhook - Content type:
application/json - Secret: (leave empty)
- Which events would you like to trigger this webhook?: “Let me select individual events” and then select the “Pull request” event
- Active: Checked.
You may also remove the write permission for your GitHub bot account (<github-bot>) as it is not necessary for making pull requests.
Troubleshooting
This is what I did to troubleshoot while I was adding the Staticman comments to my Jekyll website. Please, let me know if you would add more things here.
Comment form
In case you fail to submit any comment, check where it fails by opening the Web Developer Tools of your browser (in Firefox press Ctrl+Shift+I), going to the Console tab, and trying to submit a comment. Any error message in the Console will give you a hint where to look for a bug:
You can also use the Firefox developer tools to edit CSS and check the HTML of your comments.
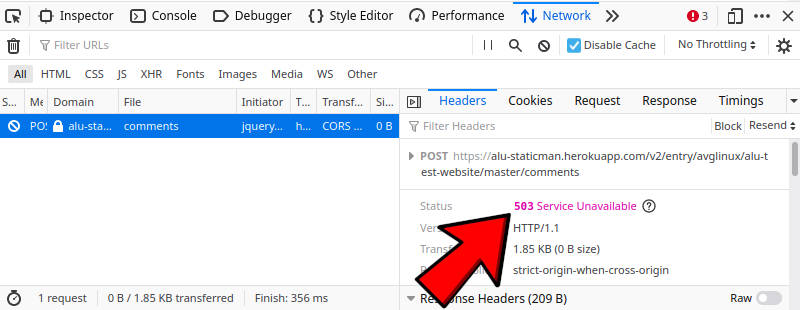
Heroku app
To check if something wrong happens with the Heroku app, you need to install the Heroku CLI which I have already mentioned several times. So, it seems to be a necessary tool.
You can use it to check the logs of your app:
heroku logs --tail -a <heroku_staticman_app>
I hope you see only status=200 that indicates a successful transaction. Any other code indicates an error, e.g. 404 - not found, 500 - server error.
If you do something very wrong and your Heroku app crashes, you can restart it with:
heroku restart -a <heroku_staticman_app>
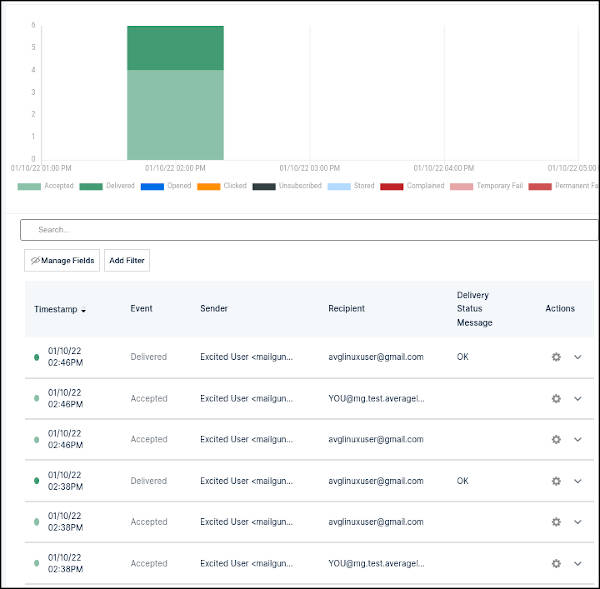
Mailgun
You can look at the logs of Mailgun. In the Mailgun Dashboard go to Sending -> Logs and see if any emails were sent and delivered:
Conclusion
I hope you were successful in implementing the Staticman comments on your static website. If not, you can clone my test website and test everything using my code then add the commenting system to your website.
To test the Staticman commenting system, go to the ALU test website. Please, DO NOT use the comment form below for testing.
Use the comment form below only to share your experience with implementing Staticman comments on your website or if you have any issues 👇.
Comments
Trevor
Looks like this month on the 28th of Nov Heroku’s free dyno support will be running out. Do you have a reccomended alternative?
Test comment
Test
pacific-feng
If I am not using a Jekyll, only with html and css code to implement a website, can I use Staticman, too?
Poils
Hi ! Same question here. Don’t want to use Jekyll but I would love to use Staticman. Is it possible ?
Norm
thanks for this. I noticed on github that the code has not been updated for a while. Are you still happy with the results?
Average Linux User
If it’s not broken, do not fix it 🙂
Nancy
Thanks.
A
cool kappa