Debian 9 Installation Guide
This Debian 9 Installation Guide will help you to install one of the most stable distros of Linux.
Users showed great ardor for Debian because of its stability. As a result, Debian is popular both for desktop users and server administrators. Most noteworthy, it’s key values include stability and freedom through the use of open source software lead to Debian more attractive for developers.
What’s new:
Debian 9 Stable edition with codename ‘Stretch’ comes with the following advancements:
- Kernel 4.9
- Default MySQL is now MariaDB 10.1
- LibreOffice 5.26
- GNOME Desktop Environment 3.2
- KDE Plasma 5.8
- Xfce 4.12
- PHP 7
- A new version of GIMP 2.8.18
- Firefox 45.9
- Python 3
If you are thinking about installing Debian stable, this Debian 9 Installation Guide will help you to perform and understand the installation. However, if you prefer more recent software, you can proceed with installing Debian Testing.
Debian 9 Installation process
For the experienced user, the installation process for Debian does not pose any difficulty. To the novice, there are things confusing and frightening. For example, there is an assortment of installation images and finding a right download link may not be easy. The installer is also little more advanced than some the installer popular Ubuntu or Linux Mint. But don’t worry, I will show and explain you everything.
Download an installation image
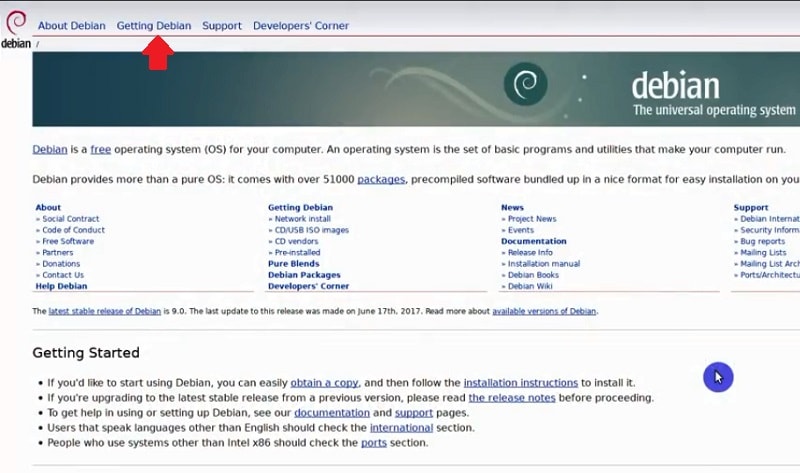
First, go to the official Debian downloads page and click on “Getting Debian”.
Next, you have options to download Debian.
For example, the “Live” flavor of the Debian installation image is good for testing hardware, but it is not meant for installation.
You need to download the actual Debian installation images.
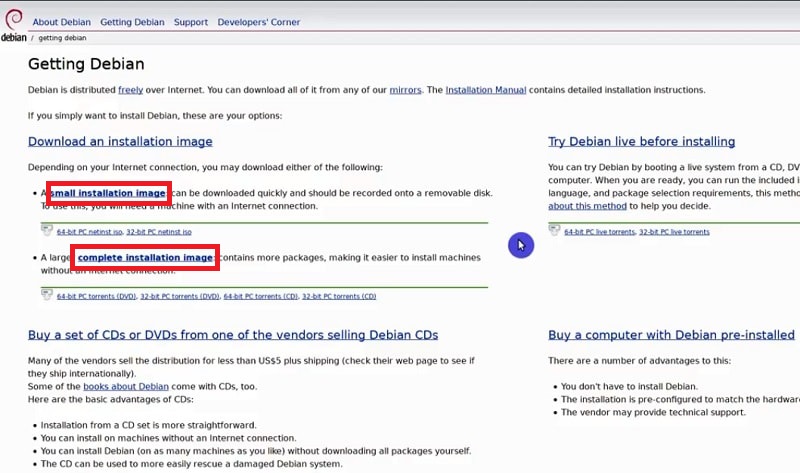
As shown above, you can choose between the installation images:
- a small network installation image
- a complete installation image.
If your internet speed is reasonable, I advise you to proceed with the network installation image. Otherwise, download the complete installation image.
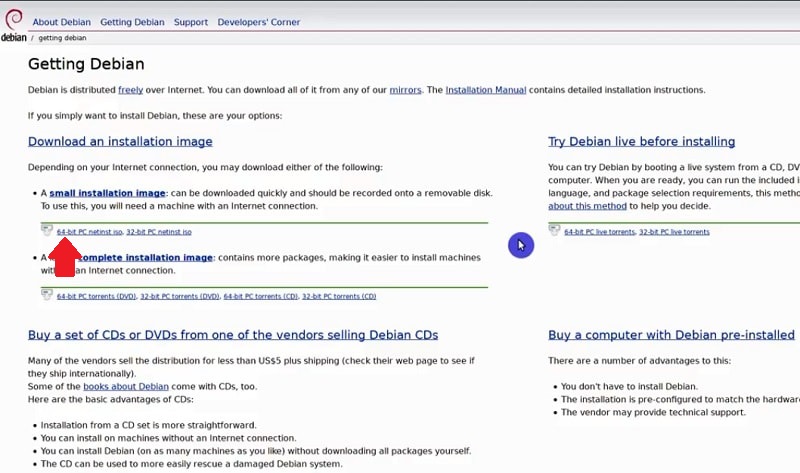
On this download page, you are also given a choice between i386 and amd64 architectures. Unless you intend to install Debian 9 on an old machine, you should download the 64-bit ISO.
No Wi-Fi, video, or sound during installation
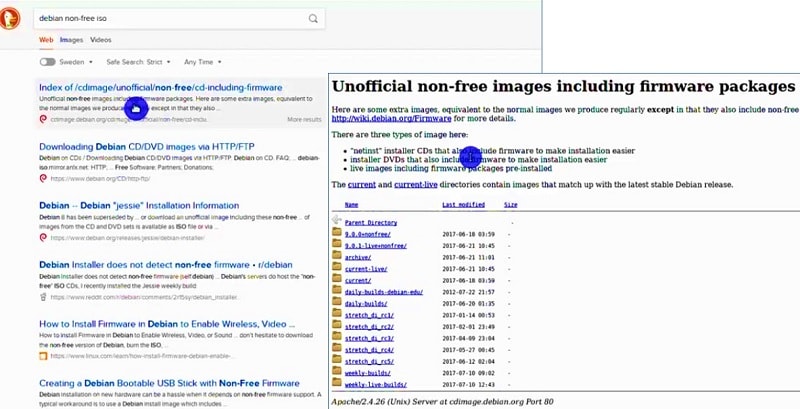
If you only have access to the Wi-Fi connection and your wireless does not work in the standard Debian ISO, you probably need to use Debian non-free installation image, which includes the proprietary drivers for your Wi-Fi card. The standard Debian ISO does not include non-free software because Debian has a very strict policy against proprietary software. With this in mind, it is not that easy to find these images on the Debian website.
You download the Debian non-free ISO by clicking on the link below, or you can find it by searching for the term “Debian non-free ISO” in Google.
https://cdimage.debian.org/cdimage/unofficial/non-free/cd-including-firmware/
Furthermore, you can use the non-free Debian ISO, if you experience any problem with your graphics card when you boot from the standard Debian ISO.
Boot from the CD/DVD or the USB device
Once the image file is downloaded then burn it either into USB Drive. I also recommend making a backup of all the necessary files and directories before starting the installation.
In addition, you have to configure the system to boot from USB or DVD. In case, if your computer does not boot automatically, You need to access the “Boot menu” or modify the “Boot order” in the BIOS during the start-up.
Usually, some of the FXX (e.g. F12), DEL, ESC keys give you access to the boot options. The key to access BIOS or boot menu should be shown during the start-up.
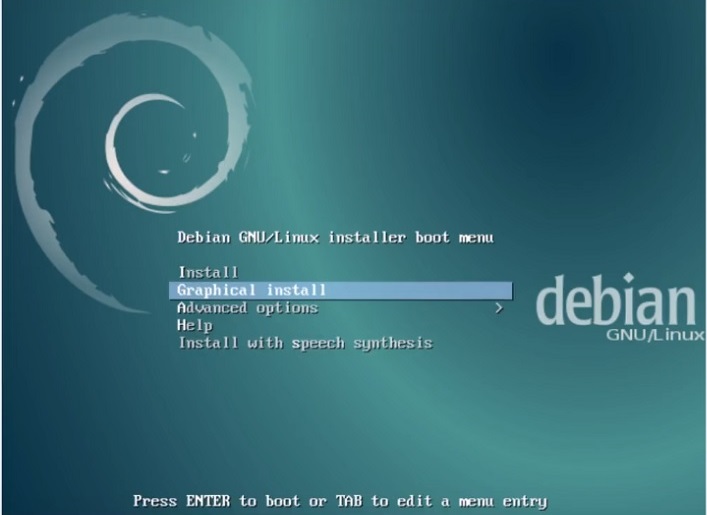
After booting DVD, Choose “Graphic Install” to begin the Debian Installation in graphical mode.
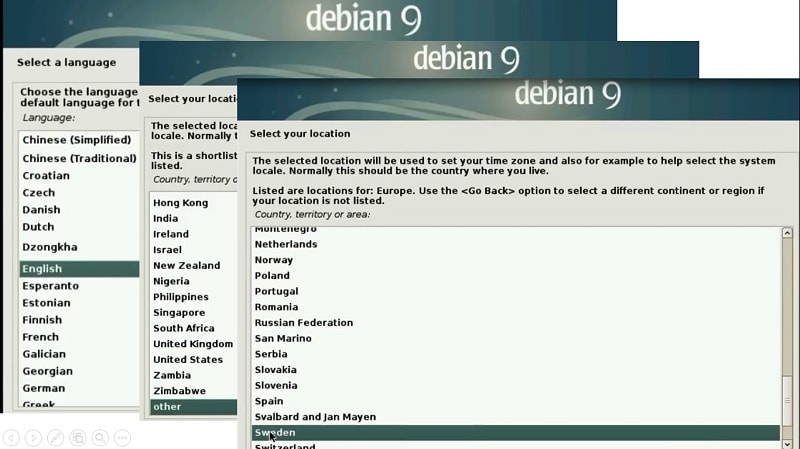
Choose Language, Location, and keymap
Choose your language for the installation process, and select your location. This will be used to set your local time, currency etc.
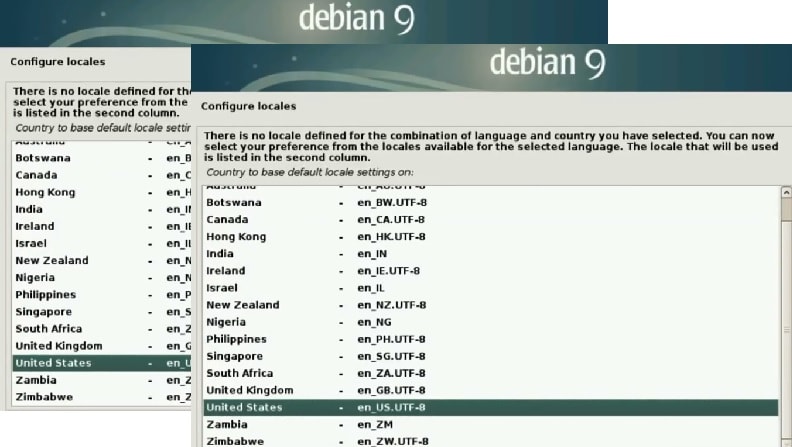
At this instant, configure the system locales (language and country combination) and click Continue.
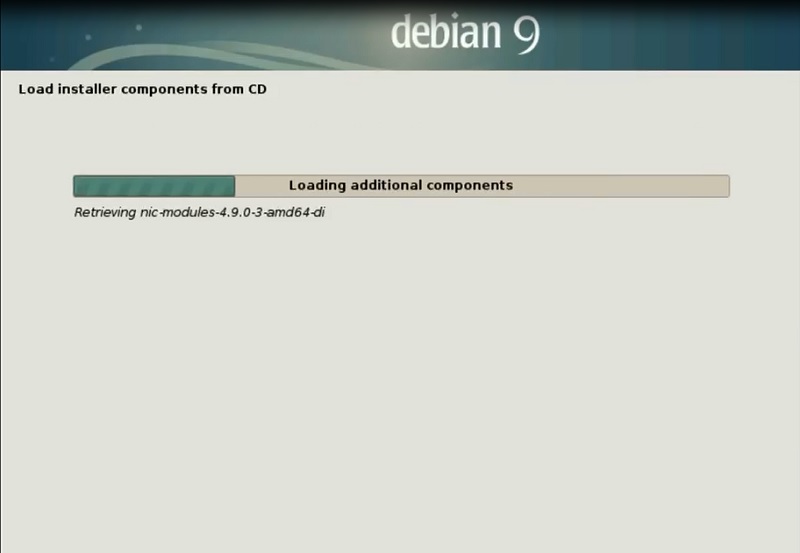
Next, the installer will now load components from the CD as shown below.
Configure the network
In the hostname, you assign the name to your computer. Moreover, here you can also assign a Domain Name as per your needs and requirement. I usually keep it empty. After you entered your computer name, click on Continue.
On the next screen, you can enable a root password. However, you can also leave it empty and this way, the user account will have administrative privileges with the command sudo. I recommend to keep it empty for new users. So, just leave it empty and configure your user password in the next screen (see below).
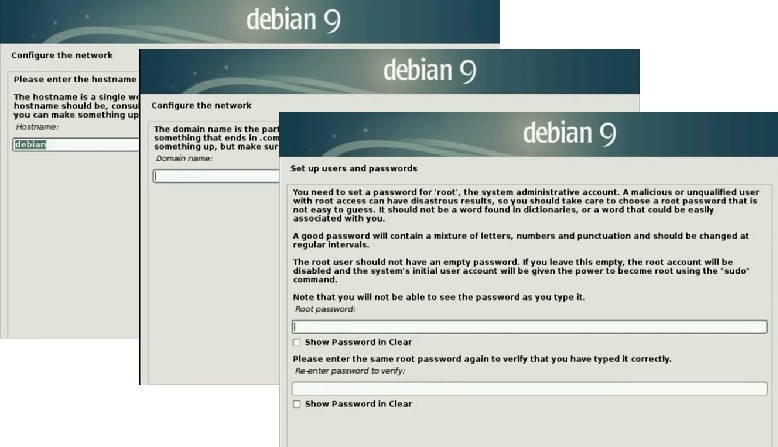
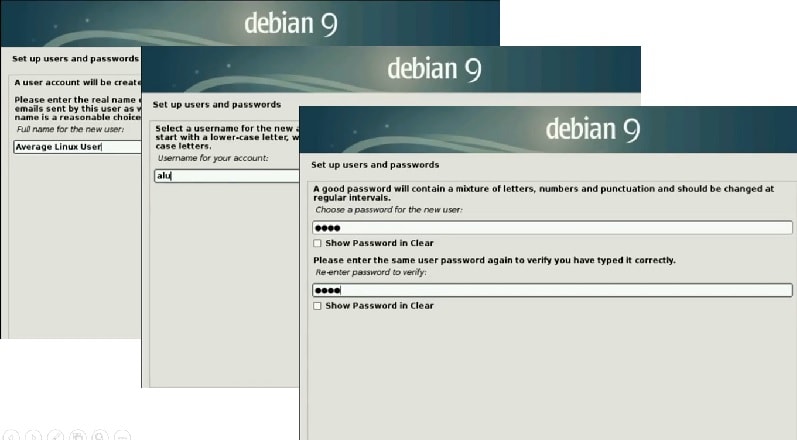
Create a new user
At this stage, enter your name and username. The user password entered here will be subsequently used for administrative privileges (you will need to use sudo).
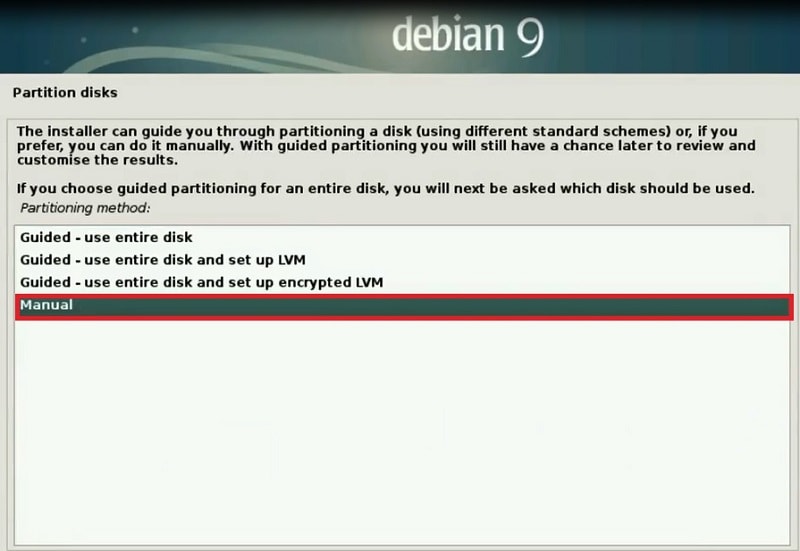
Partition your Disk
By all means, be very careful here because if you do this step wrong, it will be very difficult (but possible, see this guide) to change it later. Also, if you have any data on the computer where you intend to install Debian, back up it!
For this Debian installation, I will show you three ways I do disk partitioning.
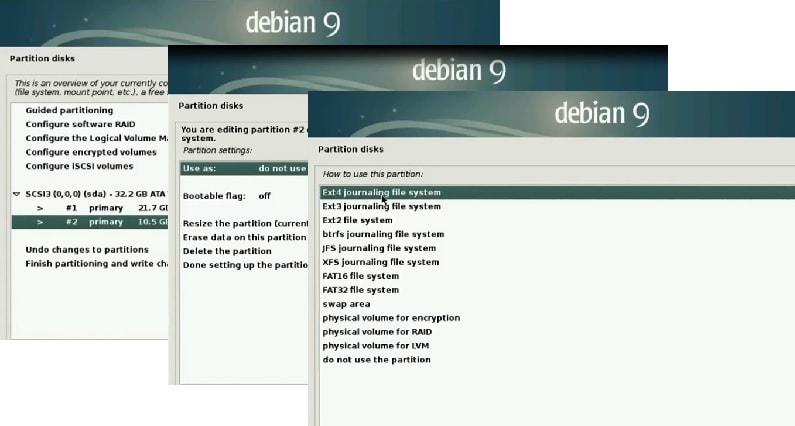
1. Automatic partitioning
To the novice, it is recommended to proceed with Guided partition. Guided partition method automates operations including formatting.
2. Install with existing home partition
For expert users, if you already have a Linux distro installed, you can reuse its home partition. You just need to skip the formatting step for /home and only reinstall the system in the system partition. To do that, you need to proceed with manual partitioning.
So, select Manual and click Continue.
System Partition
I assume here that your first partition is the system partition. So, select it, assign root mounting point (/) to it, and choose the file system (ext4 is a popular one). Next, click to format it
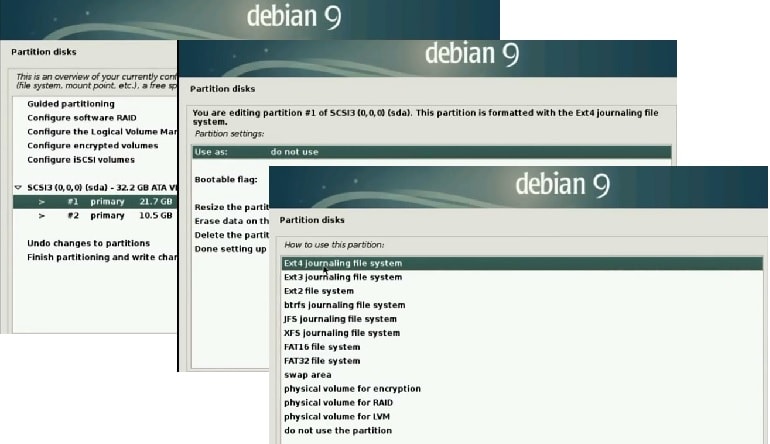
Optionally, you can also name this partition as a system partition.
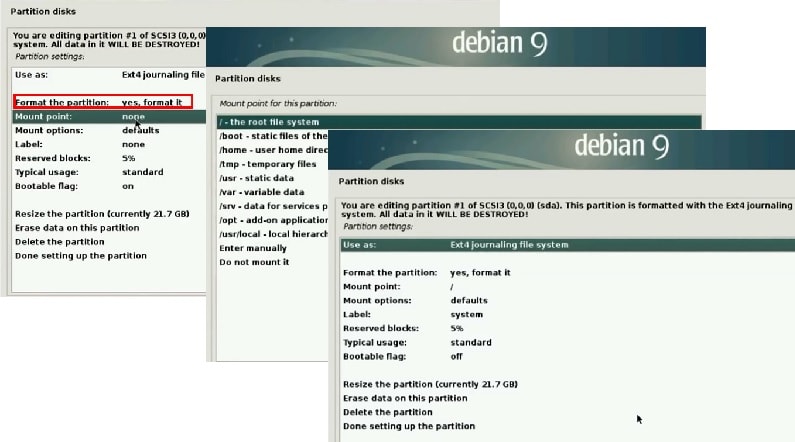
In the end, set the bootable flag on, check if everything is configured correctly and click on Done.
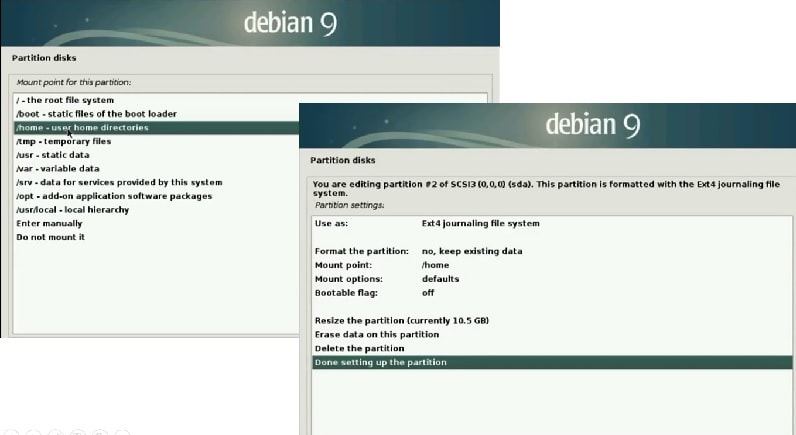
Next, proceed with the home partition.
Home Partition
Select your home partition. This is the partition where all your data resize and you do not want to format it.
You need to select the same file system you had before on this partition. If you do not know what file system you had on it, it is probably the ext4. You can check the file system with lsblk -f command.
At this point, do NOT select format, the point is that you want to keep this partition intact with all the data on it. Again, I remind you to make a backup of this partition before you do anything because you may make a mistake and all your data will be gone.
Next, assign the mounting point to home.
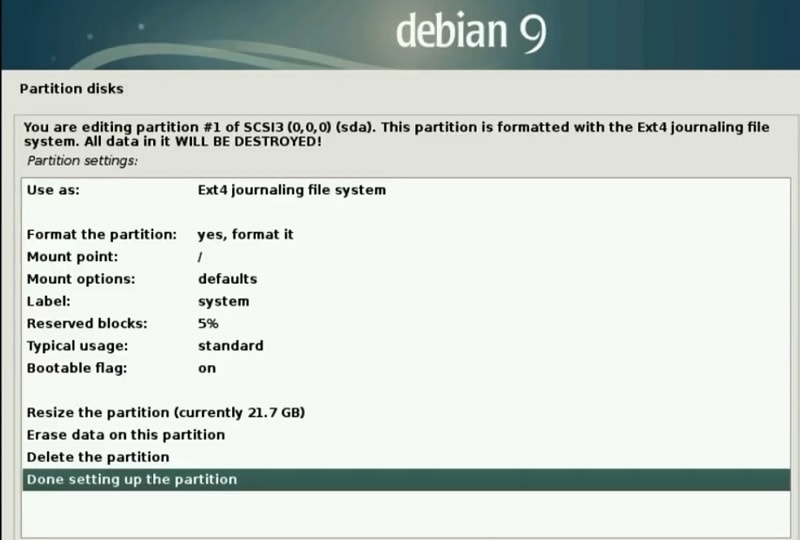
Now, check the summary of your partition configuration and make sure that your home partition has none in the Format the partition option. It is also good to check all other settings and then apply the changes by selecting Finish partitioning and write changes to disk.
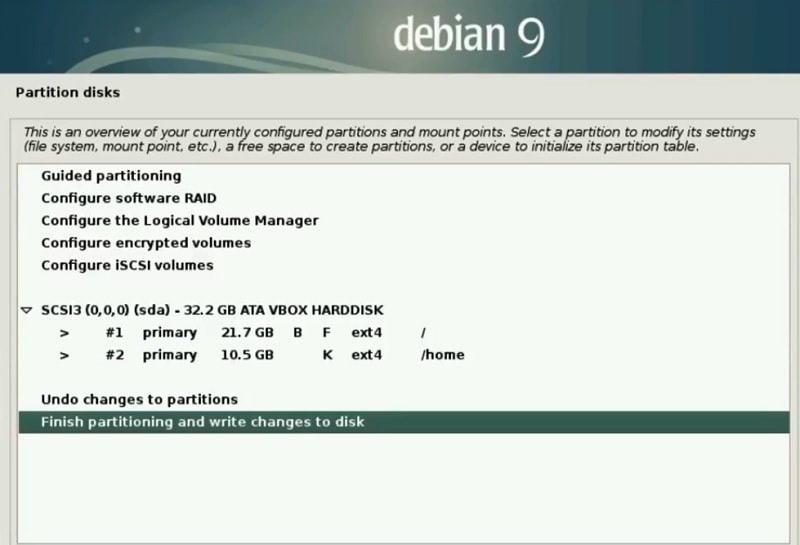
I usually do not create a swap partition because I use a swap file instead. You can also create a swap file after the installation, or add a swap partition before you write changes to the disk.
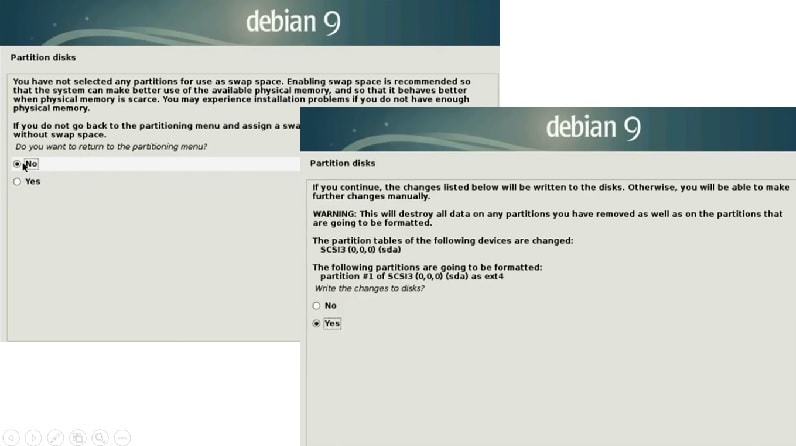
Confirm the partitioning as shown in the images above and you are done.
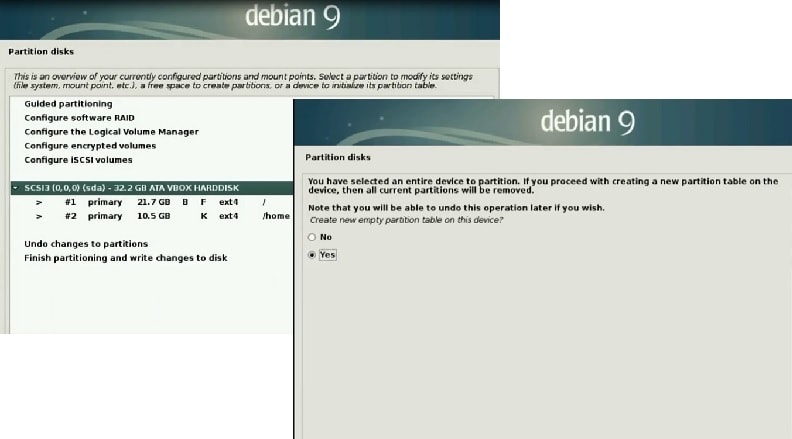
3. New manual partitioning
You need to follow this scenario if you either have a brand new hard drive or you want to wipe all data from your hard drive and create a new partition table.
Click on the hard drive and select to create a new partition table. Then proceed in a similar way as described above in scenario 2, except that here you format both home and root partitions.
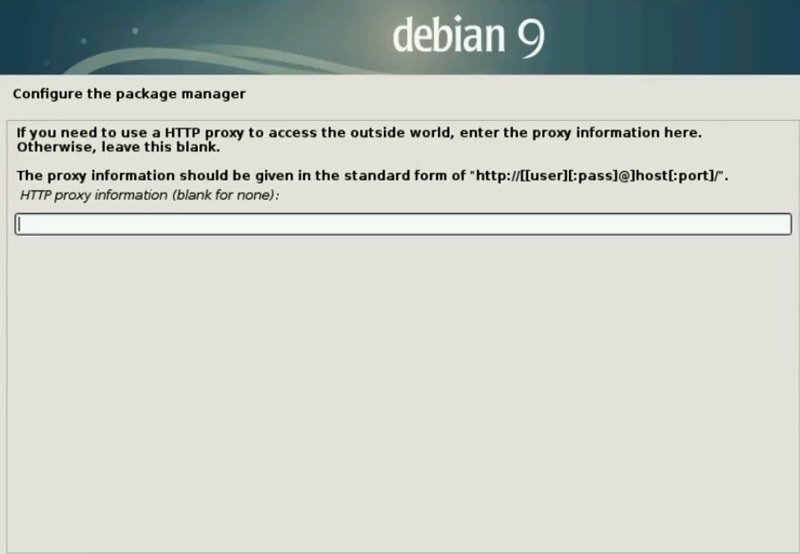
Configure the Package Manager
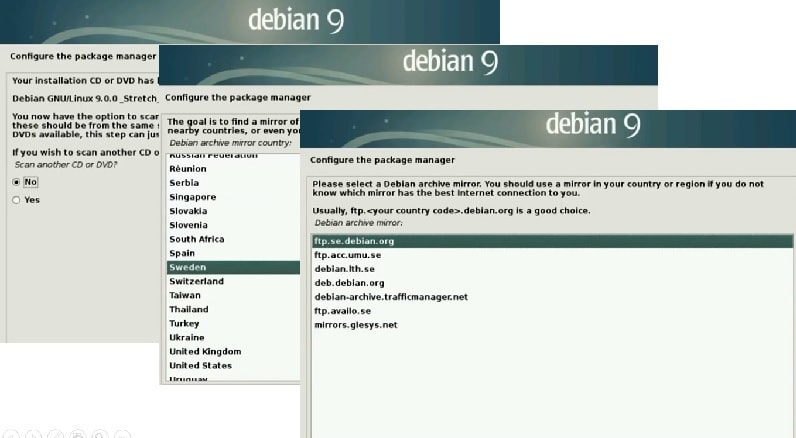
You have only one installation image when you are asked about inserting another CD, select No.
Next, select your location and any mirror from your country. Usually, the top one works fine.
If you access to the internet through the proxy, configure it here, otherwise keep these field blank.
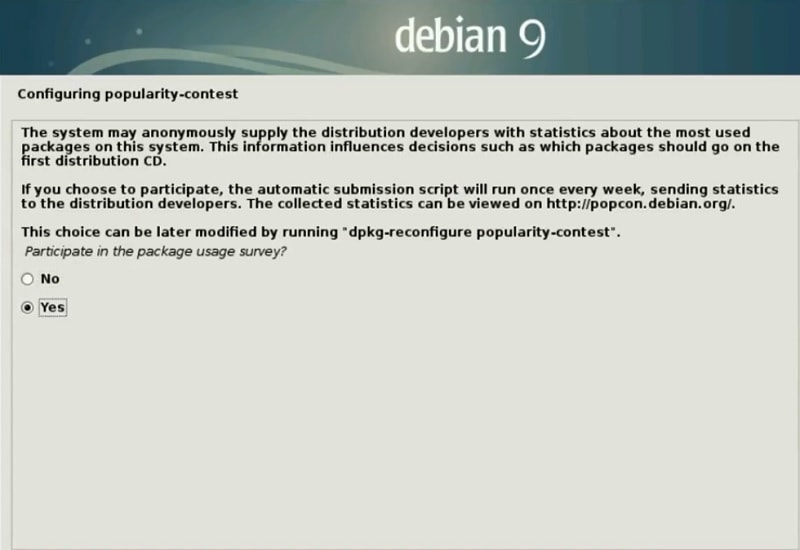
Enable Popularity Contest
It is up to you if you agree to participate in the usage survey, but I encourage you to agree because it will help the Debian project to make future versions of Debian better.
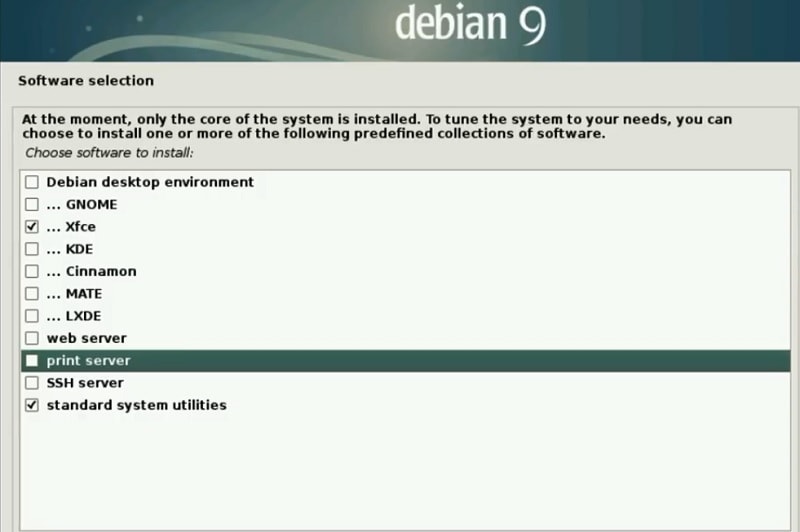
Desktop selection
Now, select the preferred desktop environment to install. By default, Debian will install GNOME desktop. Personally, I prefer the XFCE desktop in Debian because it is very a lightweight, yet still visually appealing desktop experience.
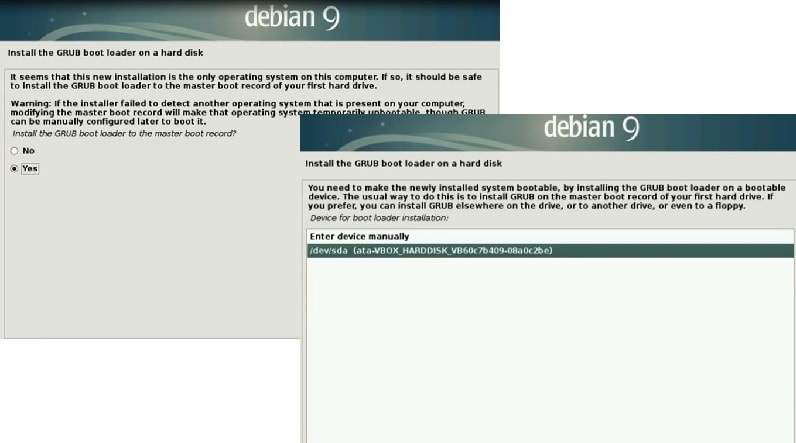
Install Bootloader
Once the desktop is installed, the next window will offer you to install a bootloader.
In case you install Debian as a secondary system and you are going to boot it with a bootloader from another Linux system, you can skip this step. However, the majority of users will not do that, so you most likely need to install a bootloader.
So, select Yes and install it on the same hard drive where your system is going to be installed.
Finish the System Installation
Wait some time until the installation finishes and then remove your installation media and proceed with the reboot.

Hopefully, you will see the Debian Xfce desktop or whatever you chose.

Things to do after the installation
For most intents and purposes, you can start using Debian as it is, but I recommend to do a few things after the installation.
Adding contrib and non-free to Debian 9
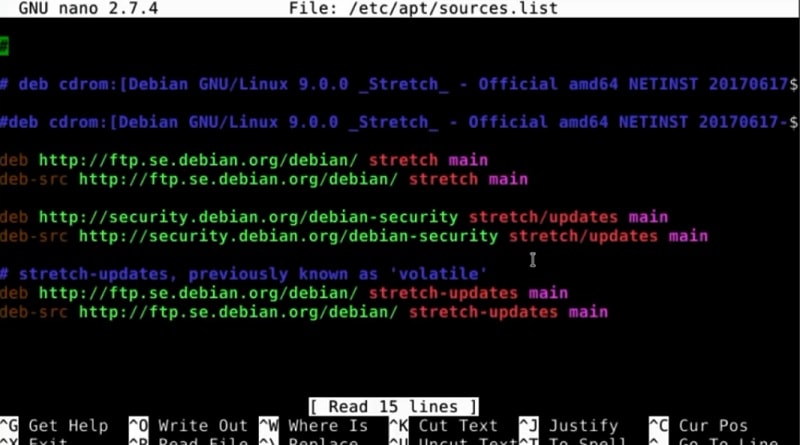
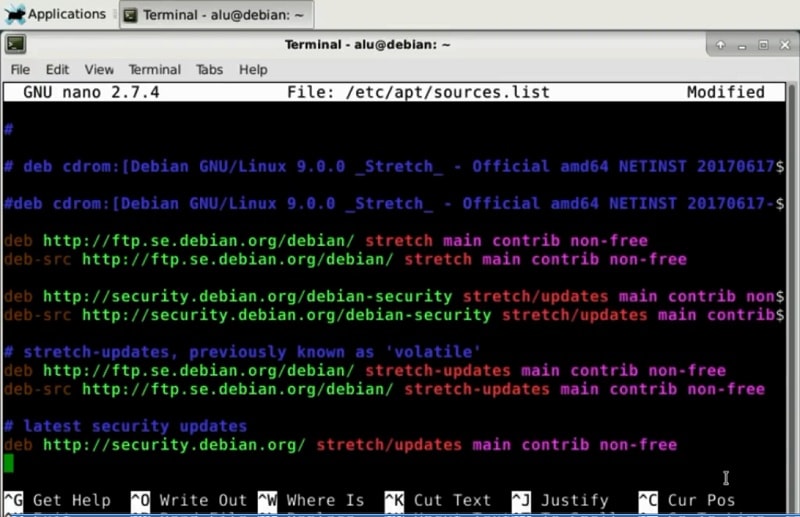
Debian 9 Stretch default repositories are usually enough. But you can extend the list of packages you can install by adding contrib and non-free repositories. The package repository information is stored on the /etc/apt/sources.list file. Further, you may edit this file to add a new package repository.
Open /etc/apt/sources.list using Nano text editor.
sudo nano /etc/apt/sources.list
When you open it, you will see the content with default repositories configured:
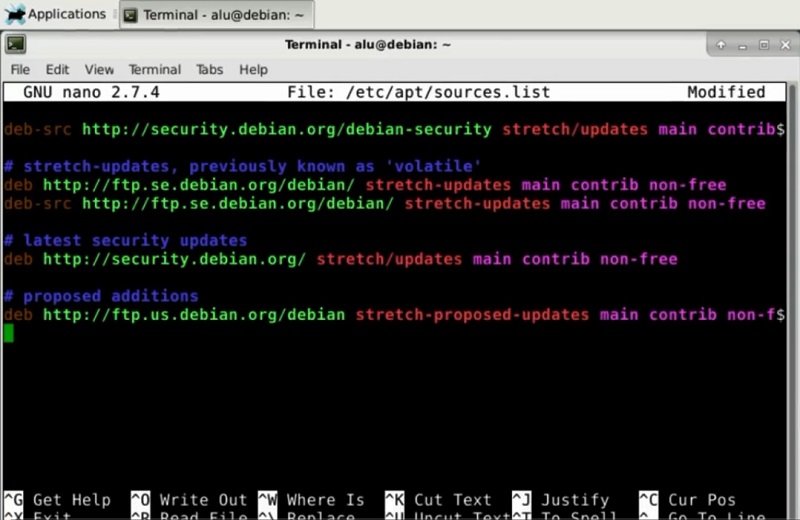
To have the contrib and non-free components, add contrib non-free after main as shown below:
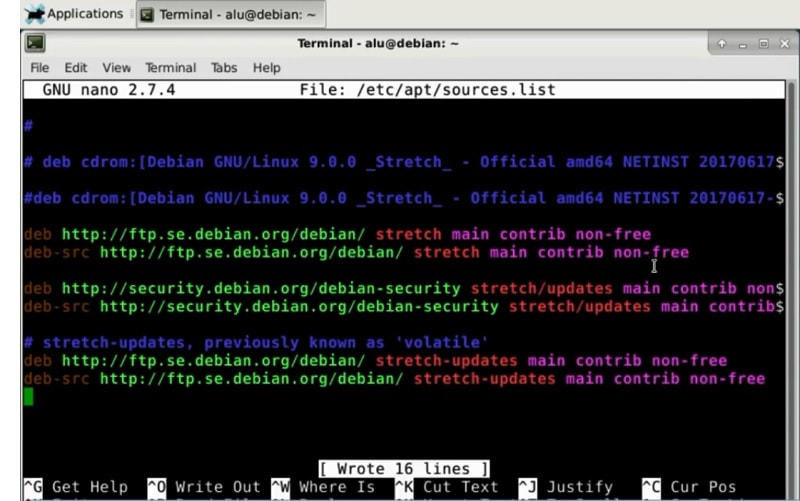
Once you are done, press Ctrl+O to save and Ctrl+X to exit.
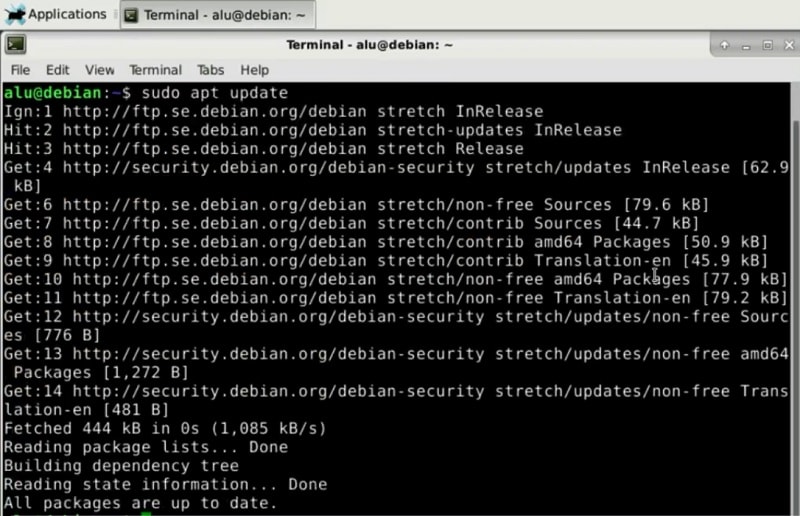
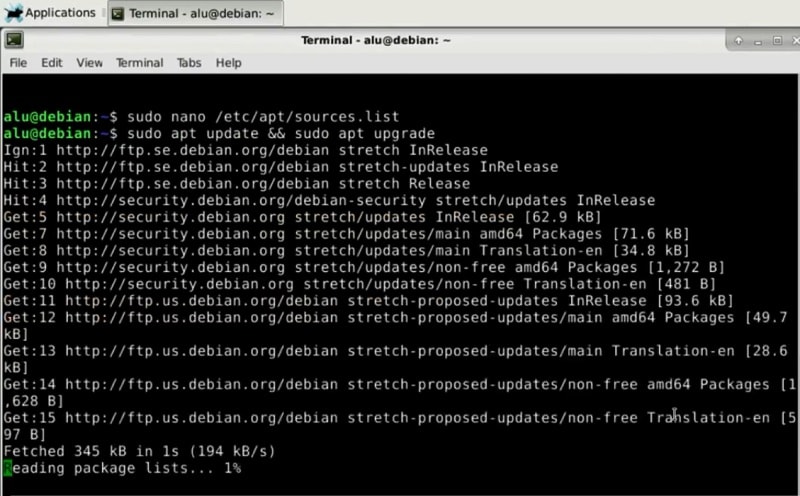
After you have made changes to the sources.list file, we need to update:
sudo apt update
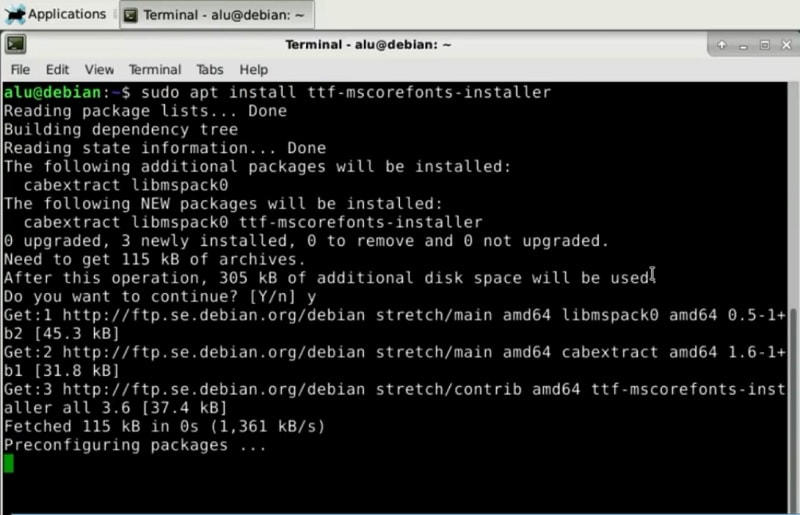
After these simple steps, you should be able to install some non-free programs such as Microsoft fonts, for example.
<span style="color: #666666; font-family: Consolas, Monaco, 'Lucida Console', monospace; font-size: 0.857143rem;">sudo apt install ttf-mscorefonts-installer</span>
Enable the latest security updates
Debian 9 is secure and stable already, but you can improve it even further to get the latest security updates as soon as they are released without waiting for the next point release (e.g. Debian 9.1).
For this purpose, you can add this security repository to your /etc/apt/sources.list:
# latest security updates

deb http://security.debian.org/ stretch/updates main contrib non-free
Receive the bug fixes as quickly as possible.
Similarly, you can also extend your repository list to receive bug fixes as quickly as possible, i.e. without waiting for the point release. Add this line to your /etc/apt/sources.list:
# proposed additions

deb http://ftp.us.debian.org/debian stretch-proposed-updates main contrib non-free
Again, every time you add new repositories, update the system.
Proprietary drivers
At the time of creating this tutorial, I don’t have a dedicated graphics card or a WiFi card. So, I cannot demonstrate how to install proprietary drivers. However, for your convenience I want to provide you links to Debian wiki pages on how to install nVidia, AMD Graphic card, and WiFi drivers.
Graphics Card
https://wiki.debian.org/GraphicsCard
Nvidia
https://wiki.debian.org/NvidiaGraphicsDrivers
ATI
https://wiki.debian.org/AtiHowTo https://wiki.debian.org/ATIProprietary
https://www.reddit.com/r/debian/comments/4a8nyq/fglrx_for_debian_9_will_it_get_back/
WiFi driver
https://www.youtube.com/watch?v=eUnfVG7Zst0
Conclusion
Following Debian 9 install guide, you should now have a fully functional Debian 9 Stretch. Debian is not well configured by default, so I usually also do a number of things after the installation to improve it. If you installed Debian with XFCE desktop, you can also configure it to look more modern and beautiful.
If you find Debian Stable too outdated, you can also consider installing Debian Testing and receive more up-to-date software.
Please share your feedback in the comments section below.
Comments
itaavo
Thank you for the instructions. As a beginner Linux user it teaches a lot about installing options and what is recommended an what not. I have one question though. If I want to keep running my Debian as stable version, can I use then “stable” instead of “testing” as a version in sources list?
Average Linux User
Yes, use ‘stable’ which is default if you follow this guide. BTW, there is an updated version of this guide on Debian 10 Installation
itaavo
Thank you! I’ll definitely take a look. Your tutorials are great and very helpful. Can’t thank you enough :)
Ben Jones
Hi,
I'm having trouble installing Debian 8.6 on an SSD and the install keeps on failing on the GRUB section. Help would be greatly appreciated.
thanks in advance
Ben
Average Linux User
Try this Debian 10 installation guide
Ben Jones
I specifically need to install 8.6 as it's for a Caldera machine and for some reason I can not get Caldera to work with version 10 of Debian.
Is there any way of tricking it into installing the GRUB?
Sorry I'm completley new to all of this!!
Average Linux User
What error do you get during Grub installation?
Ben Jones
An installation setp has failed. You can try to run the failing item again from the menu, or skip it and choose something else. The failing step is: Install the GRUB boot loader on a hard disk”
Average Linux User
How old is your system? Maybe it runs in the EFI mode only. So, Grub in Debian 8 or even 9 fails installing in the EFI mode on some systems.
Ben Jones
Its a brand new systems, Dell Precision 5820. I am working on it on behalf of a customer, Am I right in saying that 8.6 can not be installed on a SSD?
Average Linux User
I don't think it's SSD problem. It's rather EFI. I cannot say for sure that it cannot be installed. You need to research this topic. I only can say that both Debian 8 and 9 failed to install in the EFI mode on my computers. Debian 10 installed fine.
Ben Jones
Thanks for the info, is there any way to change the boot mode from UEFI?
Average Linux User
It depends on your hardware. In some systems, you can disable EFI in BIOS. But if it's one of the newest computers, probably you cannot. I don't know much about this. I just speak from my experience.
Average Linux User
One more thing, make sure you have disabled Secure Boot in BIOS
Ben Jones
Thanks for the information, do you think it would be possible to see if version 11.2 of caldera is compatible with Debian 10.1?
Ben Jones
On your debian 10 system?
Average Linux User
I don't know Caldera. Could you please share a link to the program?
Michael Biller
This is a great article. I used it as my guide for my first pure Debian install and it worked perfectly. Many thanks
Average Linux User
Hi Michael, I'm glad it was helpful. Thanks for the comment.